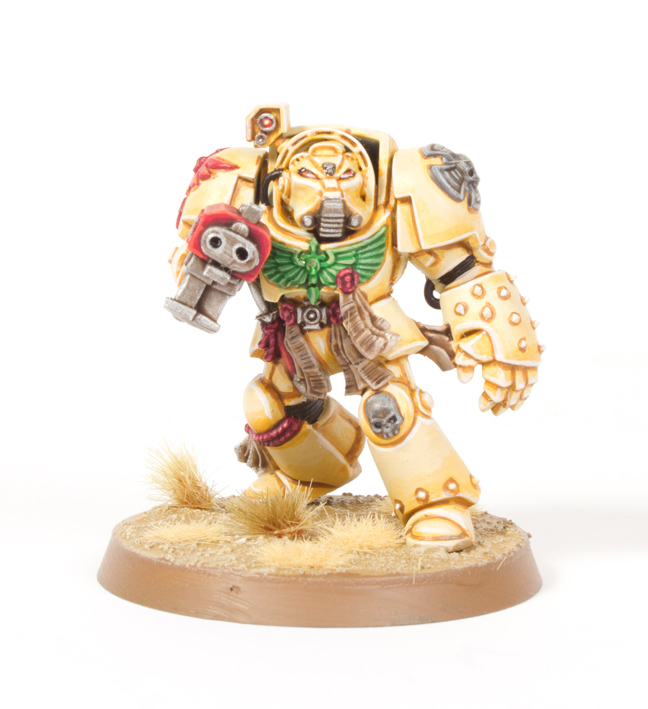
This is the final part of this series of exclusive Tale of Painters’ tutorials, Whilst I describe the tutorial as Dark Vengeance in the title, the model is more than at home in this Space Hulk tutorial. Deathwing have been a major part of Space Hulk since the beginning.


This tutorial assumes you have a basic understanding of how to paint. For the beginners, I will explain the techniques as I go along. Each picture below shows four chronological steps. Underneath each picture are the corresponding instructions. Each step shows the paint I used during that step.
Paints you will need for this tutorial:
- White Undercoat
- Ushabti Bone (layer)
- Zamesi Desert (layer)
- XV-88 (base)
- Warpstone Glow (layer)
- Nurgling Green (layer)
- Agrax Earthshade (shade)
- Biel-Tan Green (shade)
- Eshin Grey (layer)
- Dawnstone (layer)
- Administratum Grey (layer)
- Karak Stone (layer)
- Rakarth Flesh (base)
- Khorne Red (base)
- Wazdakka Red (layer)
- Wild Rider Red (layer)
- Screamer Pink (base)
- Pink Horror (layer)
- Leadbelcher (base)
- Ironbreaker (layer)
- Abaddon Black (base)
- Fire Dragon Bright (layer)
- Ceramite White (base)
- Steel Legion Drab (base)
- Armageddon Dust (texture)
If you need to expand your paint collection, check out our 🇬🇧/🇪🇺 partner stores Wayland Games, Element Games, and Firestorm Games, at 🇩🇪 Taschengelddieb and PK-Pro, and at 🇺🇸 Noble Knight Games, which all offer an amazing range of paints and hobby products at a discount. Using our links helps to support Tale of Painters at no additional cost to you, so thank you very much for using them!
Deathwing Terminators painting guide


1. Undercoat the model white. I used Vallejo Surface Primer in my airbrush.
2. Basecoat the model with Ushabti Bone. Painting several with an airbrush speeds this step up.
3. Create a glaze of Zamesi Desert by mixing 75% of Lahmian Medium with 25% Zamesi Desert. Then paint the thin translucent mix onto the lower halves of all the armour pieces. Repeat this step to blend and increase the intensity of the shading.
4. Water down XV-88 so it flows from your bristles smoothly and then carefully paint the creases and recesses on the armour to give the model depth and shading.


5. Paint the Chest Aquilla with Warpstone Glow.
6. You then need to highlight the chest with Nurgling Green (I photographed the wrong colour) you can then wash with Agrax Earthshade.
7. Wash the chest Aquilla with Biel-Tan Green.
8. Paint the Crux Teminatus and any areas you want to be stone with Eshin Grey.


9. Highlight the Stone areas with Dawnstone.
10. Highlight the stone areas further with Administratum Grey.
11. Paint the purity seals with Karak Stone.
12. Highlight the edges of the purity seals with Rakarth Flesh.


13. Paint the wax seals, the braided rope, the Deathwing shoulder icon and stormbolter casing with Khorne Red.
14. Highlight just the Storm Bolter casing and shoulder pad icon with Wazdakka Red.
15. Highlight just the Storm Bolter casing and shoulder pad icon further with Wild Rider Red.
16. Screamer Pink is now used to highlight the wax seals and braided rope.


17. Continue to highlight the wax seals and braided rope with Pink Horror.
18. Paint the metal areas with Leadbelcher.
19. Wash the Stone, Metals, Reds and Purity Seals with Agrax Earthshade.
20. Highlight the metal edges with Iron Breaker.


21. use Abaddon Black to Paint in any flexible areas between the armour like the elbows and back of knees. Also pick out any hoses or pipes. Black in the eyes.
22. Paint a thin orange line along the bottom of the eye lens.
23. Paint a dot of white in the top corner of the eye. Highlight every single edge of the bone armour with a thin white line of Ceramite White.
Finally, base the model in a way which fits in with your collection. I used Armageddon Dust texture paint highlighted with Screaming Skull and the base edge was painted with Steel Legion Drab.
That’s it for this series of Space Hulk tutorials. Hope you enjoyed it.


Thank you so much for sharing this tutorial. Amazing!
Can u tell me what brushes i should buy to start painting ??
It's more important you learn how to care for a brush first. Once you can care for a brush and maintain a good point to the bristles then you can buy any sable brush and paint with it.
Check out this article on looking after your brushes.
https://taleofpainters.blogspot.com/2017/02/review-masters-brush-cleaner-and.html
Thank you for sharing this interesting and informative article, painting with airless spray gun will be faster and more interesting!
Thanks for another great tutorial! I am just getting ready to start painting my Death Wing Terminators and your tutorial is going to help me out greatly. Keep up the great work!
I remember how we were told that video games would kill all creativity. Instead they have spawned more interest in crafts than I can remember we had when we were young! The list of different shades available is mind-numbing. All we knew was to mix them but then we never had to work to such exacting standards.
Remember this is all for free. I get nothing for doing these. So be patient. If it was paid work I'd say next week, as it stands I'm not going to commit to a deadline. Could be a month or a year.
My next deadline is armies on parade and I have less than a month left for that. After that I don't know what I'm going to work on.
Good luck at armies on parade!
Thank you.
Ride on Bro, ungrateful plebs making comments like that when you do this to help ppl. Respect
When can we see Guides for Stormclaw you promised in the july?
Your the best
Great tutorial ! Thanks a lot !
Thats one of the best tutorials I've seen for Deathwing mate – cracking good job.