
Merry Christmas everyone. I hope you’ve all woken up to lots Games Workshop gifts from your loved ones. I spoke to Stahly about giving you guys something cool on Christmas Day. He agreed. So please accept this gift of a tutorial from all of us at Tale of Painters. Full high quality tutorial after the jump.
This tutorial assumes you have a basic understanding of how to paint. For the beginners, I will explain the techniques as I go along. Each picture below shows four chronological steps. Underneath each picture are the corresponding instructions. Each step shows the paint I used during that step. It’s good to have reference material close to hand to check colours. I used google images for film stills and Games Workshop’s 360º pictures on their website were a great help.
Paints you will need for this tutorial:
Black Undercoat
Cadian Fleshtone (layer)
Bugmans’ Glow (base)
Doombull Brown (layer)
Kislev Flesh (layer)
Ushabti Bone (layer)
Abaddon Black (base)
Mournfang Brown (base)
Gorthor Brown (layer)
Rhinox Hide (base)
Baneblade Brown (layer)
Steel Legion Drab (base)
Agrax Earthshade (shade)
Zandri Dust (base)
Karak Stone (layer)
Screamer Pink (base)
Pallid Wych Flesh (layer)
Leadbelcher (base)
Stirland Mud (texture)
XV88 (base)
In case you need to expand your paint collection, head over to Wayland Games or Slave to Painting, which both stock a huge selection of paints at competitive prices.
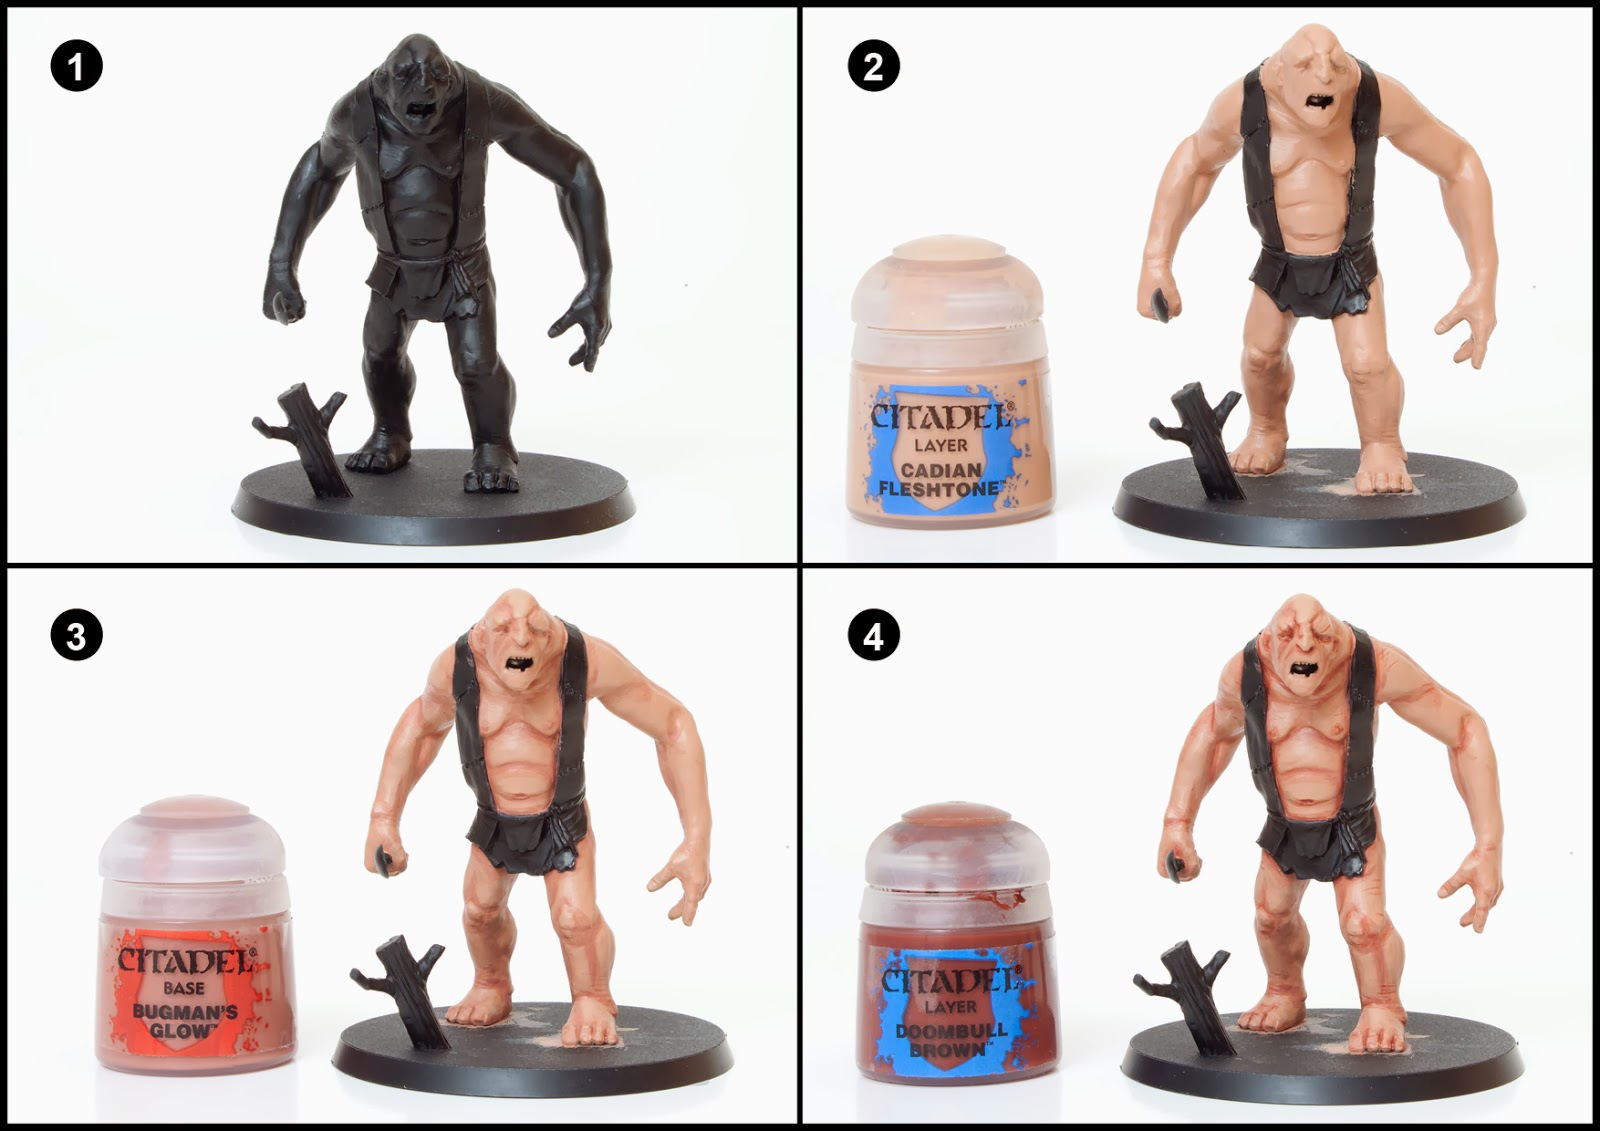
1. Undercoat the model black.
2. Paint all the skin areas with Cadian Fleshtone. This will take three thin coats to get an even smooth coverage. Wait for each coat to dry. Painting another layer on top of a wet layer will result in a lumpy paint job. Use thin layers, so mix some water into your paint (just a touch to thin it) on a mixing palette. Old white tiles or CD cases make good mixing palettes.
3. Create a glaze of Bugman’s Glow (50%) and Lahmian Medium (50%) and only apply it to the creases and shaded areas. Once it dry, repeat this step to increase the shading. Because we’ve created a glaze, the paint is more translucent, so painting multiple layers will increase the opacity. This is a great way to transition from one colour to another. This is called blending.
4. Now create a glaze with Doombull (50%) and Lahmian Medium (50%) and apply it to all the recesses. Look at how dark the paint pot is in the picture and how different the shading looks on the model. The translucent glaze mix is allowing the lighter Cadian Fleshtone to show through so we’re getting much softer blends. Switch to a fine detail brush to paint fine lines to represent wrinkles in the flesh.

5. To add texture to the skin we need to highlight the model with horizontal lines of Kislev Flesh. This is quite subtle at this stage so check out the close up above by clicking on it. It’s ok to let your lines touch. Use a standard or large brush because we want quite fat lines so we can paint thinner lines on the next step.
6. This is the final highlight stage for the skin. Ushabti Bone is a light colour so we need to use it sparingly so we don’t lose too much of the skin tone and it end up looking like a pale zombie. Using a fine detail brush increase the texture effect by painting more horizontal lines and pick out the detail in the face. Where you see a wrinkle or crease in the skin that you previous painted with Doombull Brown add an underline highlight of Ushabti Bone. This is just a single thin line underneath the Doombull Brown line.
7. Paint everything that isn’t skin including his eyeballs with Abaddon Black. This is basically a tidy up stage.
8. Paint the clothes with Doombull Brown. This will take two to three coats to get a solid colour.
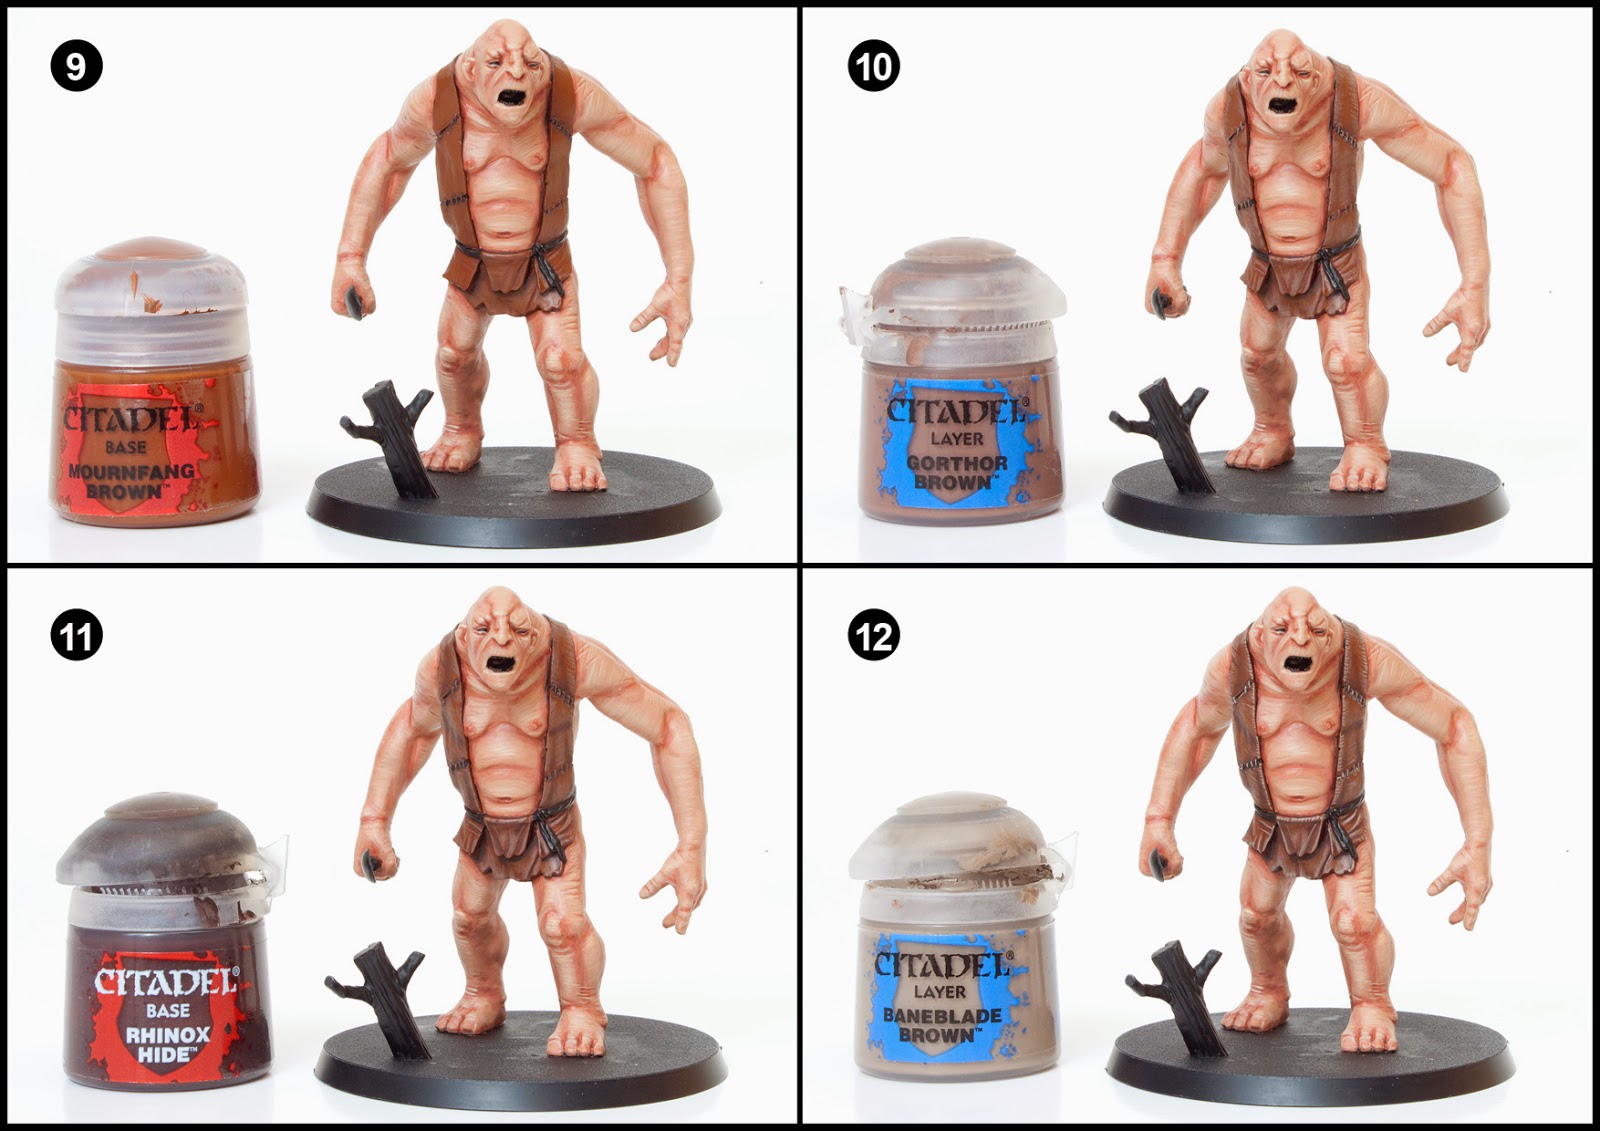
9. Highlight the clothes using Mournfang Brown. Leave Doombull Brown showing through in the creases and folds. Paint the handle of the weapon with Mournfang Brown.
10. Highlight the previous stage further using Gorthor Brown. I’ve used small parallel horizontal strokes along the edges to represent fabric. The close up above will illustrate this.
11. Create a wash of Rhinox Hide (30%) by mixing in Lahmian Medium (70%). Shade the creases and folds with this mix. Also shade the handle of the weapon.
12. Final cloth highlights are with Baneblade brown. Paint shorter, thinner, horizontal, parallel strokes along the edges and also pick out the raised lines in the folds.

13. Paint the rope around his waist with Steel Legion Drabt. There is also some rope around his spoon to paint. Paint his teeth, finger nails and toe nails with Steel Legion Drab.
14. Wash the rope areas with Agrax Earthshade. Wash his teeth, finger nails and toe nails with Agrax Earthshade.
15. Highlight the rope areas with Zandri Dust.
16. Highlight his his teeth, finger nails and toe nails with Karak Stone.

17. Paint his tongue with Screamer Pink.
18. For each eye add a dot of pallid Wych Flesh in each corner.
19. Paint his spoon with Leadbelcher.
20. Wash the spoon with Agrax Earthshade.
Finally base the model in a way which fits in with your collection. I used Stirland Mud texture paint highlighted with Karak Stone and the base edge was painted with XV-88. Static grass and scrub were glued on in small clumps.


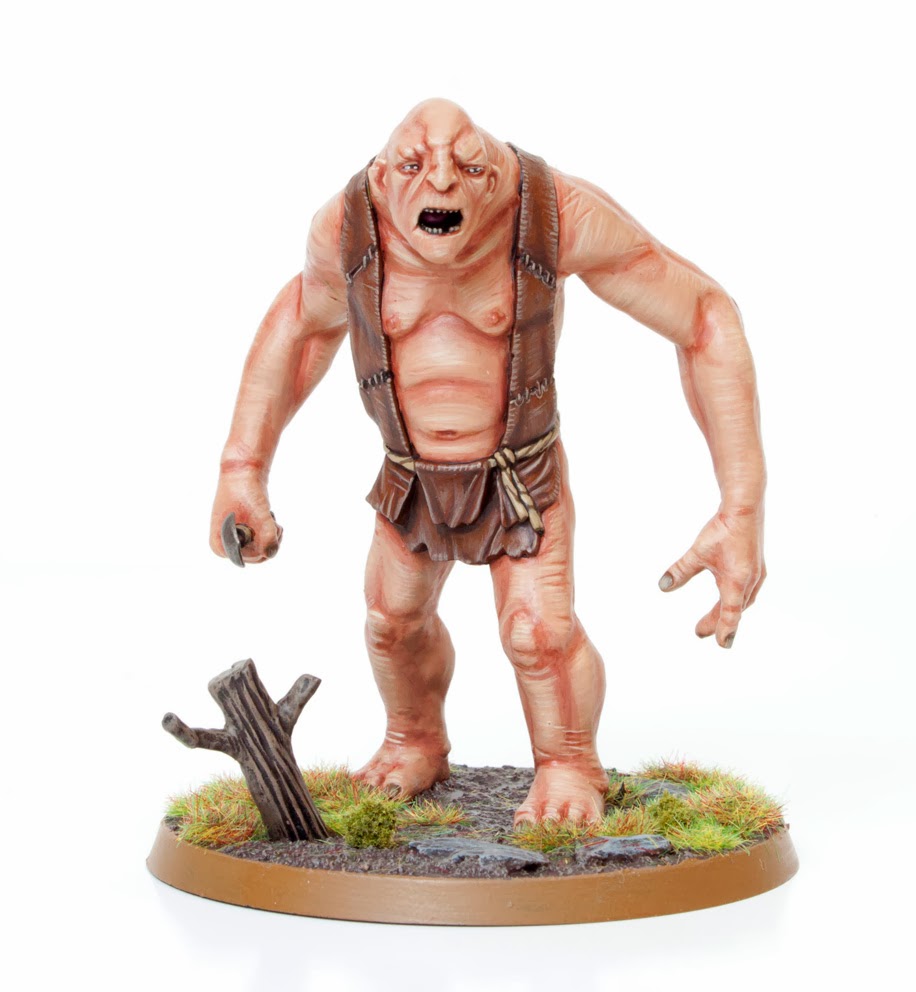
I’ve wanted to create this tutorial for so long and I’m really happy with the outcome. It’s not many steps but the detailed texturing really makes this model seem life-like as if it’s stepped out of a film. I hope you enjoy this tutorial and please send me pictures of your Hobbit models you’ve painted using my tutorials.
Tale of Painters has a whole host of Hobbit tutorials for you to check out.
Do you like our tutorials and reviews? Here is what you can do to support us: Check out the websites of our sponsors, place your next orders at Wayland Games by clicking here or on the banner on the right. Thank you very much, we appreciate any help to keep us going

Slowly working through your amazing Hobbit Tutorials and successfully finished Bert now.
Thank you so much.
Thanks kindly for the tutorial. It's a shame that The Hobbit doesn't get more attention as the game is a lot of fun and the models are a joy to paint. I'm looking forward to trying this out soon after I'm done building up my Dark Angels. It should go really well with a Goblin army.
I hear you about the lack of Hobbit content. Hopefully I can add more Hobbit material to this blog over the next month or so. Trying desperately to ignore Nids at the moment.
is there a way how i can be informed with each and every new tutorial iam quite new to blogs etc… may i suggest a tutorial about Radagast on sleigh or Gandalf on cart 🙂
Tutorials are a bit hit and miss. We fit them in in-between our hobby projects. We don't work to a structured release schedule so we can't tell you what's coming up soon.
The only thing I can suggest is bookmark the site and check it regularly. We post everyday and sometimes even twice day. our monthly hobby content rivals most hobby magazines and we're just 6 painters doing this for fun. It's completely free as well. Why wouldn't you bookmark it and check it daily? 😀
Excellent. I'm really enjoying your Hobbit tutorials.
Thanks for the Christmas tutorial present! Amazing work as always, I hope you keep posting more LotR/Hobbit tutorials. They are some of the best around!
Amazing.
Merry Christmas all 🙂
Looks brilliant and also Merry Christmas!
But how did you paint the tree stump? :p
A very nice tutorial as always, thanks for posting this on the holiday!
Amazing as always. Thank you and merry Christmas.