

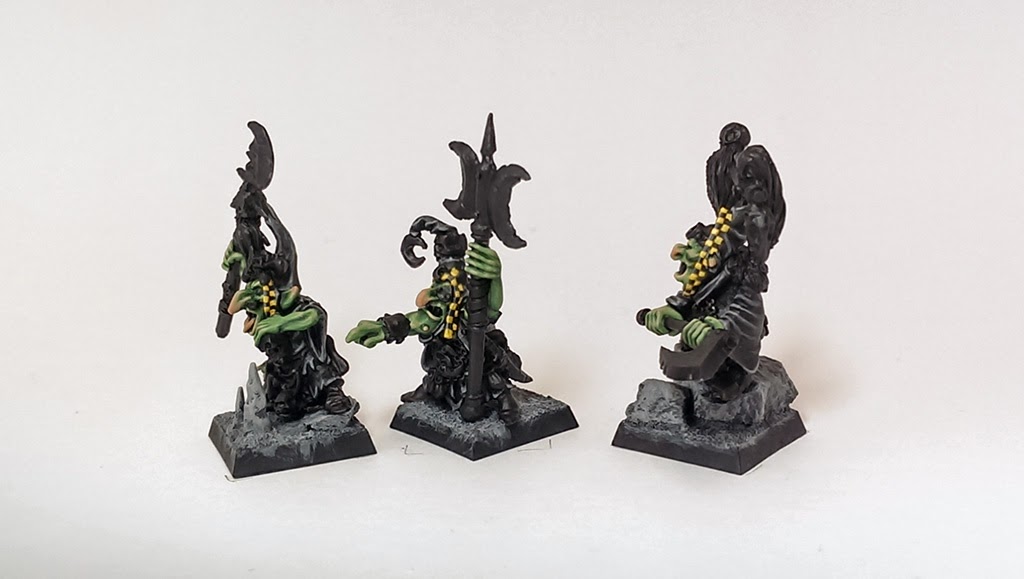
This is the second part of my three part tutorial of how I paint my Night Goblins. The first part covers how I do the skin. This time I will cover how I do the robes and checks. At the end of this step your models will look like those above.

Here is where we left off in part one. The skin complete.

Paints needed for these steps:
Eshin Grey (layer)
Dawnstone (layer)
Averland Sunset (base)
Yriel Yellow (layer)
Screaming Skull (layer)
In case you need to expand your paint collection, head over to Wayland Games or Slave to Painting, which both stock a huge selection of paints at competitive prices.
The technique I use on the black robes is called edge highlighting. This is a very popular technique in 40k and Stahly is a master of it as demonstrated in this excellent example here. The way it works is all the edges including those in shadows are painted with a slightly bold line of paint that is about 10% lighter in value than the base coat. Then just the points of those edges or those that would be in direct light are given a finer line of paint at another 10% lighter value. The process can be refined with more steps in the values, better line control, hue shifts and practice.

This first step with Eshin Grey is subtle and I am afraid these photos might not really show it that well. Paint all edges and high points in folds on all the cloth areas. Including the areas that would be in shadow. This helps give those areas some definition.

Dawnstone is now painted in fine lines on areas that would be touched by light or areas that need a little help with definition. Keep the paint thin and your lines thinner. A little goes a very long way in this step.

Next is the checks which I base in Averland Sunset. If there is a fast and easy way to do the checks I don’t know of it. I know some people paint a grid and then just fill in the holes but that doesn’t leave the positive and negative spaces the same size. I freehand mine one check at a time using a brush with a good fine point, thin paint and patience. It is important to keep the edges of this first base coat clean so take your time.
Yriel Yellow is then added to the body of the checks on the top and to about half of each check on the sides of the hoods. Those that wrap under the chin I leave just Averland Sunset.

The final step is to highlight the checks on just the edge of the hood, on the top and sides of the head with Screaming Skull.

There you have it. In part three I will run through the rest of the steps and wrap these guys up.
Do you like our tutorials and reviews? Here is what you can do to support us: Check out the websites of our sponsors, place your next orders at Wayland Games by clicking here or on the banner on the right. Thank you very much, we appreciate any help to keep us going.
4 Comments
Leave a Reply
Tale of Painters is the unofficial Warhammer hobby magazine run by hobbyists like you. Support our work by using the affiliate links from our 🇺🇸 / 🇨🇦 partner stores for your next orders so we can continue to bring you fantastic FREE content every day:


Or support us directly:


Thanks. Fixed the link … sorry about that.
Thanks for this, but you seems to have a problem with the link of the first part ^^
Awesome! Looking forward to the third part of this tutorial.
Great tutorial, and it's making me want to go back and re paint my gobbos! Just a quick note, the redirect link to the first article doesn't seem to be working. Can't wait to see more, and love the tutorials!