

In this detailed tutorial I explain how I painted this spider for my Hobbit collection. More after the jump.
This tutorial assumes you have a basic understanding of how to paint. For the beginners, I will explain the techniques as I go along. Each picture below shows four chronological steps. Underneath each picture are the corresponding instructions. Each step shows the paint I used during that step.
Paints you will need for this tutorial:
Black Undercoat
Doombull Brown (layer)
XV-88 (base)
Zamesi Desert (layer)
Ushabti Bone (layer)
Abaddon Black (base)
Ceramite White (base)
In case you need to expand your paint collection, head over to Wayland Games or Slave to Painting, which both stock a huge selection of paints at competitive prices.

1. Undercoat the model black. I use Vallejo Surface Primerthrough my airbrush.
2. Paint the abdomen with Doombull Brown. Add some Doombull Brown highlights to the head of the spider. Finally paint the legs with Doombull Brown ensuring you leave black showing through at the joints and feet.
3. Use XV-88 to further increase the highlighting of the previous step. Make sure you leave Doombull Brown showing through on the legs as per the picture above.
4. Repeat step three, this time using Zamesi Desert.

5. Drybrush the rear abdomen with Ushabti Bone. Use a sponge to apply some Ushabti Bone freckles to it’s back.
6. Use a sponge to add some Abaddon Black markings to the abdomen.
7. Use Ceramite White to add thin line highlights to every leg, face and mandibles. Add small white dots to the eyes.

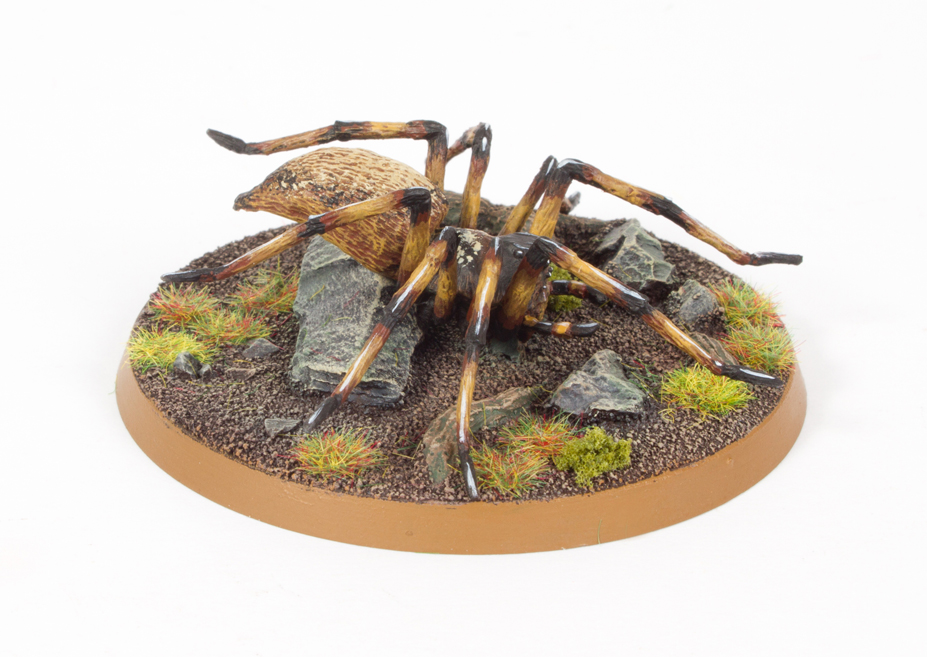

Finally base the model in a way which fits in with your collection. I used Stirland Mud texture paint highlighted with Karak Stone and the base edge was painted with XV-88. Static grass and scrub were glued on in small clumps.
Tale of Painters has a whole host of Hobbit tutorials for you to check out.
Do you like our tutorials and reviews? Here is what you can do to support us: Check out the websites of our sponsors, place your next orders at Wayland Games by clicking here or on the banner on the right. Thank you very much, we appreciate any help to keep us going.

thanks. great job yet again.
what is next?
I'm painting a squad of Deathwing Terminators at the moment. There will be a tutorial as well.
Wow, that spider is really cool looking. The final lines of white add so much to it. Great work!
At least with this colours scheme they are more interesting to see!
thanks for the tutorial even though the models paint scheme is different to the film I can definitely use some of these steps with a few different colours to recreate something similar to the film.