
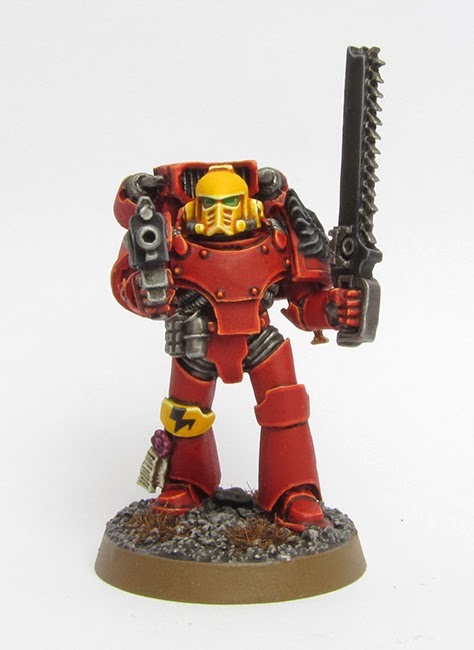
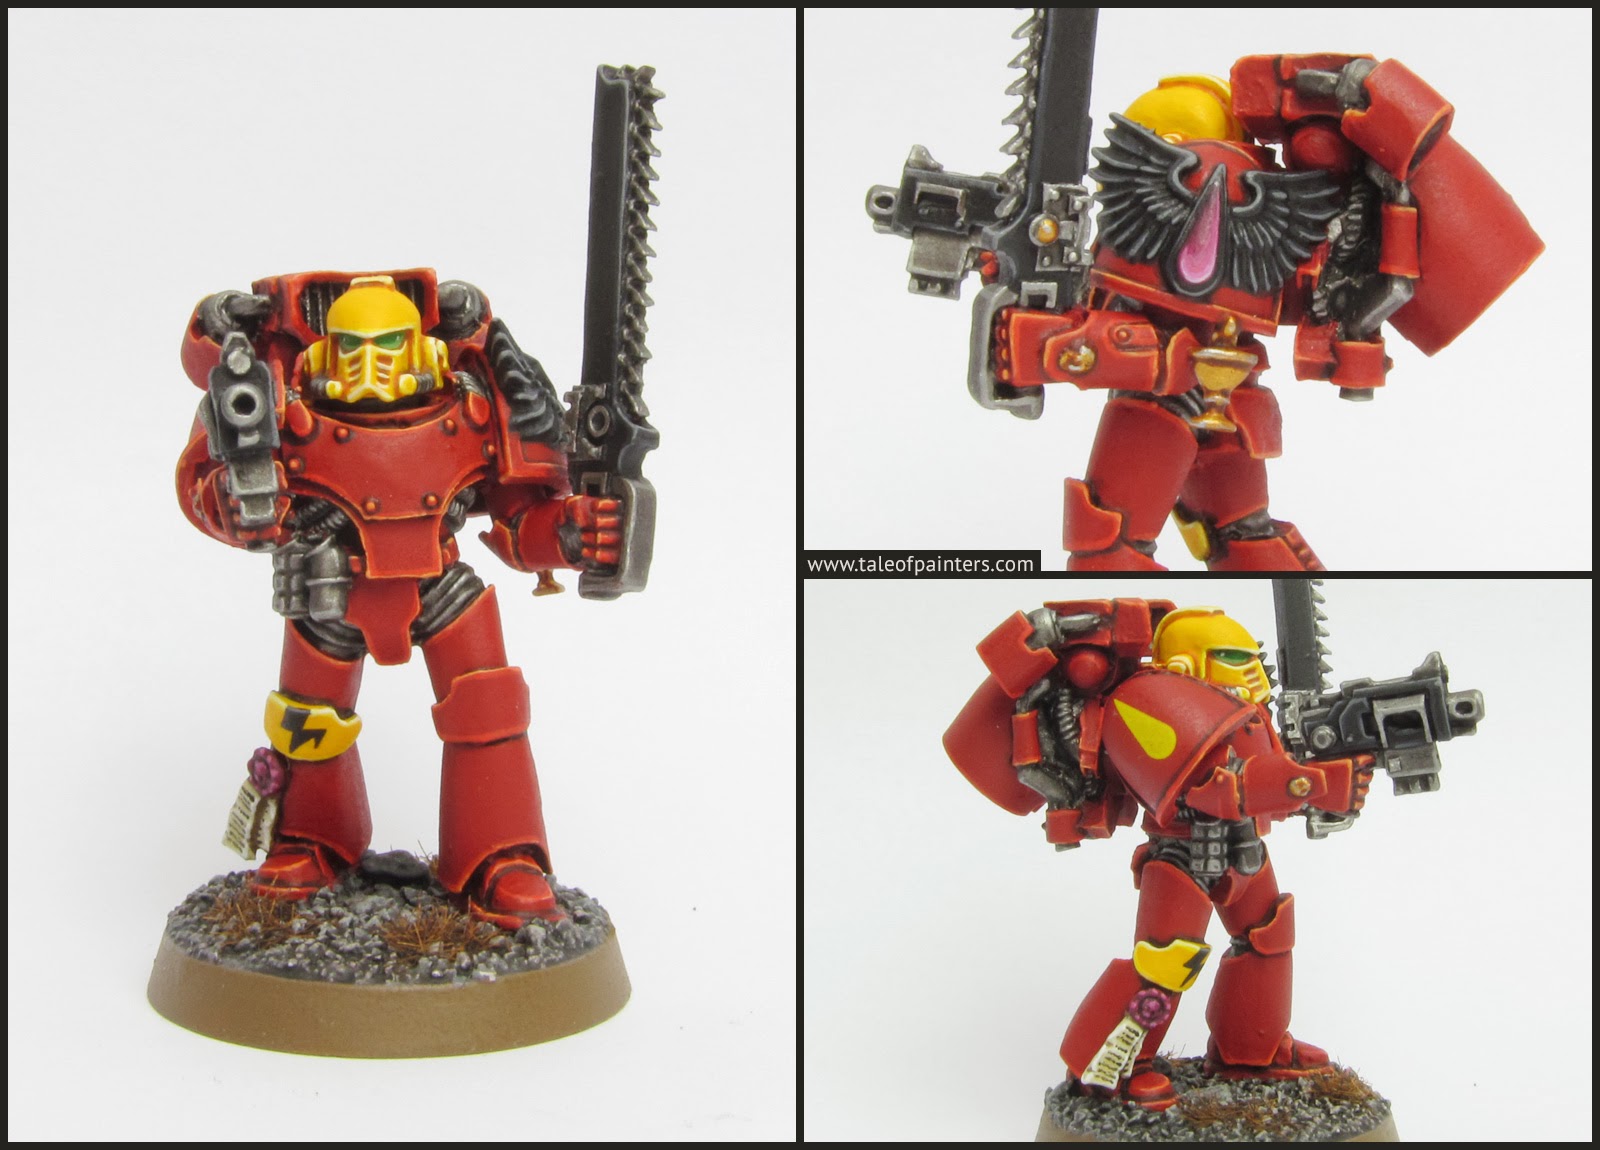
Hey guys, we published this tutorial a while ago, but to celebrate the release of the new Blood Angel models we thought it might be a good idea to bring it back to the front page. Originally, this tutorial was created by a reader’s request, and it also served as the blue print for painting my Mk4 assault squad. Click “More after the jump” and learn in an extensive step by step tutorial how I painted the model above (and learn my recipes for a deep vibrant red and yellow).
This tutorial assumes you have a good understanding of how to paint. It involves paints from a lot of different brands and mixing paints. I also used an airbrush to speed certain steps up, though you can acchieve the same result by using only a paint brush. Underneath each picture are the corresponding instructions. Each step shows the paint(s) I used during that step. If I use a non-GW or OOP paint, I try my best to give you suitable alternatives [in brackets].
Paints I used for this tutorial:
- Vallejo Surface Primer Grey
- Games Workshop Mephiston Red
- GW Mechanicus Standard Grey
- GW Longbeard Grey
- GW Wild Rider Red
- GW Bronzed Flesh [OOP, use VGC Bronze Fleshtone or Ungor Flesh]
- GW Boltgun Metal [OOP, use Leadbelcher]
- GW Bloodletter
- GW Abaddon Black
- GW Eshin Grey
- GW Codex Grey [OOP, use Dawnstone]
- GW Steel Legion Drab
- GW Bleached Bone [OOP, use Ushabti Bone]
- GW Screaming Skull
- GW Screamer Pink
- GW Warlock Purple [OOP, use VGC Warlord Purple]
- GW Emperors Children
- GW Snot Green [OOP, use Warpstone Glow]
- GW Skarsnik Green
- GW Skrag Brown
- GW Dorn Yellow
- GW Lamenters Yellow
- Vallejo Game Colour Gold Yellow
- VGC Brown Ink
- VGC Squid Pink
- VGC Glorious Gold
- VGC Off White
- VGC Smokey Ink
- Vallejo Glaze Medium
- The Army Painter Warpaints Strong Tone wash
- Warpaints Dark Tone wash
- Warpaints Plate Mail Metal
- Warpaints Shining Silver
- Warpaints Matt White
- Privateer Press Formula P3 Carnal Pink
If you need to expand your paint collection, check out our 🇬🇧/🇪🇺 partner stores Wayland Games, Element Games, and Firestorm Games, at 🇩🇪 Taschengelddieb and PK-Pro, and at 🇺🇸 Noble Knight Games, which all offer an amazing range of paints and hobby products at a discount. Using our links helps to support Tale of Painters at no additional cost to you, so thank you very much for using them!
How to paint Blood Angels
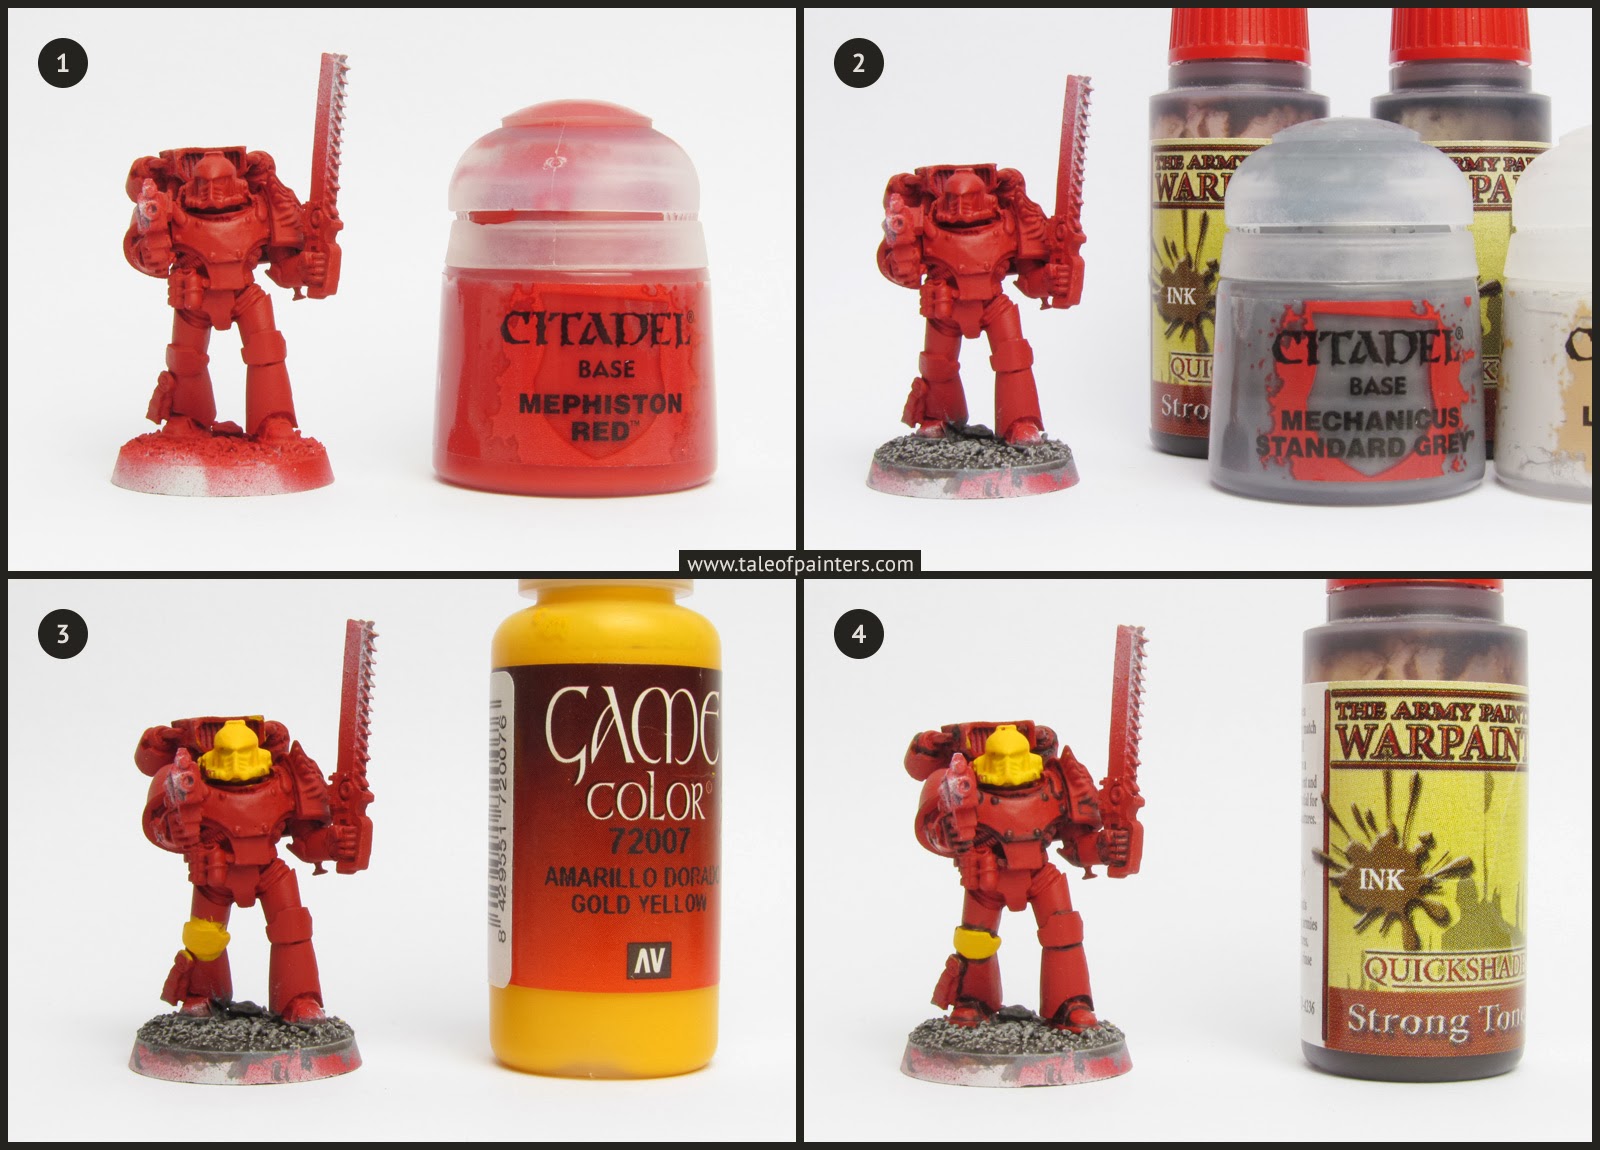
1. The model was primed with Vallejo Surface Primer Grey using an airbrush. It’s a light grey primer that is excellent for applying the red (use a white spray primer if you don’t have access to an airbrush). Once the primer was dry, I applied Mephiston Red in several thin coats, again with my airbrush. Of course you can use a brush instead as well. In hindsight, I would have left the helmet off to be primed white and sprayed yellow with my airbrush, would have been less time-consuming than painting the yellow over the red.
2. I painted the texture of the base with Mechanicus Standard Grey. Then I drybrushed the base heavily with Longbeard Grey and applied a generous wash, made up of a 1:1 mix of The Army Painter Warpaints Strong Tone and Dark Tone Ink [Devland Mud and Badab Black/Nuln Oil].
3. Meanwhile I applied a couple of thinned coats of Vallejo Game Colour Golden Yellow, because at this point you can allow yourself to be quick and messy. Being quick is is good, because you will need about 8 – 10 thin coats for an even result.
4. Now I took Warpaints Strong Tone Ink [Devlan Mud] and applied the wash directly into the recesses of the armour. For an even result some areas might need two passes.
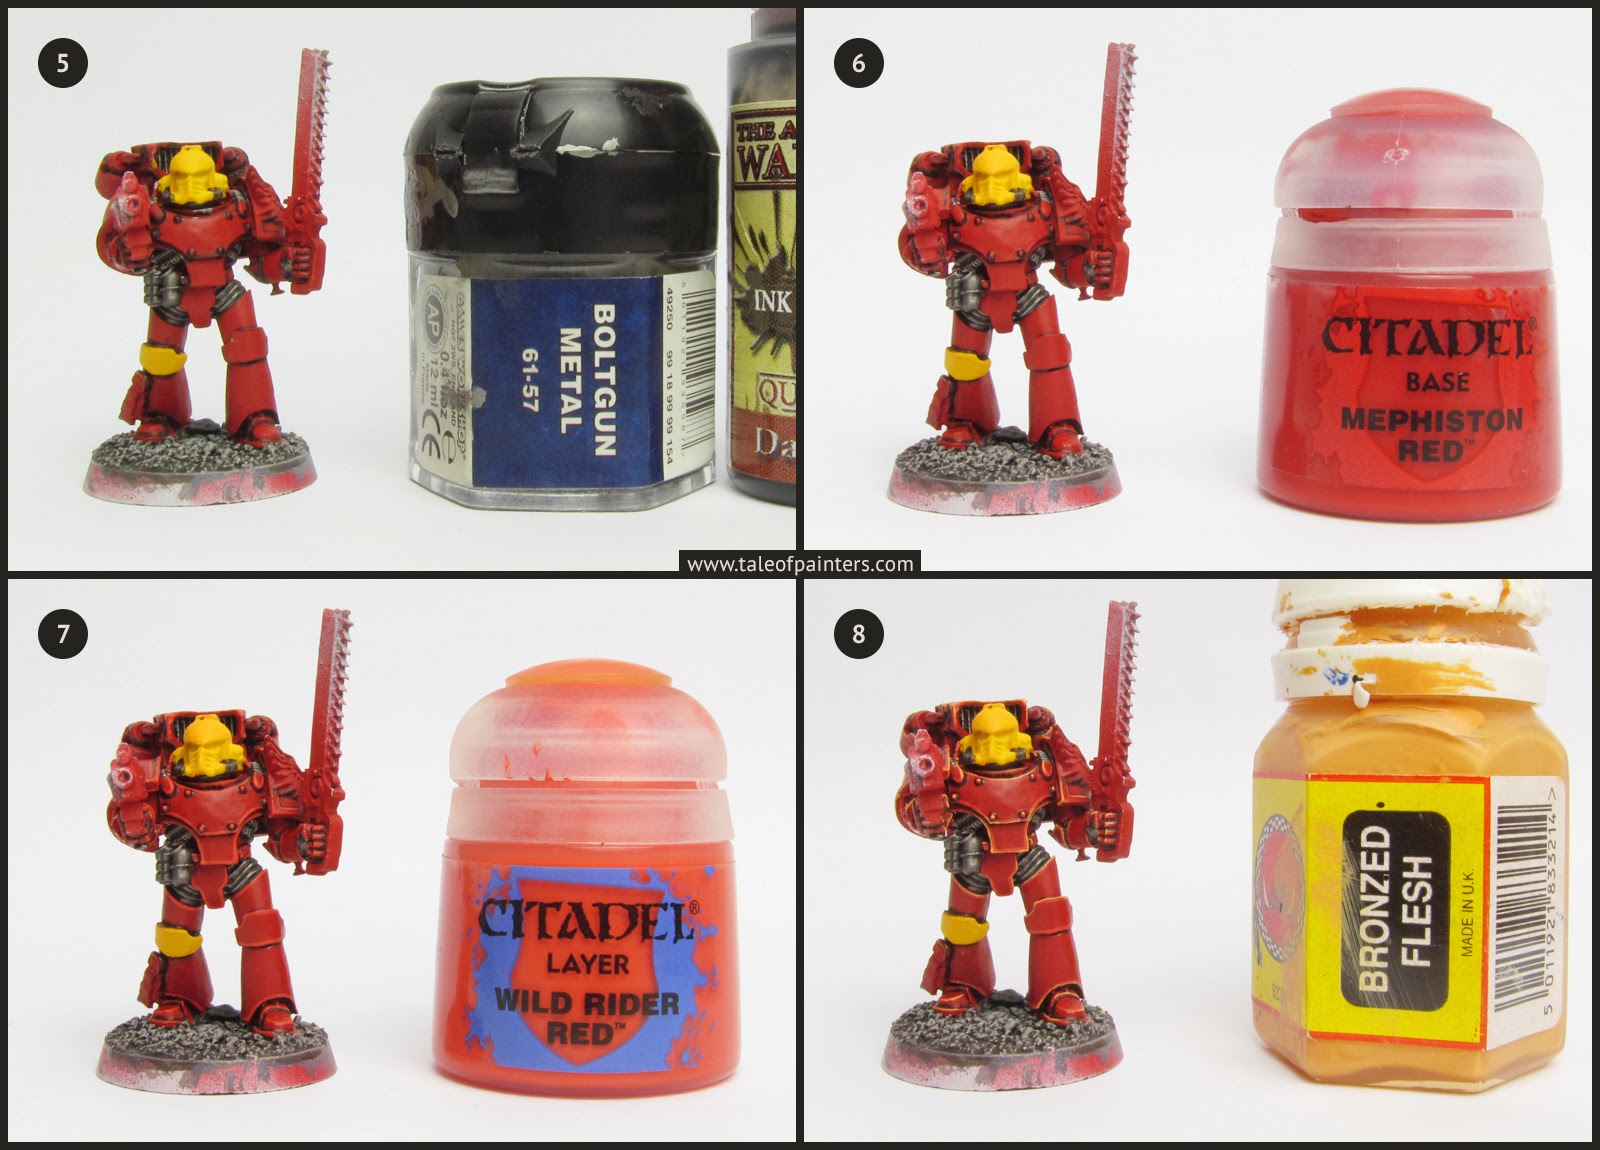
5. At this stage I painted all the metal parts of the armour that would be hard to reach once the armour is finished, such as the armour joints, with Boltgun Metal [Warpaints Gun Metal or Leadbelcher] and washed them with Warpaints Dark Tone Ink [Badab Black or Nuln Oil].
6. I fetched my pot of Mephiston Red again to clean up the armour.
7. I applied a first edge highlight of Wild Rider Red. As always when applying highlights, I used my faithful Winsor & Newton Series 7 M brush in size 00.
8. For the second and final highlight for the armour, I used a very old pot of Bronzed Flesh [can easily be substituted by VGC Bronze Fleshtone or Ungor Flesh]. As Bronzed Flesh is such a light colour in comparison to Mephiston Red, the highlights need to be as thin and sharp as possible or else they will overpower the red. Better skip this stage if you can’t carry it off.
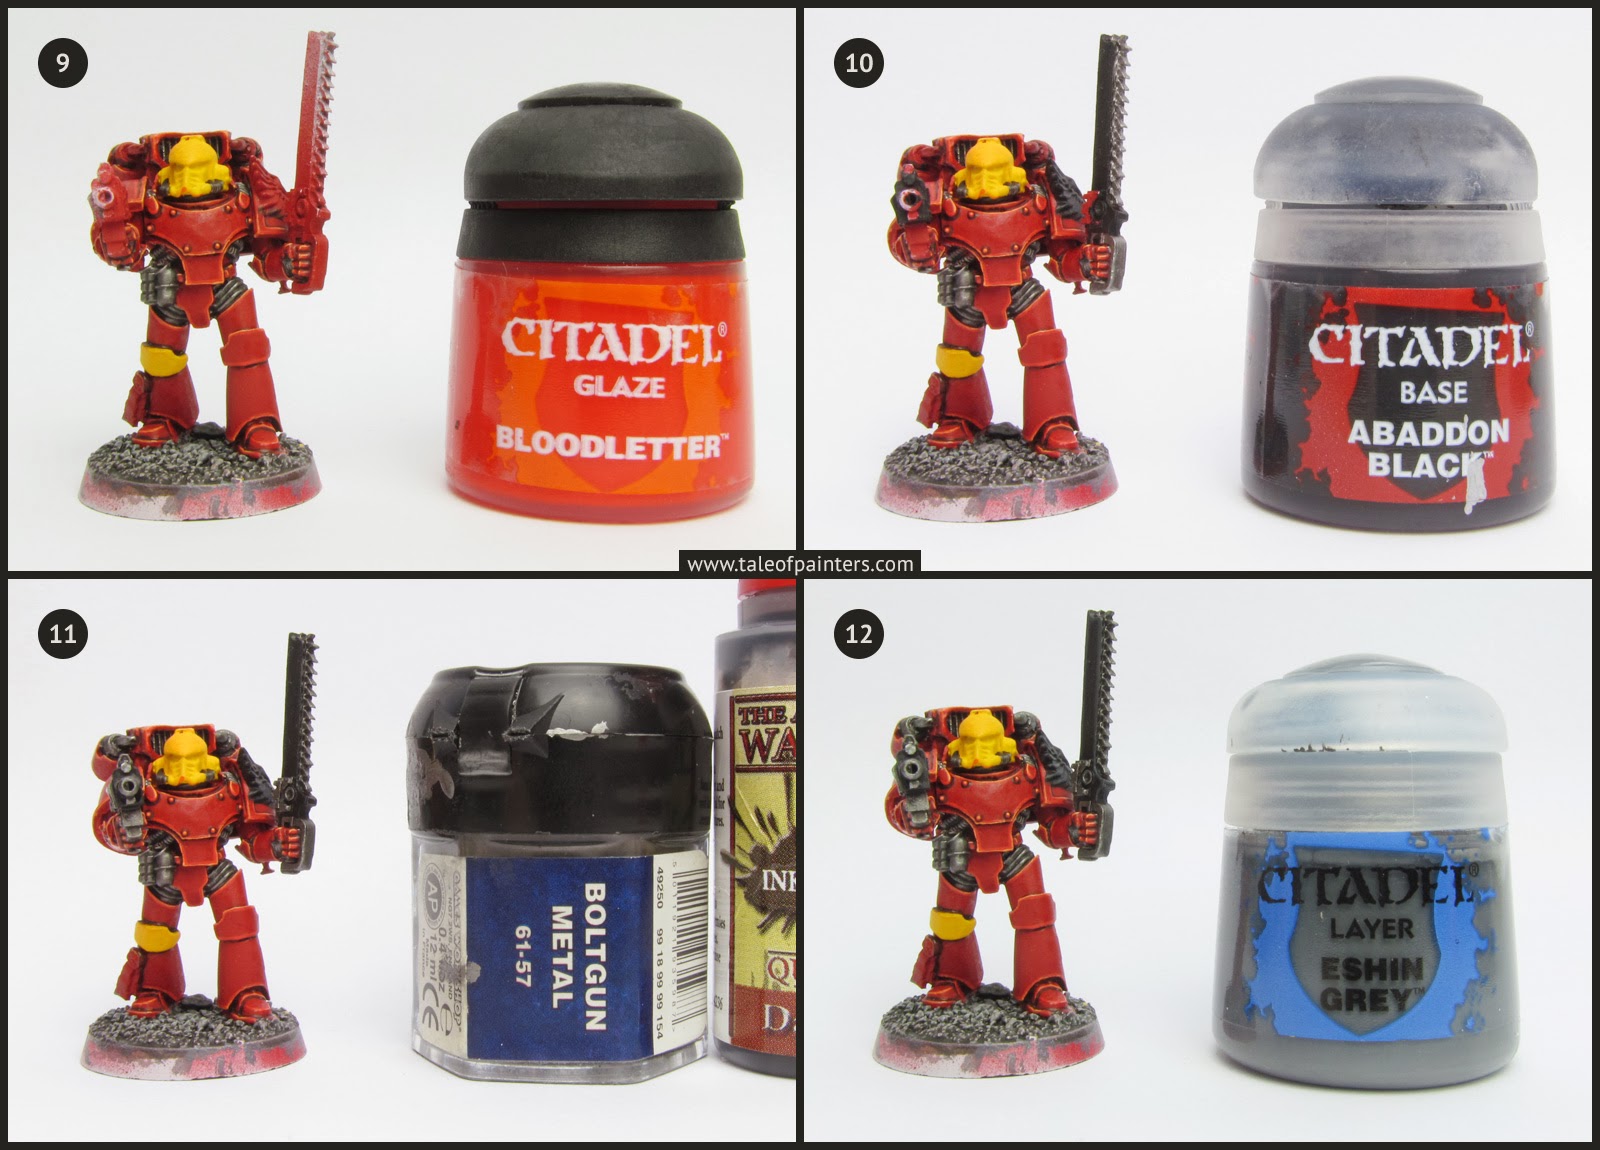
9. To remove the peachiness of the highlights, I glazed the red armour with Bloodletter. When applying a glaze, don’t overload your brush with paint as when using a wash. Instead, wipe off any excessive glaze on a towel and spread a thin and even coat over the desired areas.
10. Now I painted the black areas, such as the weapons and the chapter symbold on the shoulder guard, with Abaddon Black.
11. In this step I basecoated all the remaining metal areas with Boltgun Metal and washed them with Dark Tone Ink.
12. A highlight of Eshin Grey was applied to the black areas.
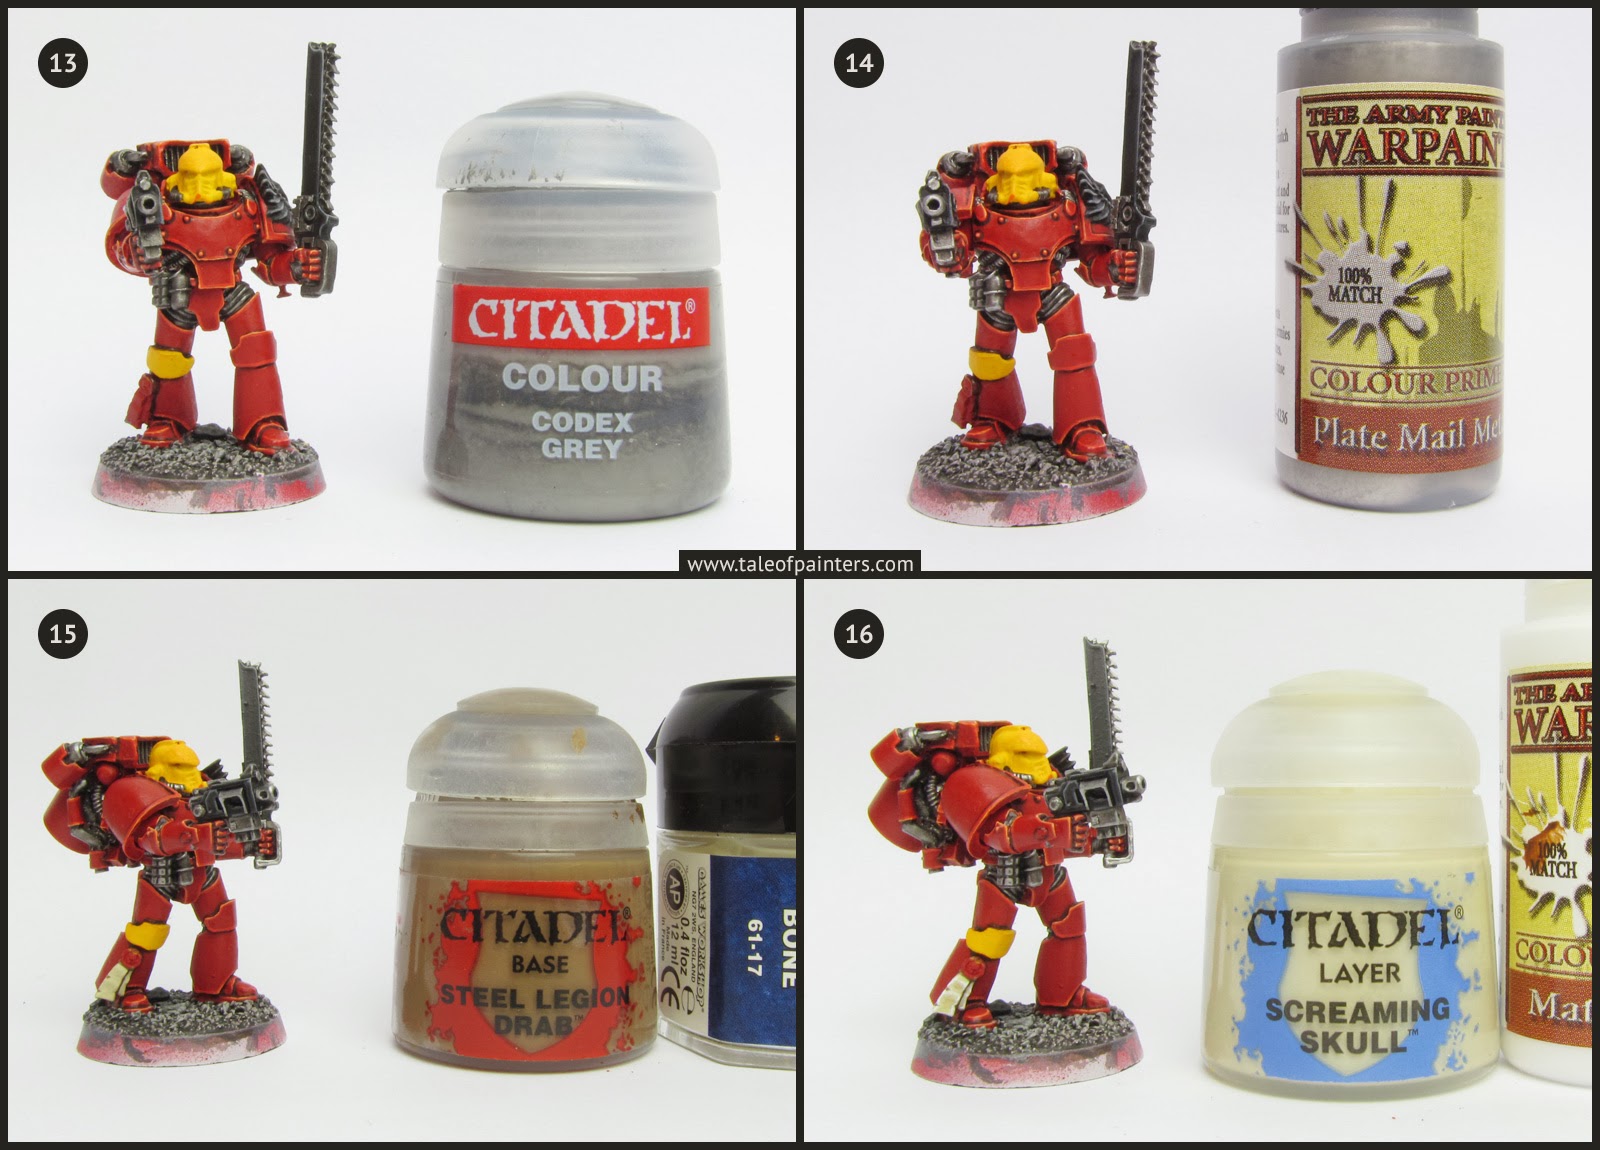
13. A final edge highlight of Codex Grey [Dawnstone] was applied to the black areas.
14. Then I highlighted all the metal areas with Warpaints Plate Mail Metal [Chainmail or Ironbreaker].
15. The parchment of the purity seal was basecoated with Steel Legion Drab, once dry Bleached Bone [Ushabti Bone] was layered while leaving Steel Legion Drab in the recesses.
16. Finally I highlighted the parchment with Screaming Skull and then Warpaints Matt White [any white can be used, such as White Scar or Skull White].
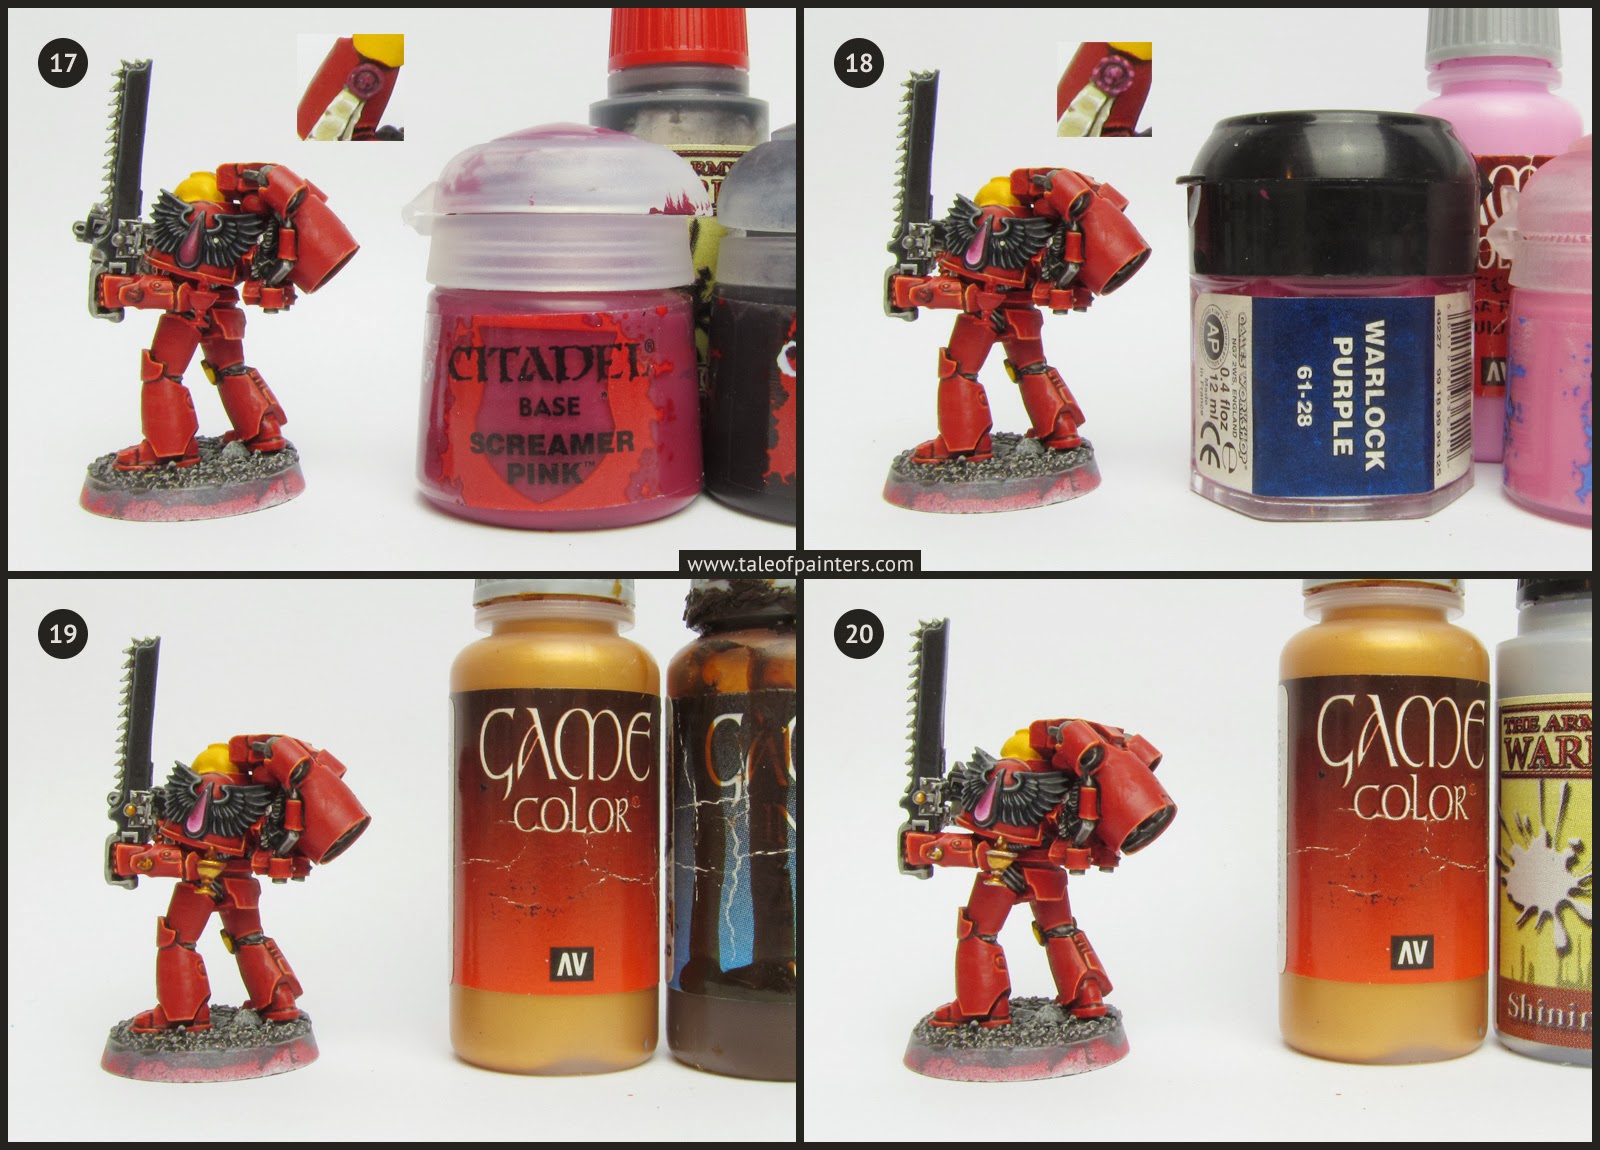
17. The blood drop shaped gem was basecoated with Screamer Pink. Then I mixed a little bit of Abaddon Black into Screamer Pink and shaded the upper left part of the gem. The wax seal was also basecoated with Screamer Pink and washed with Warpaints Dark Tone Ink [Badab Black or Nuln Oil].
18. I highlighted the gem with four successive highlights, concentrating more and more on the lower right part of the gem with each step. I started with Warlock Purple [VGC Warlord Purple], followed by Emperors Children, VGC Squid Pink and Privateer Press Formula P3 Carnal Flesh (can’t be seen on the picture, it’s an almost white pink]. I also applied a small dot of Carnal Flesh to the upper left of the gem. The wax seal was highlighted with Screamer Pink and Emperors Children.
19. The gold parts were painted with VGC Glorious Gold [Gehenna’s Gold], then I washed slightly thinned VGC Brown Ink directly into the recesses for the shadings.
20. I cleaned up any messy shadings with Glorious Gold and applied a highlight of Warpaints Shining Silver [Mithril Silver or Runefang Steel].
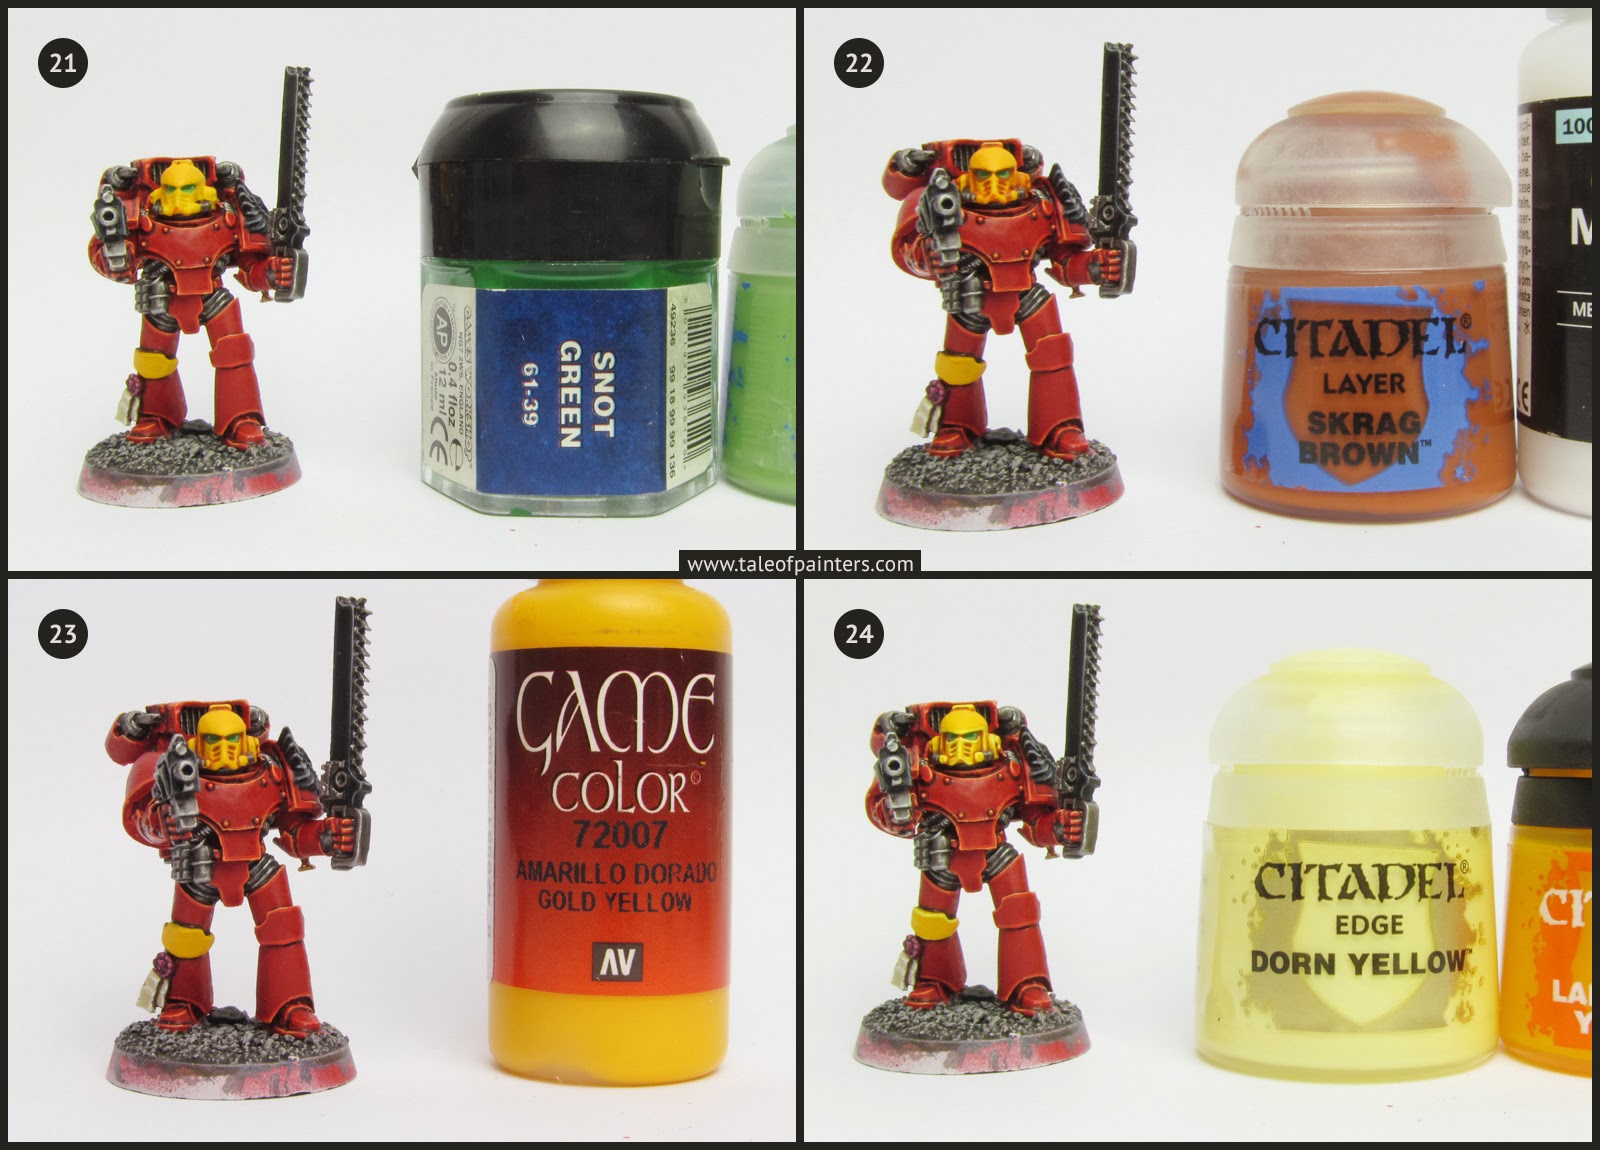
21. The lenses of the helmet were painted with Snot Green [Warpstone Glow]. Then I highlighted the lower part of the lense with Skarsnik Green and apllied a small white dot in the corner.
22. I thinned Skrag Brown with a little bit of Vallejo Glaze Medium [Lahmian Medium might work similarly] and shaded the yellow helmet. Multiple passes were needed to build up the colour. I used undiluted Skrag Brown to encircle the lenses.
23. I cleaned up the yellow of the helmet and the knee protector with another couple of thin layers of VGC Gold Yellow.
24. I highlighted the yellow with Dorn Yellow and applied a glaze of Lamenters Yellow to tone down the stark highlights.
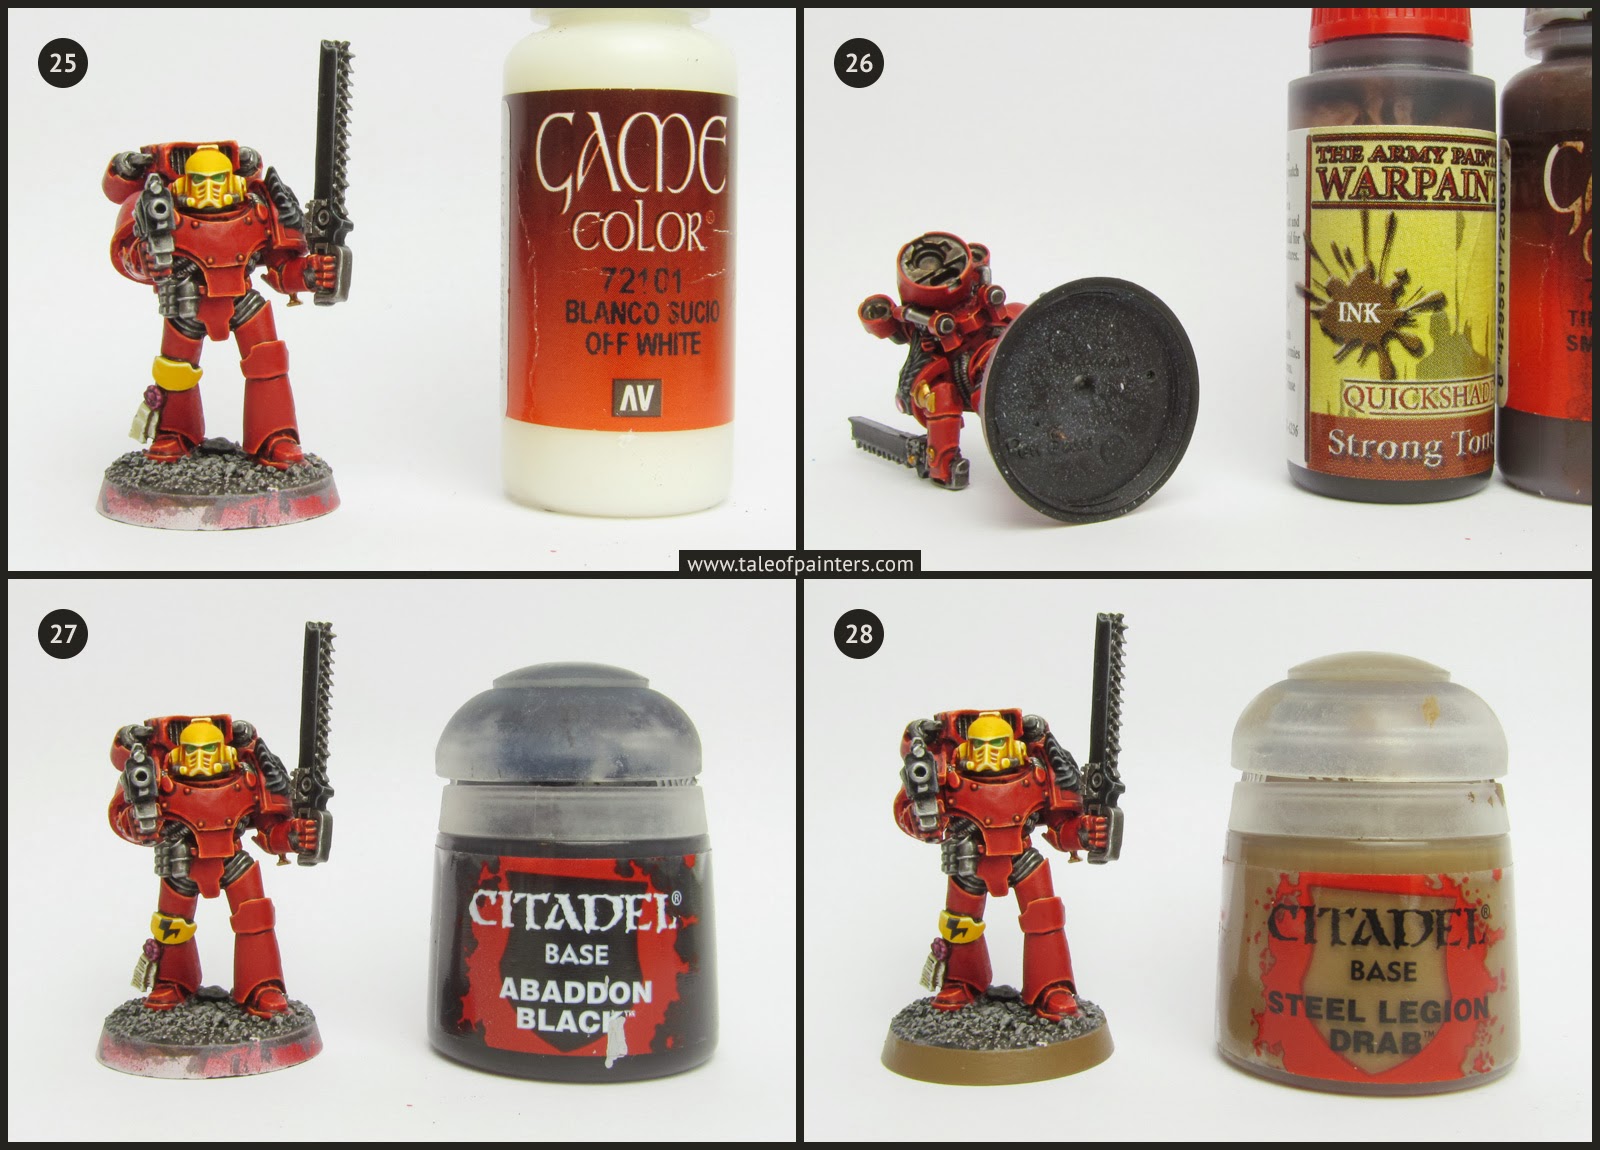
25. The final highlight of the yellow parts was made with VGC Off White.
26. For the charred exhausts of the jump pack I applied three coats of Warpaints Strong Tone Ink [Devlan Mud] and one coat of VGC Smokey Ink [Typhus Corrosion].
27. Thinned Abbadon Black was used to paint the inscription of the purity seal and the squad marking on the left knee protector. Take your time and use thinned paint, as any mistakes on the yellow are time-consuming to correct. I highlighted the black of the freehand on the knee as laid out in step 12 and 13.
28. Paint the trim of the base with Steel Legion Drab.
To complete the model, I added a custom blend of static grass made up of light brown, brown and black fibres which I picked up from an ebay seller. I also added a transfer with the company marking with the help of Microset (check out the tutorial here) and applied a coat of matt varnish.
How do you like the model? Have you found anything useful in this tutorial for your own projects? Let us know in the comments!
18 Comments
Leave a Reply
Tale of Painters is the unofficial Warhammer hobby magazine run by hobbyists like you. Support our work by using the affiliate links from our 🇺🇸 / 🇨🇦 partner stores for your next orders so we can continue to bring you fantastic FREE content every day:


Or support us directly:


This is great. Thank you!
These tutorials are always so well laid out and meticulous!
Fyi…you mention grey primer…an alternative out of a can grey primer which I now use on everything is the halfords grey plastic primer….because its for car bodywork its ultra fine grain and doesnt obscure any details. Its totally opaque not showing any colour thru.
Great tutorial for the colours. I especially like the yellow.
Just an FYI Slave to painting looks to have closed its doors and the domain looks to have expired.
Tamils x-20a thinner works extremely well for GW paints
isopropyl alcohol works very well too, basically the same stuff as tamiya's, just a lot cheaper, 2 liters for the price of a bottle of tamiya.
Although i just use vallejo airbrush thinners these days…
What are you using to thin GW Mephiston Red for airbrush?
Nice work
Why didn't the reaper yellow you had?
Great tutorial!
Still surprised though: I bought the full GW-paint-range-in-a-box but still I seem to be missing some colors…
Awesome tutorial! This is how the Paint Splatter articles in White Dwarf should be written along with the large pictures showing the paint(s) being used! The only thing missing is showing which brush you used at each step (if you were doing the WD articles of course!)
Thank you very very much!
Fantastic! Awesome job Stahly!
Great edge highlights, kudos.
How do you like the edge paint series?
They are pretty much like Citadel Layer paints. My pot of Flayed One Flesh is very thin and runny though.
Outstanding tutorial, and wonderful work!
Really helpful tutorial thanks!
Tremendous work and well organized with numbered pictures and the exact paint used beside it. Very useful for beginners.
Keep going with the Blood Angels!