
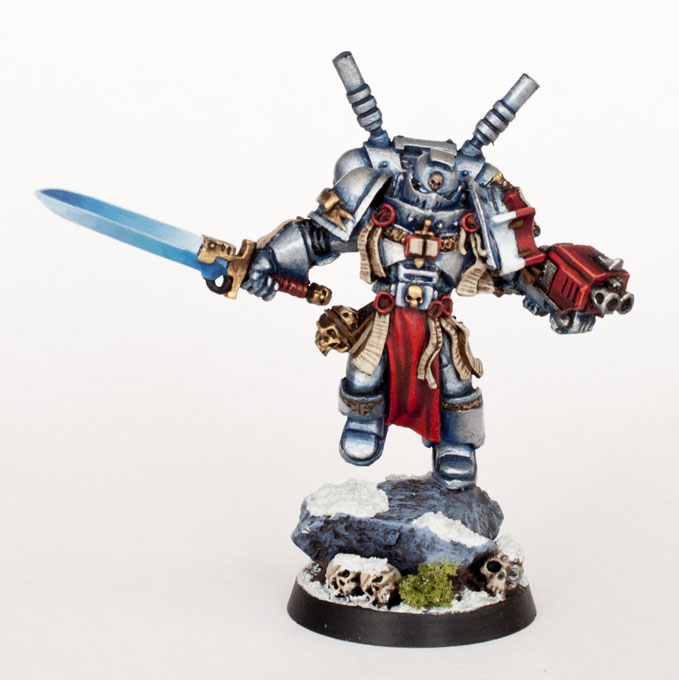
In this step by step tutorial I will show you how I paint my Grey Knights using the new range of paints from Citadel. In just 39 steps you can replicate the above paint job.
I’ve designed this tutorial so established painters find it interesting but also so new comers to the hobby can learn some basic and advanced techniques. I will use terms such as glazing and washing, don’t worry if you don’t know what these mean because I will elaborate and explain during that step.
Paints you will need for this tutorial:
Runefang Steel (layer)
Kantor Blue (base)
Abbadon Black (base)
Gulliman Blue (glaze)
Hashut Copper (layer)
Rhinox Hide (base)
Auric Armour Gold (layer)
Khorne Red (base)
Wazdakka Red (layer)
Evil Sunz Scarlett (layer)
Flash Gitz Yellow (layer)
Ceramite White (base)
Fenrisian Grey (layer)
Warplock Bronze (base)
Leadbelcher (base)
Mournfang Brown (base)
Ushanti Bone (layer)
Russ Grey (layer)
Lothern Blue (layer)
Temple Gard Blue (layer)
Teclis Blue (layer)
Stirland Mud (texture)
Mourn Mountain Snow (texture)
In case you need to expand your paint collection, head over to Wayland Games or Slave to Painting, which both stock a huge selection of paints at competitive prices.
Stage 1 – Blue Steel Armour and Gold Trim

Firstly, I just wanted to say I don’t paint straight from the pot. I prefer to use an old white tile and I always add water to my paints, even when I’m using Lahmian Medium (Glaze Medium).
Step 1.1
I use Vallejo Surface Primer with my Airbrush, you can read how in this review I wrote.
Step 1.2
Runefang Steel, Kantor Blue and Lahmian Medium are mixed together to create a metallic with a blue tinge. This is a thin mix that should go on in 2-3 coats. Paint this on as smooth as possible. If it’s lumpy all the imperfections will show on the shiny armour. Use an airbrush if possible, especially if you’re painting an army to save time.
Step 1.3
I create a dark blue mix with Kantor Blue, Abaddon Black and Lahmian Medium and proceed to line all the armour joints to create depth.
Step 1.4
I enhance the blue armour by using Guilliman Blue Glaze. This doesn’t act like a wash, so you have to do the previous step to get the shading.
Step 1.5
Mixing Lahmian Medium with Runefang Steel I highlight the armour which instantly brightens up the model.
Step 1.6
I base coat the Gold areas with Hashhut Copper and Lahmian Medium. This medium gets used a lot with the metallics because they’re a bit thick and gloopy for my tastes, so this thins the paint better then water.
Step 1.7
Now I create my own wash by using a lot of Lahmian Medium with Rhinox Hide mixed with Abaddon Black and run this over the gold. This has a different surface tension to a pre bought wash and I prefer it for this stage, it shades deeper then a wash. A wash tends to colourise an area, where as this flows in and covers completely.
Step 1.8
Add a quick highlight of Auric Armour Gold with a touch of Lahmian Medium.
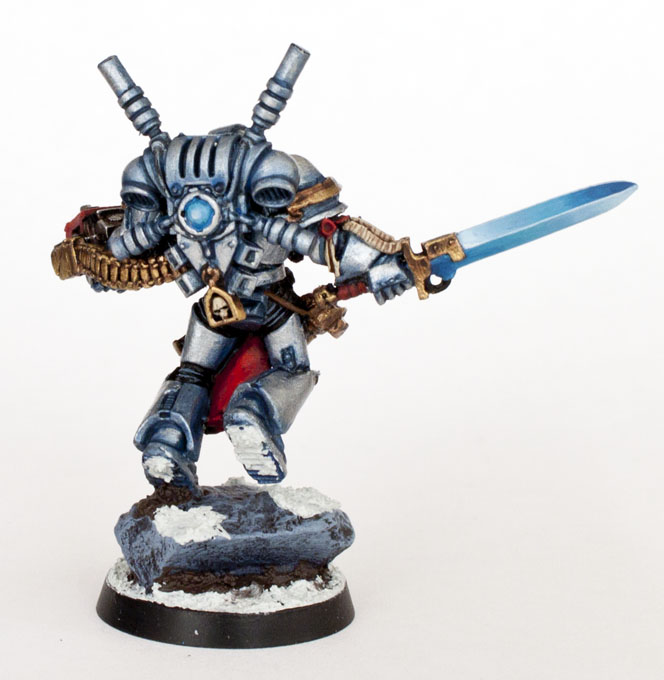
Stage 2 – Red and White
Step 2.1
Base coat the area with Khorne Red. On a side note, this is a better match for the old Mecharite Red then the new Mephiston Red. Don’t forget to paint the Storm Bolter and Sword handle like I did in the picture.
Step 2.2
Highlight with Wazdakka Red.
Step 2.3
Highlight with Evil Sunz Scarlett.
Step 2.4
Shade with a mix Khorne Red and Rhinox Hide. Add plenty of Lahmian Medium and just paint it into the recesses or the lower halves of the flat red areas.
Step 2.5
Mix some Flash Gitz Yellow and Ceramite White into Evil Sunz Scarlett to create a colour to edge highlight with. I didn’t use this colour on the cloth areas. Cloth doesn’t tend to be very shiny (unless it’s satin) so it doesn’t need the extra shiny highlight.
Step 2.6
For the white areas of the model base coat with Fenrisian Grey. 2 coats.
Step 2.7
Then highlight with Ulthuan Grey. 1 coat.
Step 2.8
1 coat of Ceramite White is used as the final highlight. Building up the colours like this cuts down the number of coats need to paint white and you get some shading as well.
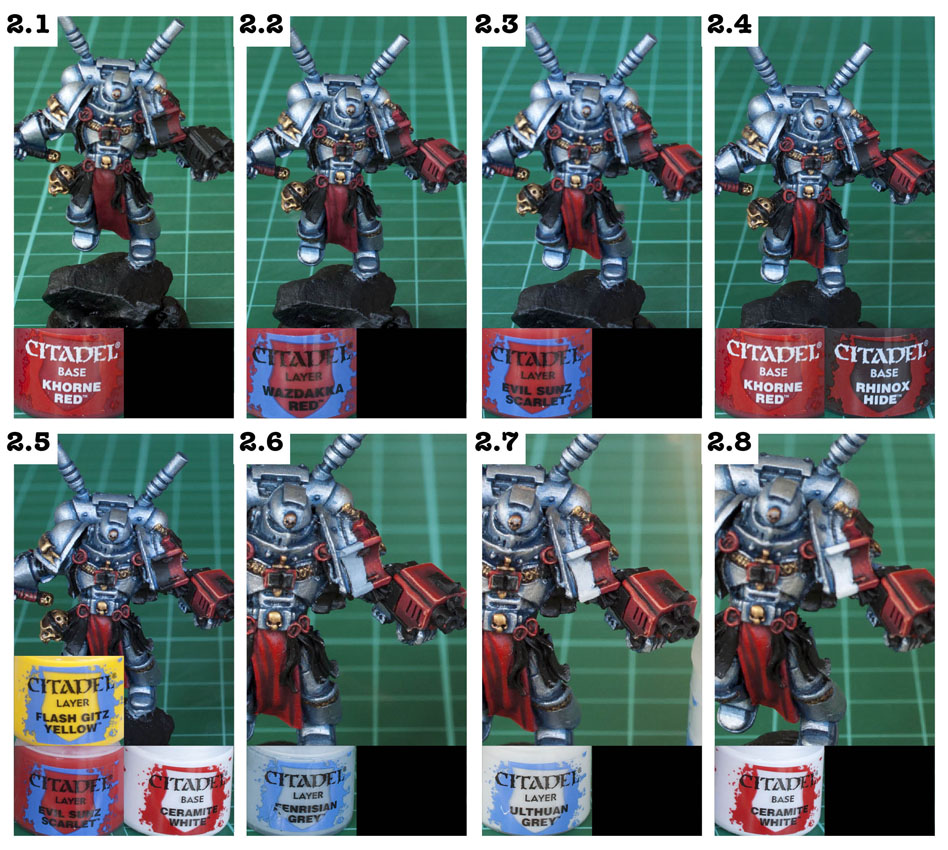
Stage 3 – Gun Metals and Bone/Parchment
Step 3.1
Basecoat the gun metals with Warplock Bronze.
Step 3.2
Highlight with Leadbelcher.
Step 3.3
Final edge highlight of Runefang Steel.
Step 3.4
Basecoat all the skulls and purity seals with Mournfang brown.
Step 3.5
Mix a touch of Mournfang Brown into Ushabti Bone and paint over the whole areas leaving the previous layer showing though the overlapping parchment joins.
Step 3.6
Use pure Ushabti Bone to highlight with.
Step 3.7
Watered down Rhinox Hide is used to add very very thin lines to the parchment as mock text.
Stage 4 – Black joints and Nemesis Force Weapon

Step 4.1
Use Abaddon Black to paint all the ribbed areas between the armour. This is a good point to tidy up any other areas with black as well.
Step 4.2
Paint some thin lines using Russ Grey as highlights.
Now for the bit you’ve been waiting for and the bit I was dreading! The Nemesis Power Sword, blending colours with close up pictures… Gulp!
To save myself repeating myself, mix Lahmian Medium in at every stage to aid blending. I found these Citadel paints blended smoother then Vallejo.
Step 4.3
Paint the whole blade with Lothern Blue.
Step 4.4
Then paint opposite quarters with Temple Guard Blue. Paint along the length of the blade, not across it. This will help avoid banding.
Step 4.5
Using Teclis Blue repeat the above step but make sure you leave some Temple Guard Blue showing. You should start to see the colours blend together. Don’t load up with heavy brush. Light thin coats blend better.
Step 4.6
Mix a touch of Kantor Blue into Teclis and paint that over the previous layer. Remember, paint along the length the of the sword for all these layers leaving some of the previous layer showing through.
Step 4.7
Repeat 4.6 but add more Kantor Blue. 50:50 is about right for this step.
Step 4.8
Kantor Blue with water and Lahmian Medium is used on the far ends now as the darkest colour. I have gone to near black in the past, but to keep steps down and keep a softer look to the blade just Kantor is fine.
Step 4.9
Now we do the reverse. Using lighter colours we will blend the highlights. Mix Ulthuan Grey into Lothern Blue and paint the opposite ends you’ve just been painting.
Step 4.10
Pure Ulthuan Grey mixed with Lahmian Medium is used on the ends. This should be roughly 1/3 of the blade.
Step 4.11
Very carefully paint Ceramite White on the edges. Use the side of the brush to do this. Don’t forget the central edge of the blade. I can not stress how careful you need to be now. Don’t get any on the blends, becauseit’s really hard to tidy up a blended colour.
Stage 5 – Basing
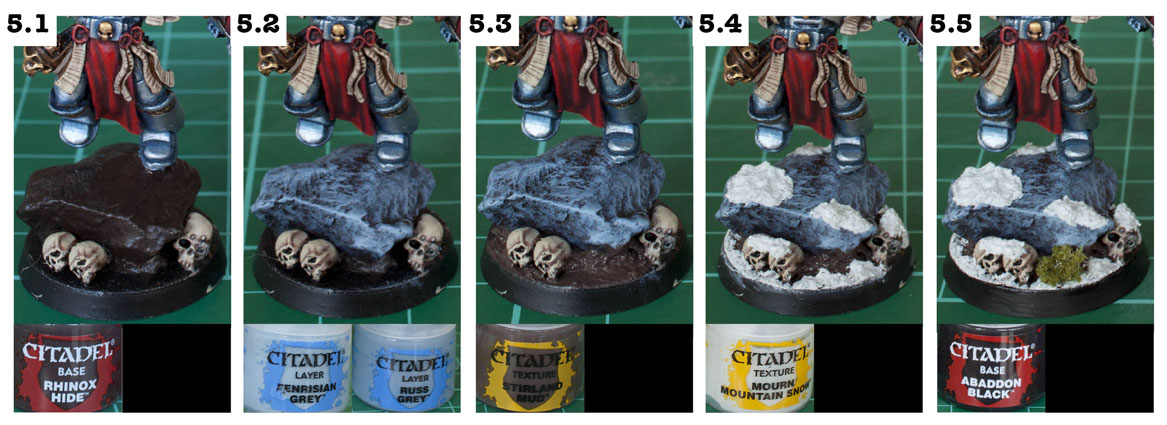
Step 5.1
Basing is personal preference and I just made this up quickly to fit in with the rest of the army. It’s a lump of slate pushed into some modelling putty with some skulls glued to it. I paint the slate with Rhinox Hide.
Step 5.2
Then using a couple of greys I drybrush the rock being carefully not to get any on the skulls I painted at step 3.4
Step 5.3
Stirland Mud is slapped on with an old brush where the rock overhangs.
Step 5.4
Mourn Mountain Snow is then painted onto the rock, the skulls, around the edges and the bottom of the boots.
Step 5.5
To finish, I glue a piece of scrub to the base (I forgot to paint snow on top of it – doh) and then edge the base with black.
There you go, quite simple really. The colours are pretty much spot on compared the Vallejo paints I used for other Grey Knights. Thank you for reading my tutorial, it’s taken 20+ hours to create but I’ve enjoyed every single minute. Please do share it with your hobby communities and friends or repost it on your own blogs. Leave me a comment if you enjoyed it to, what I’d really love to see is you guys trying it out yourself and posting the results in the comments.
Do you like our tutorials and reviews? Here is what you can do to support us: Disable your Ad Blocker or place your next Wayland Games order by clicking here or on the banner on the right. Thank you very much, we appreciate any help to keep us going!

59 Comments
Leave a Reply
Tale of Painters is the unofficial Warhammer hobby magazine run by hobbyists like you. Support our work by using the affiliate links from our partner stores for your next orders so we can continue to bring you fantastic FREE content every day:


![]()
![]()
Or support us directly:


Legit tutorial even 11 years later!! Super cool and something I’ll be using a lot to help me learn and grow my currently non existent skills. Appreciate you putting this together 🍺
Thanks for the kind words. It’s great to hear it’s still useful to people.
Legit tutorial even 11 years later!! Super cool and something I’ll be using a lot to help me learn and grow my currently non existent skills. Appreciate you putting this together 🍺
How u painted the eyes? Thanks
Step 1.1
I use Vallejo Surface Primer with my Airbrush, you can read how in this review I wrote.
It's just the undercoat! Use an aerosol or hand undercoat if you'd prefer. You DON'T have to use an airbrush. Shocking that I need to actually point this out.
Step 1.1
I use Vallejo Surface Primer with my Airbrush, you can read how in this review I wrote.
Does anywhere give guides without using a airbrush? Not all of us have the money to buy one along with the overpriced minis 😀
Erm this guide and all of my guides don't use an airbrush.
Does anywhere give guides without using a airbrush? Not all of us have the money to buy one along with the overpriced minis 😀
When you glaze with guilliman blue, do you glaze all the painted armour or just the joints that got the abbadon / kantor mix? And is it just glaze or mixed with water or lahmian medium?
Fantastic tutorial 🙂 Quick question. When you highlight the model with thinned down Runefang, do you just do one layer? and how close to the edges do you go with it?
It's all done by look and feel. I do several layers until it looks right. It's difficult to explain what is right. Definitely use the pictures as reference. Make sure you leave the previous layers showing through in areas that would be naturally shaded. So don't go to close to the edges.
Thank for the reply. I haven't done much painting with metallic colours before, and my test mini came out looking a bit 'bright', which is probably because of going too close to the edges with the runefang and not leaving previous layers showing through.
Building up the thin layers is akin to layering the same coloured tracing paper over one another. If you stagger the tracing paper you will see a colour graduation even though it's the same colour paper. It;s all to do with opacity. I really like painting with see through layers. It creates such wonderful soft blends. I find it easier then mixing colours to create those intermediate steps.
That is a good way to think about it, thanks 🙂 Going to attempt to paint an actual Grey Knight model now, lol. Hopefully it will go better than the test 😛
Send me pictures on our Facebook group. I would love to see how it came out.
https://www.facebook.com/taleofpainters
I've put up a WIP shot 🙂 no where near as good as yours, but it's a start, haha.
Thanks I really appreciate that! being so light a metal, I wonder if i should mix in some leadbelcher or just straight up replace runefang with it. Huge help on mixing, its very new to me (especially using lahmian medium, which I assumed I just add a drop or so in after mixing the first two colors). Again thanks a ton Garfy 🙂
The amount of lahmian medium you mix depends on the effect you want to achieve.
25% medium = nicely thinned metallics for smooth painting.
50% medium = translucent mix ideal for blending )called a glaze)
75%+ medium = wash like consistency, great for adding quick shading to models.
Happy painting.
Thanks so much Garfy for your awesome tutorial! Ive got a question though; I primed my models white and getting the same silver and blue armor as you have. What may you suggest I might try different? and whats the mix percentage with the runefang and kantor blue? i was attempting to just do 50% with each but maybe thats my problem.
It's difficult for me to comment on this because I primed my models black and not white.
50:50 is too much . You want to start with Silver and then progressively mix small amounts of blue into it until you get the shade you want. It should look like the picture (silver with a blue tinge). Good luck.
Add small amounts of the dark colour until it matches the picture in the tutorial. Then add lahmian medium to thin them down. It's all done by feel but here's a rough guide.
75% Lahmian Medium = Glaze. Very thin coats used to blend or add colour to existing layers.
50% Lahmian medium = Wash. This will have more paint pigment allowing you to flood textured areas with colour.
25%Lahmian medium = Thinned paint. Useful for layer blending.
is it 1:1
Just wondering what your ratios for mixing the paints were?
Mostly on the initial stages for painting the armor and golds
could you do a space wolves tutorial
I will definitely do a Space Wolf tutorial when they receive their new book.
These are, obviously, awesome tutorials! I have one suggestion though. In some of the other tutorials they list all of the paints used towards the top of the article. I find that very helpful as I can go down the list and see what I'm missing. Other that that this the best tutorial I've seen for grey knights – hands down!
Hi Eric, thank you for your feedback. I've updated the tutorial to include the list of paints. Hope this helps.
Great advice, thank you very much. I am still trying to think of some unique way to make my grey knights stand out, but I don't think the "Lilac knights of Fragrant Doom" would really work.
You will get much brighter metallics with a white undercoat. But you will quickly tore of having to 'black in' all the detail for every model. If you add purple to metallics the metal acts as a white and lightens it to a lilac colour. I found this out experimenting with red. It came came out metallic pink.
Great guide. I just bought my first Warhammer 40k army this last weekend which is Grey Knights. I am definitely going to try and use as much of this guide as I can while I paint them. I did have a couple of questions though.
First, what difference would there be if I used a white primer instead of the black one? Would there be much of a difference?
And second, I really like the metallic/blue scheme but do you think a metallic/teal or metallic/purple scheme could also work?
The first coat is quite light. The silver acts like white, lightening the blue, so you'll find you'll need more blue then you realise.
I was going to go light on the blue figuring it would blue up with the glaze. Now if I can ust get the paints. Half the paints are our of stock at my local store.
Hard to say, because i don't measure, I do it all by eye. If you use the picture as a guide that will help. Doesn't have to be exact because you'll be adding a glaze to make it more blue.
When you mixed the runefang and kantor blue what ratio did you use?
Impressed
Lothern Blue. I'm gong to update the tutorial now. Sorry guys.
For us color blind…. if it is not Emperor's Children what color might it be?
@ Bananaman – That's just typical. Trust me to get a paint with the wrong label when I write a review. Thanks for pointing it out.
@SW1 – Thanks dude.
@ Marcin – Thanks.
@ Minitrol – I got my fingers crossed.
@ Jeff – it's all about feel and consistency. You kinda have to experiment with what feels right for you. But as a rough guide if I was highlighting the armour with Runefang silver, I'd do something like 25% glaze medium.
@b w dunbar – I pin them. You can use a pin vice on slate.
I thought I had read somewhere that you used real rocks for the bases. How are you sticking the figures to them without them breaking off later?
Fantastic article, grey knights are my next project and your post is really going to help make them pop! I love the detailed step by step you presented.
How much medium do you apply to the mix, considering that you are going to add water as well?
@Garfy I'll try my best to get something done this week, (screaming dependants provisional approval required)
@ Garfy: Alclad (well, Alclad II, if you want to get all technical) lacquers are metallic paints aircraft modelers swear by. Since I'm into terrestrial stuff, I've never used them in my projects, but judging by other peoples' models there's nothing that can seriously rival them when it comes to representing metals of all kinds, even if they're rather unforgiving when it comes to surface imperfections. Google the name, manufacturer's website is impossible to miss.
This is awesome Garf. Your tutorials sould be gathered together and posted on GW's website or in one of their how too's. I have 40 GK's I just finished assembling this weekend that I will be trying this this week. I need to skip over to the store to pick up the paints so I can get started.
Great tutorial!
🙂
I really like the way you have worked to sequence the images and put them in blocks and THEN have text. The images in sequence but easily viewed side-by-side makes each step very clear.
Thanks again for all the effort!
thank you so much, I will be using this , it’s the best explanation on how to get the seams to pop , I didn’t buy enough paints on my first try and though it would just turn out, it’s showed me how to paint bone and layer the steal blue , I’m going to buy the paints for it this month, the cost is ouch lol , you should sell lessons, I would pay ,100$ for a afternoon in a class room even if I had to share you with other people, you made my day brighter. where do I post a picture of my finished marine?
Hey, you can share your pictures on our Discord, link is in the menu 🙂
Really liking these tutorials will be borrowing the blue/steel when I eventually get around to doing my Bretonnians. 🙂
You're a great inspiration, keep up the good work mate!!!
Excellent tutorial, and great job putting it together; I love seeing the paint pots with each step.
Only nitpick – somebody must have swapped labels on your new paints. In step 4.3, you show Emperor's Children, but that's a pink/magenta color, not the blue shown.
@ Mr Lee – I know, just 39 steps lol, made me giggle when I wrote it. Still, I thought it was going to be a lot more then that.
@ Marcin – I don't think the steps involved would be too difficult to follow, I think it's of a similar level to the tutorials you see in White Dwarf and and they're aimed at all ages. What are Alchad Metallic Laquers? Sounds interesting.
@ Stunty – Be sure to link me when you try out some of the techniques. I would love to see.
@ Brian – Thanks for directing traffic towards this post, it's very much appreciated.
@ Minitrol – I'm planning a WIP pic of the Storm Raven soon, I'll sneak in a comparison shot of the new GK vs an Old one too. Oh, and you don't know how excited it makes me feel to know you're going to try the tutorial out. Can not wait to see the results.
@ Kai – I think the blue blades would look awesome on the Eldar Witchblades. What's your colour scheme? You must have amassed an impressive collection in 15 years?
@Bearden314 – you're the reason I posted this tutorial, you originally asked me in August last year for a detailed tutorial, sorry you had to wait, but thank you for following Tale of Painters regularly. Myself and the other guys really appreciate it.
In answer to your question there are too differences. Vallejo metallics are thinner and smoother (but not by much when you add medium to the GW paints) but the GW bases and layers are smoother and blend better then vallejo. Both are great and the differences are subtle and tbh it's open to debate. I'm sure there are people who would disagree with me.
Amazing Tutorial!!
This is just plain spectacular and the reason why I originally started stalking this site – however, I am completely hooked and now check it multiple times a day.
Garfy – I know you originally used straight VGC paints for your Grey Knights previously. Would you recommend using the steps detailed here with the new paints instead of your original scheme with VGC?
In your opinion, what is the difference between the two brands of paints when painting up your grey knights?
Thanks in advance and once again, amazing, amazing tutorial.
Very, very nice tut! It's a shame that I don't play Grey Knights, yet your Force Weapon technique will certainly be of use on my Eldar witchblades… Yeah, I know: HERESY! Ahem. I'm sorry, I've been a pointy-ear all the last 15 years.
That was very interesting. Perhaps you could post a comparison shot with one of your originals Knights so people can finally see the two paint brands side by side.
Post up my version eh…Guess I have a marine I can dig up why not?
Absolutely amazing article. Thanks so much for posting this up. I'll be directing traffic to your post. Thanks for taking the extra time to create this!
Awesome tutorial and although I dont collect GK's I'll be using parts of it for other things, thanks for posting
The recipe is not for people who want to do their Grey Knights quickly, but the effect is stunning. I wonder how would Alclad metallic lacquers fare on miniatures, although I strongly suspect the end result wouldn't look, for want of a better word, cinematic enough.
OK.. first paragraph cracks me up.. "In just 39 steps.. " that aside.. great work.. the look of the GK there is one that looks much better than just slapping on some Silver and Gold, and calling it finished.. if I ever were to jump onto the Power Armor train, I would be following this in a heart beat.. that being said, many of the techniques and recipes I will use in other projects ( scrolls, power sword especially ).
Thanks for this, time well spent in making it, and more so in reading it 🙂