
In this enlightening tutorial I share my secrets on painting flawless blends for NMM blades. The magnification on these pictures is huge but the blends still hold up under such close scrutiny. It looks even better in real life (if I do say so myself). Read on for the concluding part to How to Paint Necrons.
I’ve designed this tutorial so established painters find it interesting but also so new comers to the hobby can learn some basic and advanced techniques. I will use terms such as glazing and washing, don’t worry if you don’t know what these mean because I will elaborate and explain during that step.
Paints you will need for this tutorial:
Black Undercoat spray (I use Vallejo Surface Primer)
Lahmian Medium (technical)
Temple Guard Blue (layer)
Teclis Blue (layer)
Alaitoc Blue (layer)
Kantor Blue (base)
Ceramite White (base)
In case you need to expand your paint collection, head over to Wayland Games or Slave to Painting, which both stock a huge selection of paints at competitive prices.

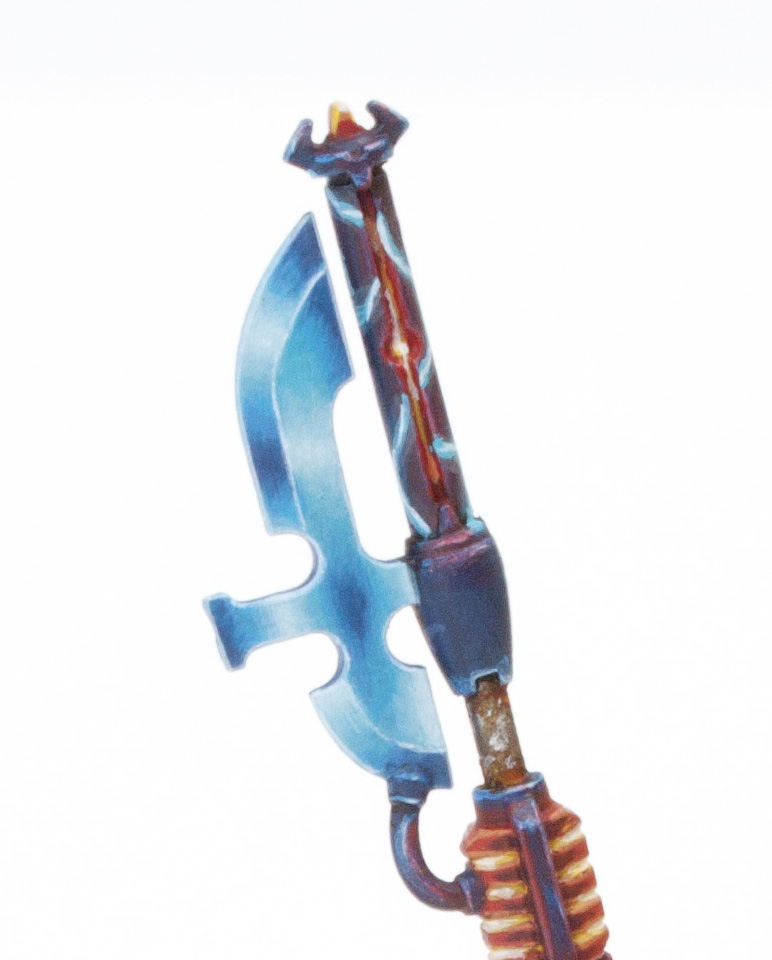
1. Start by giving the blade three thin coats of Temple Guard Blue. It’s imperative at this stage that the blade is free from lumpy paint and completely smooth. Water your paint slightly and wait for each coat to dry before starting the next. You need to take your time with this tutorial, jumping the gun and painting over half dry layers will result in brush marks.

2. This stage really shows the subtlety of the layering. You can see the paint in the pot looks different to the Teclis Blue on the blade. That’s because I’ve added 3 parts Lahmian Medium to 1 part Teclis Blue and mixed it together on a palette (shiny white wall tiles are the best) to create a glaze. The idea with a glaze is to gradually build up translucent layers. Being able to see the layer beneath the glaze really aids the blending effect. The more glaze layers you add, the more opaque the colour becomes. So to put this theory into practice take your mix and apply it to where you want dark shading to appear. Use reference material to work out where the dark areas should be. Plan ahead and try to cover more area with Teclis Blue so you get the correct amount of coverage with your later darker colours within the Teclis Blue layer.

3. For this step we need to create a Alaitoc Blue glaze using Lahmian Medium. Ratio is the same as above (3 parts medium to 1 part paint). Now use the glaze to build up a couple more coats over the top of the previous Teclis Blue layer. Be sure to leave some Teclis Blue showing (hence why I said plan ahead and paint a larger area). Make sure you let each glaze layer dry before applying the next. If your mix starts to dry on your palette add a touch of clean water to it. Vallejo make a retardant which slows down the drying time, this does help but you’ll be waiting an absolute age for each layer to dry. The retardant should be used for wet blending, but that’s a completely different subject.

4. If you judged the size of your dark areas correctly your darkest colour (Kantor Blue) should fit within the previous Alaitoc Blue layer and still cover the correct amount of space. Make a glaze as per the previous stages using Kantor Blue and apply it using several thin coats to build up a darker colour.

5. Now we need to highlight the blade up. Mix 50:50 Temple Guard Blue with Ceramite White on your palette. Then mix 3 parts Lahmian Medium to 1 part paint. Lightly paint on (glaze) thin layers onto the areas where you want the lightest colours to show. This will take around four thin layers. Once again try to anticipate the area of coverage the lightest area will cover and work larger then that.

6. Create a White Glaze and paint a couple of thin layers within the previous layer leaving some of the previous layer showing through. These previous layers are transitions of colour called a gradient.

7. Finally, and probably the scariest part of this process is to paint the thinnest lines of Ceramite White you possible can. The outer edges are easy, for those all you have to do is load your brush up with slightly watered down Ceramite White, wipe some off on a tissue twisting the brush as you do so to ensure your brush has a good point and then using the side of the brush held at a 45º angle run it along the edge of the blade. This side of the brush edging technique only works on outer edges, the edge running down the middle of the blade will require a freehand line painted. Place the model on your desk so there is zero movement. Then starting at the top with watered down white paint steadily pull the brush towards you. If you have the consistency of your paint right the paint should flow freely with minimal pressure or dragging from you. If you’re using thick sticky paint you really have to drag the bristles over the area and you’re just going to get thick wobbly lumpy lines.
This detailed tutorial has been quite time consuming to produce. I like to think that the Tale of Painter’s tutorials are not only the easiest to follow but also of the highest quality on the web. We take great pride in our tutorials and get a massive buzz when people contact us with their completed models they’ve painted using the guides found on this blog. Remember, these high quality tutorials are free.
If you’d like to follow a 28 step tutorial to paint the Necron Lord himself then click this link.
Do you like our tutorials and reviews? Here is what you can do to support us: Check out the websites of our sponsors, place your next orders at Wayland Games by clicking here or on the banner on the right. Thank you very much, we appreciate any help to keep us going!

15 Comments
Leave a Reply
Tale of Painters is the unofficial Warhammer hobby magazine run by hobbyists like you. Support our work by using the affiliate links from our partner stores for your next orders so we can continue to bring you fantastic FREE content every day:


![]()
![]()
Or support us directly:


Thank you for this tutorial and this really cool site! I just found it today while looking for tutorials on how to paint my Stout Hearted Heroes miniatures. I'm great at creating minis but not so great at painting them, lol. I was hoping to paint some up for our Kickstarter (over 200 stylized fantasy miniatures and creatures) but I don't think I can get good enough to make it for this project. With you help, I'll slay the next 😉
https://www.kickstarter.com/projects/rocketpiggames/stout-hearted-heroestm-dungeoneers?ref=nav_search
These look great, and I wish I could do them. Tried this great tutorial and failed miserably. Think I might need a face to face session.
I'll bookmark this Guys and use for my Grey Knight blades, thanks!
Can u suggest a variation for this using greens? i.e. GW paints? many thanks
Garfy, what do you think about doing a "New Citadel Range – a year after" follow-up review of the new paint range? Your original review at the release was very good and I'd be interested to read another one now that you've been using them for a year.
I have only played around with a few of them and think they're quite good.
Interesting idea for a blog post. Stahly's original review was really in depth and he used examples of how the paints work (useful because none of us knew what dry compounds and technical paints were). I'm not sure how useful a recap would be. It would literally be me just saying I pretty much just use GW paints now because I find them better then Vallejo. GW metallic aren't great, vallejo are better.
fair enough 🙂
Thanks a lot for this tutorial! 😀
Fantastic tutorial!
Whilst the basics are already known and tried by me, I completely blanked mixing in Lahmiun Medium so that's something learnt. 🙂
Awesome job, Garfy!
Very well written out and informative. Excellent stuff.
Very impressive shows that those with multi million pound companies can and should do better with their tutorials. I really enjoyed this good read.
Wonderful walk through. I think you broke down a very simple looking, but hard to execute technique very well.
Great guide thanks
Wow, thanks.
Can't wait to try this out.