
In this tutorial, I will explain how I painted the skin on my rendition of Spiteclaw’s Swarm, the Skaven warband from Warhammer Underworlds season 1, Shadespire. Thanks to Contrast paints I was able to come up with a very time-effective technique that looks great at an arms length. Allow me to explain in this five-step tutorial.
This tutorial assumes you have a good understanding of how to paint. Underneath each picture are the corresponding instructions. Each step shows the paint(s) I used during that step. If you need to expand your paint collection to follow the tutorial, check out our partner stores Wayland Games and Element Games, which offer an amazing range of paint brands at decent discounts.
Paints you will need for this tutorial:
Wraithbone Spray
Darkoath Flesh (Contrast)
Ungor Flesh (Layer)
Bugman’s Glow (Base)
Kislev Flesh (Layer)
Flayed One Flesh (Layer)
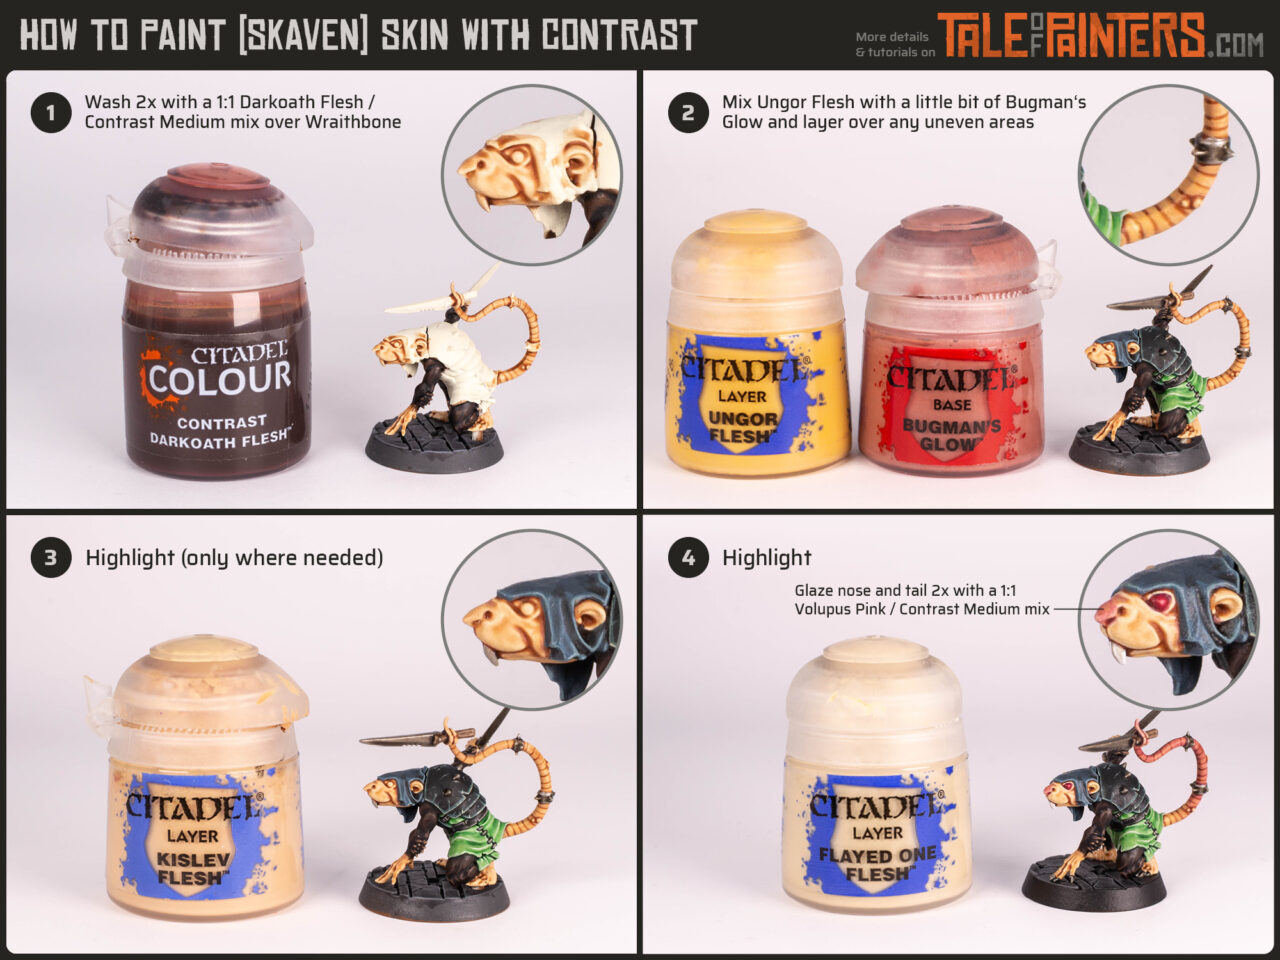
1. Undercoat the model with Wraithbone Spray. Wash the skin two times with a mix of Darkoath Flesh / Contrast Medium 1:1, taking care to not let the wash pool over flatter areas like the tail. By applying two thinned coats instead of a single thick one will help you keep the pooling to a minimum. You might want to darken some areas even more, like between the fingers, around the eyes, or the holes inside the ears. Recess wash these areas with pure Darkoath Flesh.
2. Despite your best efforts, you might end up with a couple of uneven spots, especially on the tail. Mix Ungor Flesh with a little bit of Bugman’s Glow to match the colour of Darkoath Flesh Contrast paint, and layer it over any areas where the Contrast paint dried to darkly or unevenly.
3. Highlight the skin with Kislev Flesh. I really needed to do this only in a few areas, as the Contrast paint did most of the highlighting work. I didn’t highlight the tail to save some time, as the highlights would be overpowered by the pink glaze anyways.
4. Finish the skin by emphasizing the natural highlights with a final highlight of Flayed One Skin. Then, mix Volupus Pink 1:1 with Contrast Medium and apply it to the nose and about 2/3 of the tail. You only want to glaze these areas, so don’t overload your brush or the miniature with the wash. Wipe your brush clean, pick up a little bit of pure contrast medium, and use it feather out the Volupus Pink on the tail. Once dry, repeat the process on the nose and tail, however, apply it only to about 1/2 of the tail to create a gradient. Done!
There you have it, a very quick and economic way to paint Skaven skin. This technique can, of course, be applied to human skin as well. Here is how I painted the remaining details of the face:
Mouth & Teeth
Basecoat Mouth: Doombull Brown
Basecoat Teeth: Formula P3 Trollblood Highlight
Layer Teeth: Reaper Master Series Polished Bone
Highlight Teeth: Vallejo Model Color White
Eyes
Basecoat: Wazdakka Red
Wash: Volupus Pink
Layer: Wazdakka Red
Highlight: Pink Horror
Highlight: The Army Painter Warpaints Scar Tissue
1 Comment
Leave a Reply
Tale of Painters is the unofficial Warhammer hobby magazine run by hobbyists like you. Support our work by using the affiliate links from our 🇺🇸 / 🇨🇦 partner stores for your next orders so we can continue to bring you fantastic FREE content every day:


Or support us directly:


Thanks for this. I have just bought a big batch of contrast paints, and looking to start using them.
I have a Skaven BB Team to paint as well, so this will come in very useful.
I’m wondering with a wraithbone basecoat though, should I fully undercoat with the rattlecan?
Usually with black I will not bother trying to get a full coat with the can, as i top it up with a brush. I think with Wraithbone though, the stuff in the pot is not the same colour as the stuff in the can, so might not be able to top up like I usually would.
I think for safety I’m just going to make sure I have a solid coverage from the can with the wraithbone.