
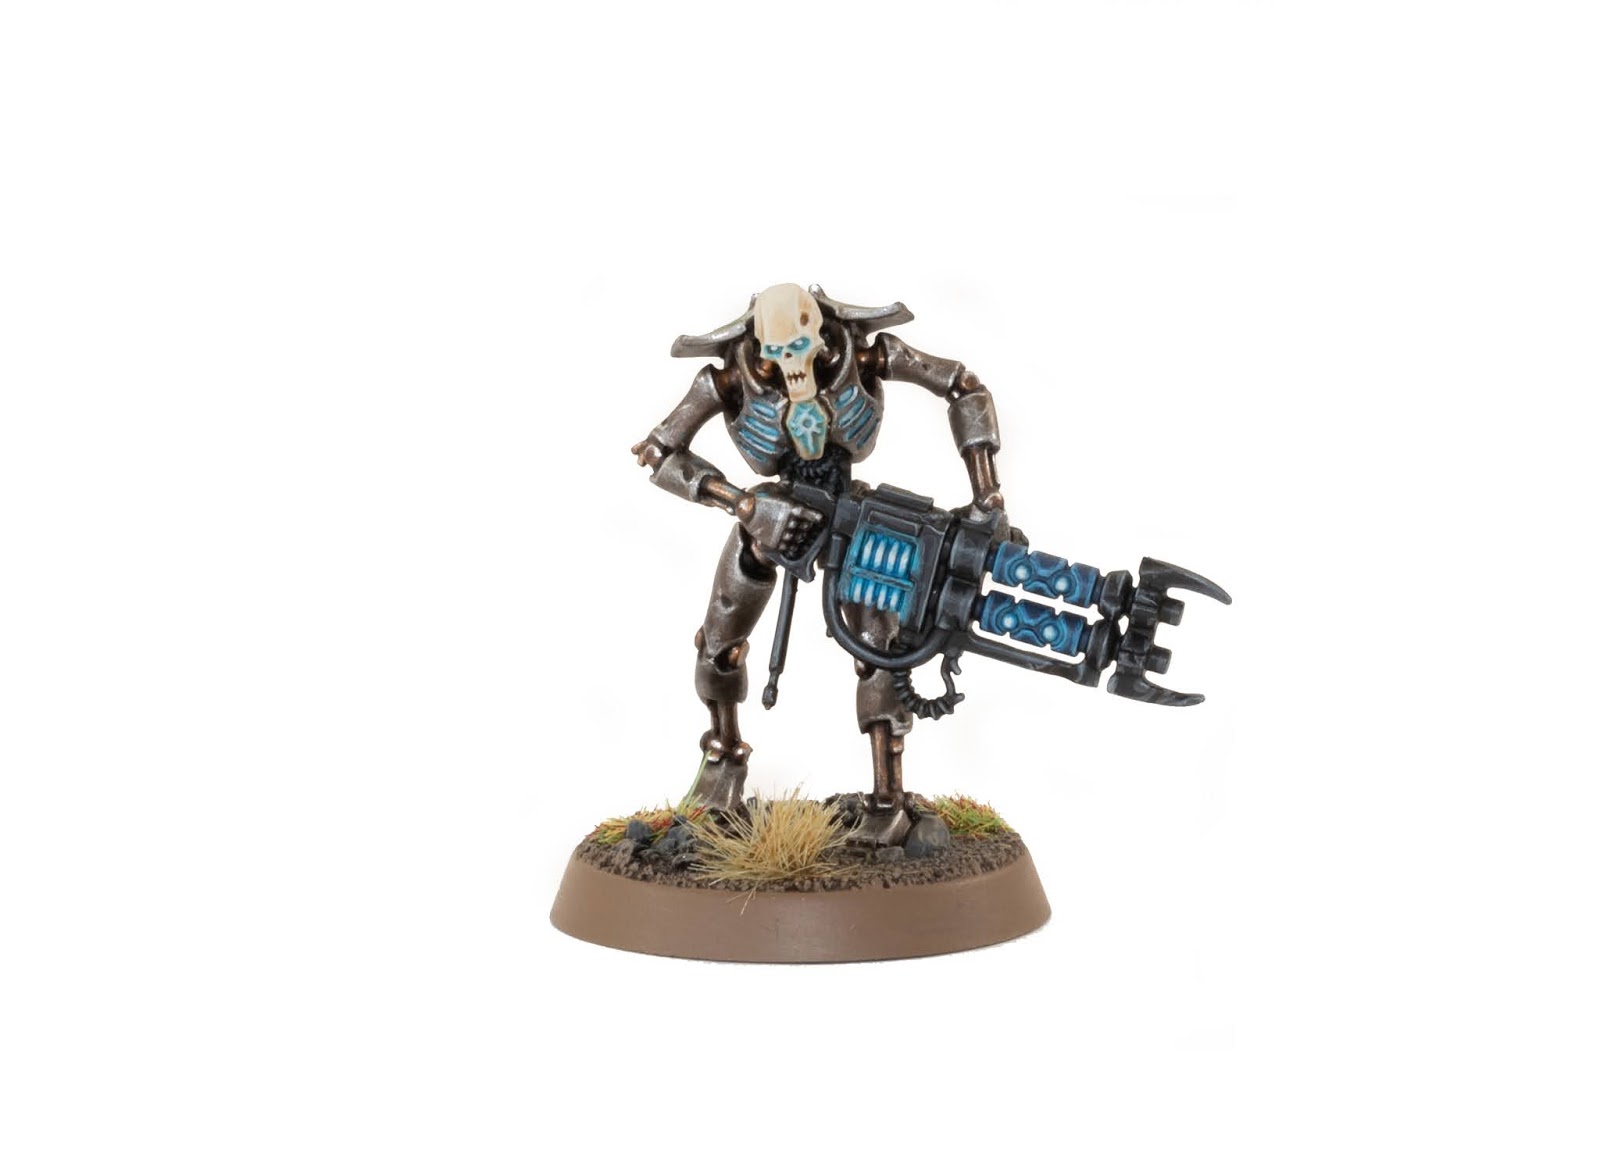
In today’s post, I share with you a complete step by step photo tutorial guide on how to paint a Necron Warrior from the Indomitus set in a paint scheme I devised for my Occiputek Dynasty. More after the jump!
This tutorial assumes you have a basic understanding of how to paint. For the beginners, I will explain the techniques as I go along. Each picture below shows four chronological steps. Underneath each picture are the corresponding instructions. Each step shows the paint I used during that step.
Paints you will need for this tutorial:
Black Undercoat
Castellax Bronze (Layer)
Leadbelcher (Base)
Contrast Medium (Technical)
Nuln Oil (Shade)
Agrax Earthshade (Shade)
Brass Scorpion (Layer)
Stormhost (Layer)
Mechanicus Standard Grey (Base)
Celestra Grey (Base)
Kantor Blue (Base)
Teclis Blue (Layer)
Lothern Blue (Layer)
Corax White (Base)
Wraithbone (Base)
Skeleton Horde (Contrast)
Screaming Skull (Layer)
Snakebite Leather (Contrast)
Temple Guard Blue (Layer)
Ulthuan Grey (Layer)
If you need to expand your paint collection to follow the tutorial, check out our partner stores Wayland Games and Element Games, which offer an amazing range of paints at a discount.
Necrons painting guide

1. Undercoat the model black.
2. Paint the Necron torso and limbs with Castellax Bronze. ToP TIP: A touch of Lahmian Medium in your metallics will make them smoother to paint with.
3. Paint the torso and limb armour sections with Leadbelcher leaving the skeletal pistons and joints as Castellax Bronze.
4. Mix 3 parts Nuln Oil with 1 part Contrast Medium and wash over the entire model. The Contrast medium helps pull the wash into all the recesses intensifying the shading.

5. Mix 3 parts Agrax Earthshade with 1 part Contrast Medium and wash over the entire model. The Contrast medium helps pull the wash into all the recesses intensifying the shading.
6. Highlight the torso and limb armour by reapplying Leadbelcher. Just do this on the upper parts of the armour where it would naturally catch the light so you leave some of the two previous steps showing through. If you’re painting a lot of Necrons you can lightly drybrush this stage.
7. Highlight the skeletal pistons and joints with Brass Scorpion
8. Fine line edge highlight the metal and bronze areas with Stormhost Silver.

9. Paint some thick highlights of Mecharius Standard Grey on the black weapon
10. Apply thin edge highlights of Celestra Grey over the previous step. .
11. Mix 3 parts Nuln Oil with 1 part Contrast Medium and wash the entire weapon to help the blend the layering in.
12. Paint barrels of the weapon with Kantor Blue.

13. Paint the energy cell of the weapon with Teclis Blue. Then paint a thick edge highlight with Teclis blue on all the edges of the barrels.
14. Paint a thin edge highlight with Lothern Blue on all the edges of the barrels.
15. Water down Corax White and paint the head and chest emblem. This might take up to 3 coats.
16. Paint the head and chest emblem with Wraithbone.
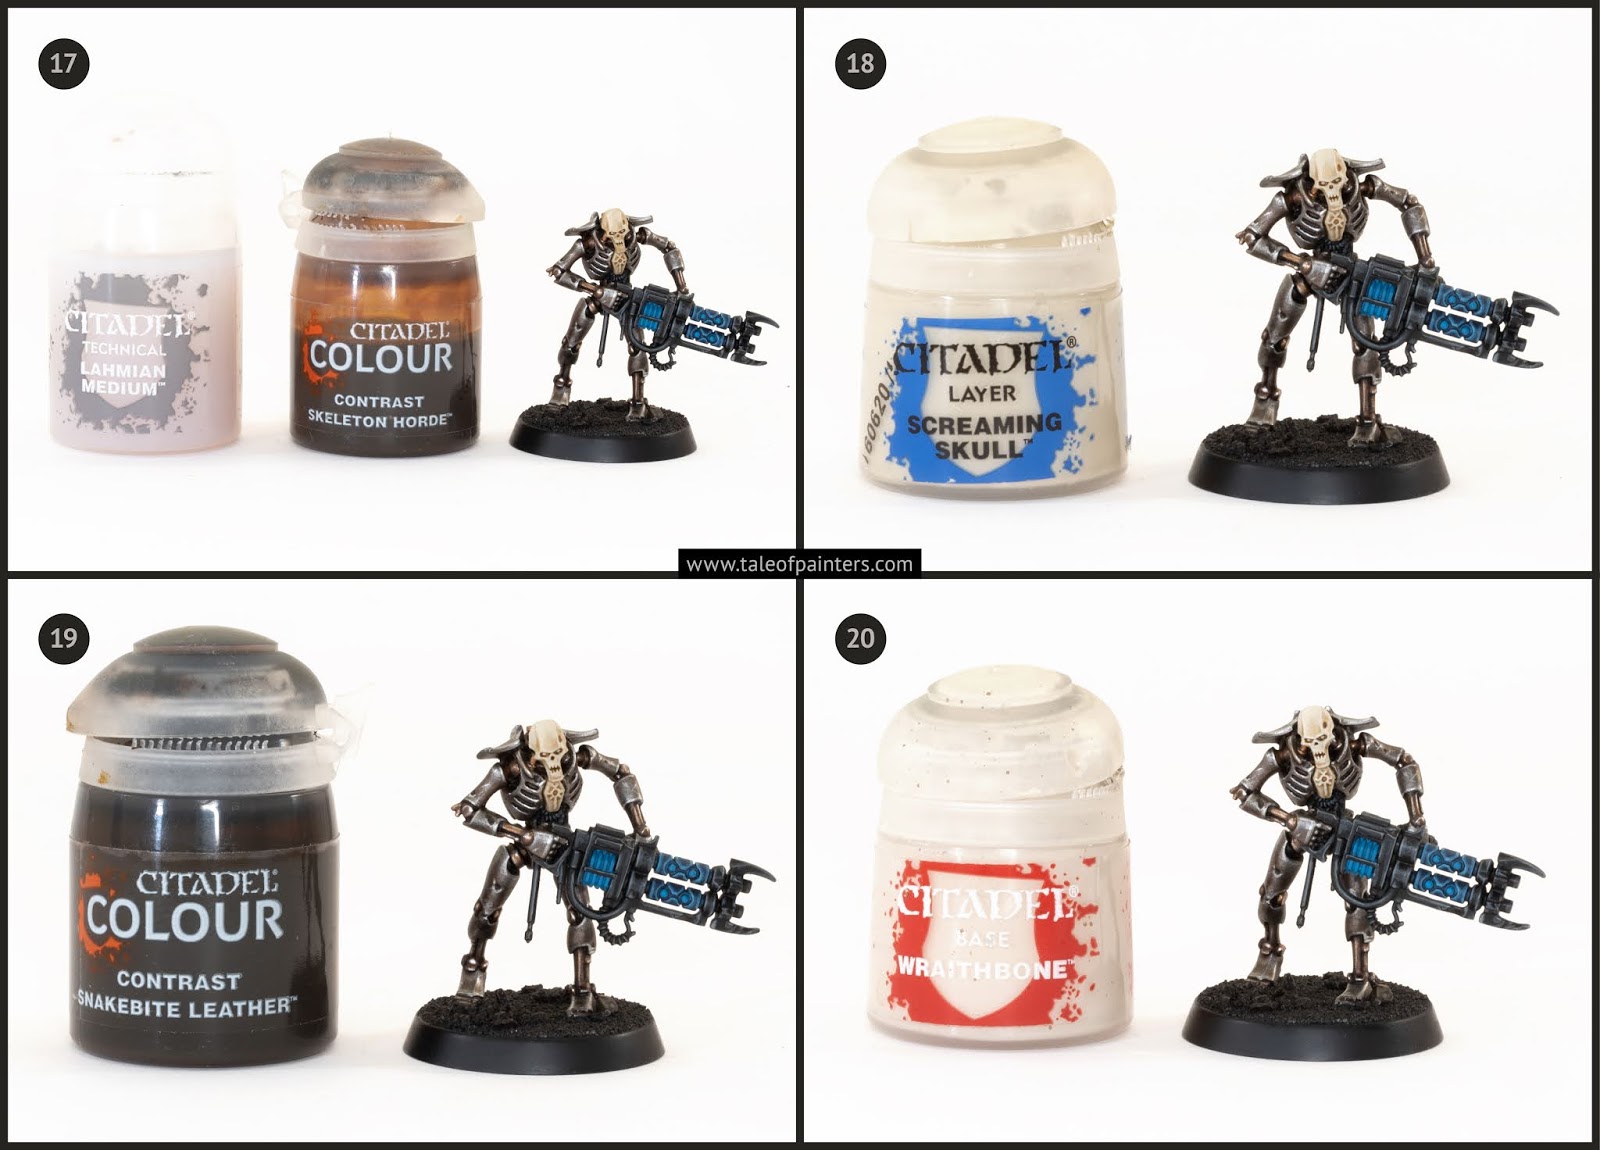
17. Thin Skeleton Horde contrast with by mixing 1 part Skeleton Horde with 1 part Lahmian Medium and lightly wash the head and chest emblem.
18. Highlight the head and chest emblem with Screaming Skull. I found highlighting several with thinned translucent layers gave a softer look. You can thin with water or Lahmian Medium.
19. Paint Snakebite Contrast into the deepest recesses like the mouth and nose. .
20. Edge highlight the head and chest emblem with Wraithbone.
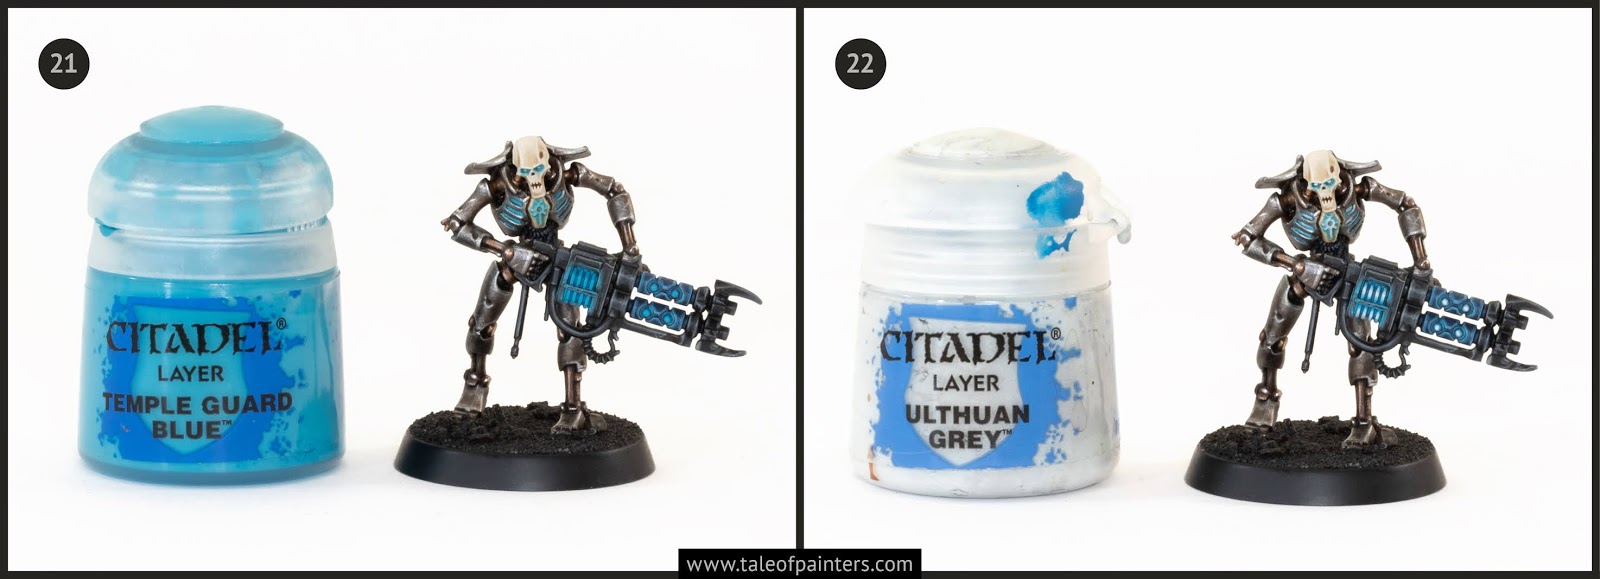
21. Mix 1 part Temple Guard Blue with 2 parts Lahmian medium to create a glaze and paint a thin translucent layer around the icon on the chest, between the ribs, the eyes and power core.
22. Paint the eyes, chest icon, between the ribs and power cell with Ulthuan Grey.
To finish the bases, PVA glue sand to the base. Once dry, paint the entire base with Steel Legion Drab, then wash the sand with Agrax Earthshade. Once dry, drybrush the sand with Karak Stone. Add static grass and grass tufts to decorate.

Thanks for checking out my tutorial. A tutorial for painting Flayed Ones in my Occiputek paint scheme can be found here.
And here is another one for speedpainting the characteristic brass armour of the Szarekhan Necrons dynasty:
And check out this super easy Gauss glow effect by using Nihilakh Oxide technical paint:

17 Comments
Leave a Reply
Tale of Painters is the unofficial Warhammer hobby magazine run by hobbyists like you. Support our work by using the affiliate links from our 🇺🇸 / 🇨🇦 partner stores for your next orders so we can continue to bring you fantastic FREE content every day:


Or support us directly:


First off, I just want to say you are an awesome painter and greatly appreciate you sharing you knowledge. I am starting my painting adventure with an army of necrons and having been following along with your tutorials. (Which are super helpful) any chance of a run down of what you did for the legs of the reanimator? (As the legs seem to be the only deviation from the necron warrior tutorial color scheme) if you have done any vehicle armor plates, a brief explainer on that would also be amazing. Thanks again
Reanimator legs are basically the gun parts of this tutorial.
Hi Garfy I'm new to the hobbie and am following this scheme as it looks amazing ! For real it looks incredible you have done a wicked job. As I'm buying all the paints at onnce I would like to use the same ones when possible. With step 21 and using Temple Guard Blue, is there any difference to using a new blue paint? Or could I just use the Lothern Blue from the previous step?Thanks !
Looks brilliant – incredible detail! I really like how the Necron models have been developed since the first plastics came out years ago, but it is very rare that I see a Necron paint scheme that really works like those of other armies do. This one looks excellent.
Have the Necron Warriors in the latest GW releases been up-scaled at all compared to the original plastic Necrons, like other ranges have? Cheers.
Seems like picture 21/22 is bugged? Super tutorial though! Love it!
Thanks Takeshi.
Excellent tutorial. I love these step by step photos…wheter it's cooking tutorials or painting 🙂 Please keep them cooming as I'm always learning new things here. Cheers from Vienna.
Amazing color scheme! Got some questions:
Is there any benefits of painting Leadbelcher over Castellax Bronze for the metal parts or could I just go straight to painting Leadbelcher over the black?
With what regular color would you replace the contrast paint?
Thanks!
The benefit is it's quicker with an airbrush or large brush to paint the whole model with Castellax. If you want to pick out the just the skeleton with Castellax that's cool.
What a superb Dynasty colour scheme. Thanks for the tutorial, I'm looking forward to trying this blue glow technique.
Hi, I love this color scheme.
I want to make the same for my necron.
I just have a question :
How do you plan to paint the shell of Canoptek Reanimator ?
And how you will paint vehicles (flyers, monolith…) ?
Thank you !
Hi Fabius. In My Plasmancer and Cyrptothralls post you'll see the bladed limbs of the thralls are painted blue and black.
The "Scheme Rules" for the army are:
Skeletal Frames – Bronze
Body pieces – Metal
Heads, chest icons and hanging decorations – bone
weapons, vehicles, bladed limbs. etc will be a combination of black and dark blue (see Cryptrothralls arms and necron warrior guns)
I'm working on the Skorptekh Lord at the moment and his legs are a good example of how i'm going to paint the reanimator. Will post soon or follow me on twitter for more WIP updates: garfytwit
Thank you very much !
I hope you will do a tutorial for the (vehicles, dark limbs…) black/dark blue 🙂
You are very inspiring !
As always, excelent tutorial Garfy. I'll follow your metallics recipe for my Necrons too.
Cheers
Does the contrast medium work better with the GW washes than say the Lahmian Medium?
It's not that it works better, they do two different jobs. The lahmian medium thins the shades. If your shade is too intensive then thinning with Lahmian medium will lessen it's intensity. Contrast medium sucks the paint into the recesses more so it makes the washes act a bit more like you'd expect washes to work by concentrating the wash into the deepest areas.
Funny, cause I use Lahmian Medium and Contrast Medium the exact opposite way. Both mediums make shades less intense of course, but I prefer Lahmian when I want the wash to settle more in the recesses, and Contrast Medium when I want a more even glazing effect.