
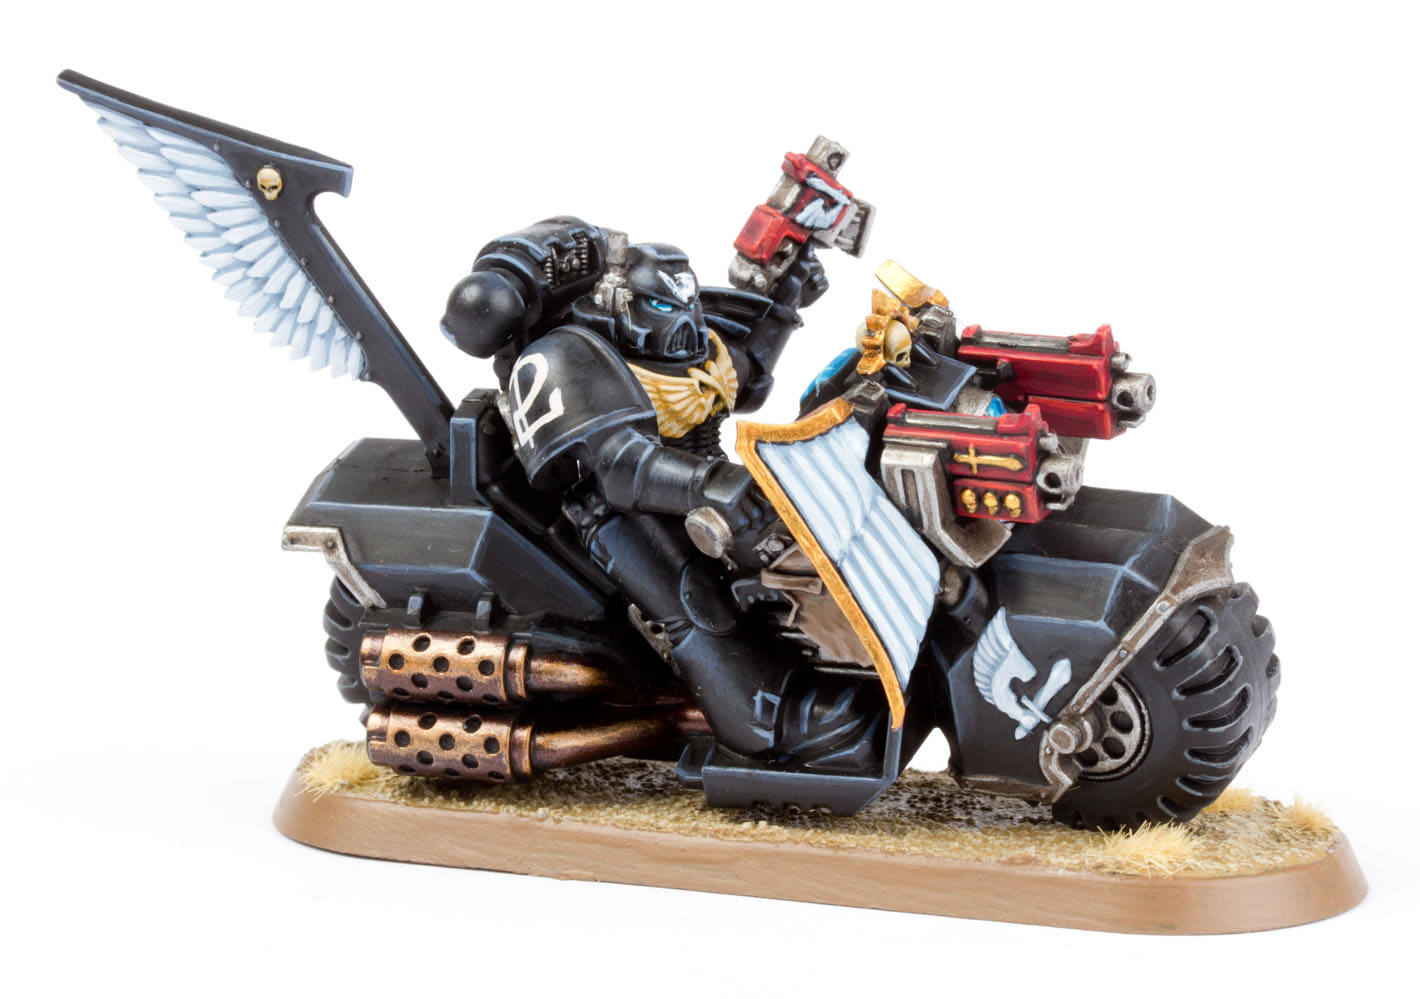
In today’s post I share with your a complete photo tutorial guide to paint the Ravenwing Biker from the Dark Vengeance boxed game. What are you waiting for, more after the jump!
This tutorial assumes you have a basic understanding of how to paint. For the beginners, I will explain the techniques as I go along. Each picture below shows four chronological steps. Underneath each picture are the corresponding instructions. Each step shows the paint I used during that step.
Paints you will need for this tutorial:
- Black Undercoat
- Eshin Grey (layer)
- The Fang (base)
- Russ Grey (layer)
- Nuln Oil (shade)
- Leadbelcher (base)
- Agrax Earthshade (shade)
- Iron Breaker (layer)
- Khorne Red (layer)
- Evil Sunz Scarlett (layer)
- Wild Rider Red (layer)
- Fenrisian Grey (layer)
- Ceramite White (base)
- Zamesi Desert (layer)
- Ushabti Bone (layer)
- XV88 (base)
- Baneblade Brown (layer)
- Rakarth Flesh (base)
- Dawnstone (layer)
- Warplock Bronze (base)
- Brass Scorpion (layer)
- Teclis Blue (layer)
- Temple Guard Blue (layer)
- Gehenna’s Gold (layer)
- Auric Armour Gold (layer)
- Pallid Wych Flesh (layer)
- Armageddon Dust (Texture)
If you need to expand your paint collection, check out our 🇬🇧/🇪🇺 partner stores Wayland Games, Element Games, and Firestorm Games, at 🇩🇪 Taschengelddieb and PK-Pro, and at 🇺🇸 Noble Knight Games, which all offer an amazing range of paints and hobby products at a discount. Using our links helps to support Tale of Painters at no additional cost to you, so thank you very much for using them!

1. Undercoat the model using a black undercoat. I use Vallejo surface primer with my airbrush.
2. Create a mix of Eshin Grey and Lahmian Medium (50:50) and paint a thin layer (a glaze) over all the rounded areas of the armour that would catch natural light. Once dry, repeat to build the intensity. It’s these thin layers that create such nice soft blends.
3. Create another glaze but this time it’s a 50:50 mix of the Fang and Lahmian Medium. Paint a couple of thin coats of this mix over the top of the previous layer being careful to blend it in.
4. With a fine detail brush, paint the upper sharp edges of the armour with Russ Grey to represent glints of light on the edges.

5. Nuln Oil is used as a thin layer over our blending to help tone it down and blend it all together.
6. Pick out any metal areas with Leadbelcher.
7. Wash the metallic areas with Agrax Earthshade.
8. Highlight the edges of the metals with Iron Breaker using a fine detail brush.

9. Paint the bolter casings with Khorne Red.
10. Highlight the previous areas with Evil Sunz Scarlett.
11. Edge highlight the red areas with Wild Rider Red and a fine detail brush.
12. Basecoat any feathers with Fenrisian Grey.

13. Carefully pick out each individual feather with Ceramite White. This might take a couple of coats to get a solid coat. Water your paint a touch to make it flow from the brush easier. It makes for a more accurate method.
14. Paint any skulls and the chest Aquilla with Zamesi Desert.
15. Highlight the skulls and chest Aquilla with Ushabti Bone. Make sure you leave some Zamesi Desert showing through for shading.
16. Water down some XV-88 and use it to shade the skulls and Aquilla. Just paint thin lines in the recesses.

17. Paint any scrolls or parchments with Baneblade Brown.
18. Highlight the scrolls/parchments with Rakarth Flesh.
19. Run a wash of Agrax Earthshade over the scrolls and parchment areas.
20. Paint thin edge highlight lines of Dawnstone onto the rubberised areas under the armour pieces (elbows, back of knees, groin etc). Add edge highlights to the tyres.

21. Paint the exhaust system with Warplock Bronze.
22. Highlight the exhaust with Brass Scorpion.
23. The eyes actually require three steps. Firstly paint Teclis Blue into the lens leaving a black area showing in the upper most corner furthest from the nose. Then paint a line of Temple Guard Blue along the bottom of the lens. Finally, paint a thinner white line below the line of Temple Guard Blue and paint a white dot in the middle of the black area you left. Use these colours to paint the headlight and bikes rider display.
24. Paint all the gold areas with Gehenna’s Gold. This might take a couple of coats. Thin the metals with Lahmian Medium to make your paints smoother.

25. Highlight the Gold areas with Auric Armour Gold.
26. Any large blank areas are great for decals. Use them for squad or chapter markings. I painted this squad number on the shoulder pad using Pallid Wych Flesh.
27. Finally, base the model in a way which fits in with your collection. I used Armageddon Dust texture paint highlighted with Screaming Skull and the base edge was painted with Steel Legion Drab.
Come back soon as a couple more Space Marine tutorials in the pipeline. Hope you enjoyed this one.

21 Comments
Leave a Reply
Tale of Painters is the unofficial Warhammer hobby magazine run by hobbyists like you. Support our work by using the affiliate links from our partner stores for your next orders so we can continue to bring you fantastic FREE content every day:


![]()
![]()
Or support us directly:


Thanks Garfy! 3 years later and still providing value to all of us!
I know that painting takes a while in general, so you adding the steps, photos and this guide in order to show us your process… it's triple what it would have taken for a showcase. Just wanted to say I greatly appreciate your work!
Thanks for the appreciate Unknown. It's my pleasure. I'm proud to be a part of the Tale of Painters crew and offer free tutorials.
Hi,
I don't have baneblade brown.
What colour can I take instead ?
Hi,
i have a question.
Does Nuln Oil make the Black a little bit shiny? I cant see anything on the miniature, but i think its a wash and it will always look a little bit shiny.
I guess it can do if it catches the light a certain way. It's not shiny like an ink. You can make your own wash from lots of lahmian medium and Abaddon Black, that would give similar result without the shininess. Paint it thin though. It's just to help darken and blend the gradients.
Garfy, have you found a replacement for Ogryn Flesh shade other then the new lines Reikland Flesh Shade? I still follow the Master Class PDF's on painting face, one and redux, if your not familuar with the 2 PDF's that were released by Games-Workshop a few years ago, I'll post them here in case.
https://dl.dropboxusercontent.com/u/92669553/White%20Dwarf%20Masterclasses/m2570007_PaintingFacesMasterclass.pdf
And
https://dl.dropboxusercontent.com/u/92669553/White%20Dwarf%20Masterclasses/m820035a_Painting_Faces_Redux.pdf
No worries they were public and available at one time so they are legal. Also I still have an abundant amount of the old colours and I bottled them in dropper bottles and sparingly use them. Take care my friend.
Randy, AKA relicpainting
Relic painting, thanks for sharing this useful reference. And Hardy thanks as always for a great (& free) tutorial I've found that basecoating the gold areas with baneblade brown makes the gold smoother and more consistent. I am a little surprised that you didn't highlight the gold areas further using a 50:50 mix of Auric Armour Gold and Runefang Steel as there are some nice crisp edges that might have benefited from a little more (personal opinion) but great method and nice to get a good tutorial on machine edge highlighting
For the rank and file models I try to keep the steps to a minimum. Makes it quicker. it's actually quite a fun challenge trying to produce a great looking model whilst being economical with the number of stages. It's definitely a plus that I can blend pots of colours together without intermediate steps.
I spend longer on Character models or larger centre pieces. Those models get the extra layers, deeper shading and more highlighting.
Thanks for taking the time to reply. The brown tip is a good one. Haven't done it for a while.
The effects you get in so few stages is awesome Garfy (blame my auto correct for renaming you in last post) I'd be quite interested in learning how you get your free hand work so crisp. I find my free hand brushstrokes are inconsistent in thickness yet yours are always spot on any tips you can share?
When it comes to freehand I thin my paints with water instead of Lahmian Medium. I find this way I get the smoother fluidity from the bristles but it doesn't make the paint as transparent as Lahmian Medium does. Thinning your paints is imperative because if you have to drag the brush to get thick paint off the bristles then you can't be accurate.
For the first steps I was thinking about going for a purple tint do you think that doing the 50/50 mix of nagaroth night and lahmian medium would work instead of eshin grey?
I haven't tried it so I can't give you an opinion. Try it out on a test mini. Let me know how you get on.
don't let negative comments get you down, i always appreciate your (and the others, too!) tutorials every time they're put up on here. keep up the great work!
Don't worry, I'm cool with the negative comments. I appreciate the time people take to write a comment wether it's good or bad. Sometimes I learn the most from the negative comments because I get to see something in a different light. Not this time though, the gold of the wings clashes with everything else made me laugh. It doesn't clash at all haha.
You are free to disagree of course.^^
And just to clarify this, I have no problem with the tutorial by itself, I agree that people will find it useful and of course I appreciate the time and work that you put into this.
I am not entirely sure why some people feel the need to defend the miniature/tutorial because it needs no defending – with "one of your [Garfys] weaker works" I do not mean to say "its horrible" but instead "it is not as good as you usual work, still quite good over all".
As someone who does a lot of art himself (although mostly writing) I can only say for myself that I can' stand it if nobody around me has something negative to say. After all, I want to improve and I can only do that if someone voices a critical opinion. That might just be me though.
tl;dr: I only wanted to help, sorry if I blew it or insulted someone 🙁
Very nice work. Can you do Space Wolves now, you have to do Space Wolves, please paint a Space Wolf.
You won me over! Even though I'm not painting ravenwing at the moment it still amazes me how you use Lahmian Medium, either its a flat medium or an extender or a thinning agent. Still can't wait for the green guys, black armor no problem. Green yeah. And thank you for the tip on blue eyes, I'm going to use it to distinguish other squads or find really small roman numeral transfers.
Sorry to say, but I think this is one of your weaker works. The white is a bit messy on the helmet and the right side of the wheelcasing. The gold on the wings clashes with the rest, in particular with the chest aquila – a darker gold or boltgun like the frame would probably help. Reducing the amount of different metals would further tie the model together.
I do not mean to be a "negative nancy" here but you do regularly present better work on this blog and I don't believe flattery would be in any way helpful.
I do look forward to other showcases and tutorials from you.
Can't win them all. I'm sure someone will find this free tutorial useful.
This bike looks incredible. Please share some of your work so we can pick it apart.
Garfy, thanks for posting this. I'm using it now and it's a great guide. Thank you!
For the first steps I was thinking about going for a purple tint do you think that doing the 50/50 mix of nagaroth night and lahmian medium would work instead of eshin grey?