
After pain-stakingly painting the Land Raider in the part one of this two part tutorial, we’re now going to wreck that immaculate paint job and dirty the old girl up using some simple techniques with detailed explanations. More after the jump.
Introduction
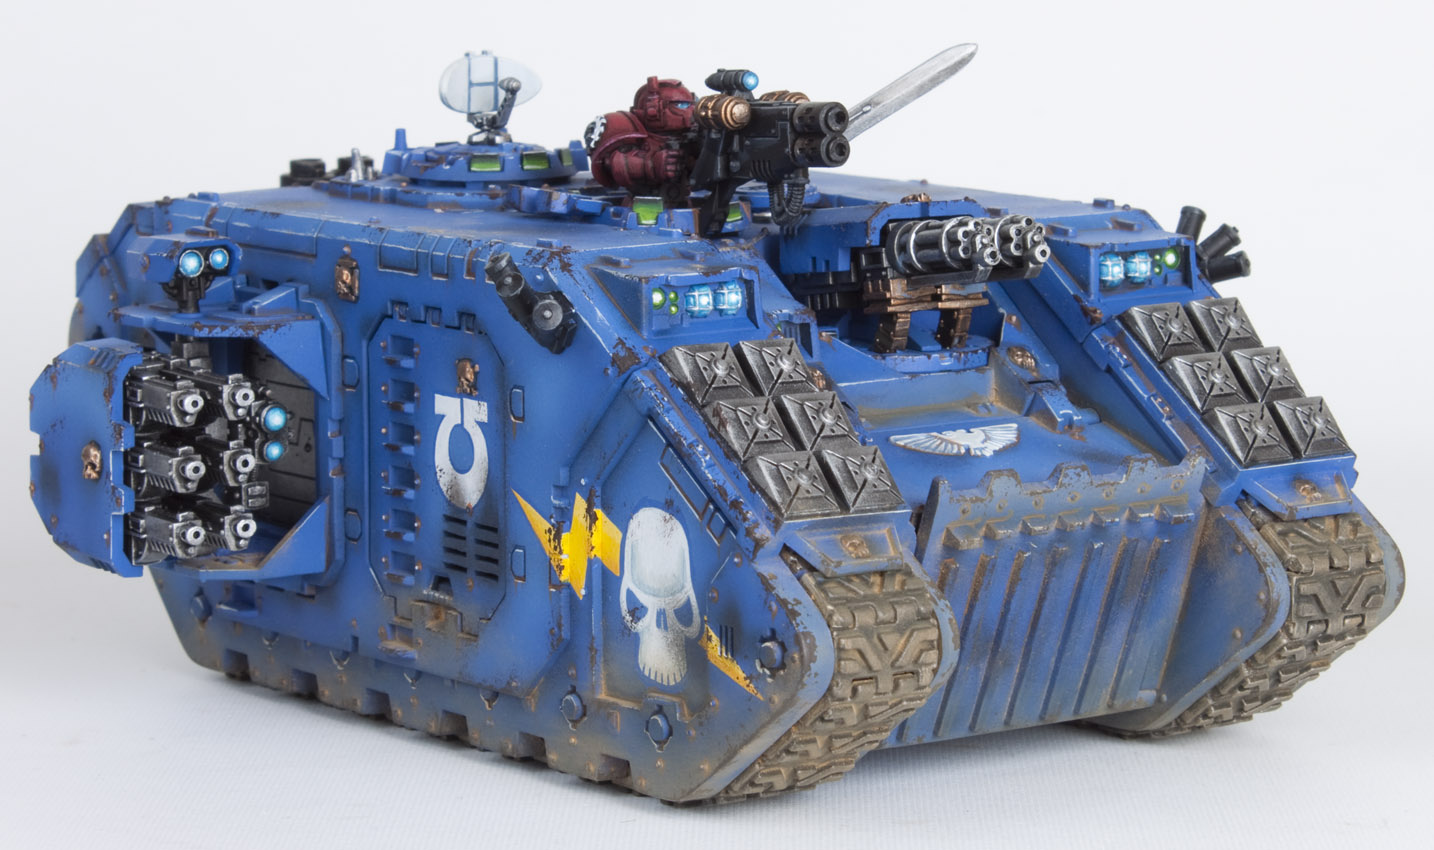
I use a 4 stage technique to weathering: rust, paint chipping, blast damage and dust. I layer each stage over the previous stage in a chronological way. You would have rust under the paint chipping, on top of the rust and chipping would be blast damage from previous battles and finally you have dust/sand/dirt from the tanks current activity adhered to all the previous layers. With this in mind, this is how I paint the 4 stages.
1. Rusty Rivets

Skrag Brown is a great orangey brown for rust. I water it down a fair bit and then with a small brush apply it around all the rivets and into some recesses. Don’t paint all the recesses, just paint it where water would collect and run into and create rust. Occasionally on some of the rivets paint a vertical line down away from the rivet to represent a rust streak/stain. I keep my lines thin so it’s not distracting. For ork vehicles you might want to thicken up your lines or use a rust weathering powder instead of Skrag Brown.
2. Paint Chipping


Because we’re painting rust in the previous stage, I don’t want to show metal under the chipping paint, instead I want to show a dark dirty brown chip that is rusty and encrusted in crud. To apply Rhinox hide to the model I use a piece of old blister pack foam. I dab the corner into the paint, dab it a couple of times on a tissue and then start dabbing the model lightly. Dab lightly and repeatedly in a concentrated area to build up the chipping, it’s better to do it this way then to just hit heavily in one go. The placement of the chipping has to be logical. Try to imagine protruding edges being caught on rough terrain or being clipped by small arms fire. Concentrate on these areas first. Around the tracked areas on the armour would feature a lot the damage as it dragged itself over rocks and ruins. Doors and assault ramps that hit the ground would also feature paint chipping. The top of the tank would have the least amount of chipping and the bottom and front would feature the most. Add some chipping to the flat panel areas to represent small arms fire. It doesn’t look right if you do an even symmetrical paint chipping all over. Keep it random while following the rules above.
3. Blast/Smoke Damage


Battlefields are smokey places and vehicles generate their own smoke, so it makes sense to show this on the model. We’ll start with the vehicle generated smoke first. Anywhere on the model where there is an exhaust pipe or a vent that would exhume oily smoke we need to show the damage that the smoke would create. To do this I use a Citadel Wash Brush and drybrush Abbadon Black in circular motions softly around the vents. Smoke is hot gas, so it rises. Make sure your drybrushing is on the vent and drifting upwards above the vent as well (you can see this better on the door in the picture above). Rockets and Grenades would create blast damage as they exploded nearby. Using the same circular motion dry brush technique apply some blast circles to the tank. I like to do this around the icons to blend them into the tank a bit. These blasts look better the lighter you do them. Your brush should be virtually dry with hardly any paint on it.
4. Dust/Dirt Weathering

Finally the tanks will fight in a filthy environment so we need to show this on the tank. My Ultramarines have desert bases so I use Forge World Dark Sand weathering powder. Once again logical application has to be applied. The tank will be dragging it’s hull through the sand, so the tracks need a liberal application of the powder. The bottom of the tank around the tracks would also be extremely dusty. It would also collect and sit in some of the recesses at the bottom of the tank. Any doors or assault ramps that would clan open and hit the sand would also get dusty. To apply the powder I just dab it on repeatedly with an old short bristled dry brush. Really hammer it on to the tank and build it up. Use a large different brush to lightly dust off any loose specks. You can seal this with spray varnish but be warned if you liberally apply the spray it soaks up the powder and it disappears. Instead use the spray varnish at arms length and very lightly.


It’s as simple as that. I’m quite a light weatherer but it all adds up and I think it’s just enough. If I was painting orks or aged necrons I would use the same effects just increase the frequency of them. For different war zone environments just change the weathering powder colour. If fighting in wet and muddy areas then the new basing texture paints are great. Just paint them straight from the pot and onto the tracks. The last point I want to make is about weaponry. Missiles, smoke launchers, assault frag launchers would all be replaced at the start of each battle so they would feature little to no weathering. This is why I haven’t weathered the weaponry.
Just one last thing to say… “Drive me closer, I want to hit them with my sword”.
Do you like our tutorials and reviews? Here is what you can do to support us: Check out the websites of our sponsors, place your next orders at Wayland Games by clicking here or on the banner on the right. Thank you very much, we appreciate any help to keep us going!

19 Comments
Leave a Reply
Tale of Painters is the unofficial Warhammer hobby magazine run by hobbyists like you. Support our work by using the affiliate links from our partner stores for your next orders so we can continue to bring you fantastic FREE content every day:


![]()
![]()
Or support us directly:


As always, a truly professionnal tutorial : clear, beautiful and full of great tips !
To be honest, would you make a book and/ord DVD of tutorials, i would buy it !
Keep going !
PS : thanks to your thunderhawk posts (and for my wife future displeasure), i will begin soon mine !
This is a great article… super helpful. Been wanting to weather my really clean Eldar vehicles for awhile now. Didn't know the Forge World powders were so easy to use… gotta look into it. Thanks!
Thanks mate.
BTW thats a very good looking Landraider. Not seen this before. Awesome stuff.
Garfy mentioning spraying varnish reminded me of a question i've been meaning to ask, how do you protect your models? Any chance of a tutorual?
I don't protect my models. I'm not a gamer so I don't see a need for varnish.
Great tutorial! But i dont have weathering powder and my FLGS rarely stock any FW products. What should i use that grant similiar effect as the weathering powder?
There are plenty of weathering products out there that you can order from gaming or model stores. Secret Weapon, Tamiya Weathering Master are both good alternatives. Ebay is also a good source. If you're in a real pinch, I've heard that people sometimes use artist's chalk scraped off to form your own powder. Haven't tried it, so I can't recommend it personally.
Thanks Gary 🙂
Wonderful tutorial. Really like the logical steps. Thanks!
This should help
http://taleofpainters.blogspot.co.uk/2011/11/review-rdg-tools-airbrush-and.html
Superb work !
What Airbrush and Compressor are you using ?
Fantastic work on this, and great little step by step as well! Cheerios!
Thanks for the tip Scrotrot.
Nice one! I use mig pigment fixer through an airbrush to fix mine. Seems to work quite well.
Thanks guys. Always a pleasure to create these tutorials.
Even if they drive closer I think he would still need to throw the sword ; )
I just recently tried weathering for the first time and was pleased with how simple it was and will definitely be trying out your tips. Many thanks for taking the time!
Will 100% be using this when I come to weathering my new tanks. Thanks again!
Congratulations and well done, looks even better.