
At last, a brand new tutorial on Tale of Painters! Find out how I painted my Skaven Blood Bowl team in this extensive, step-by-step tutorial, after the jump.
This tutorial assumes you have a good understanding of how to paint. Underneath each picture are the corresponding instructions. Each step shows the paint(s) I used during that step. The paint scheme I came up with involves paints from all sorts of brands. When I use a non-GW or OOP paint, I’ll provide you with suitable alternatives from the current Citadel paint range [in brackets] for a very close match.
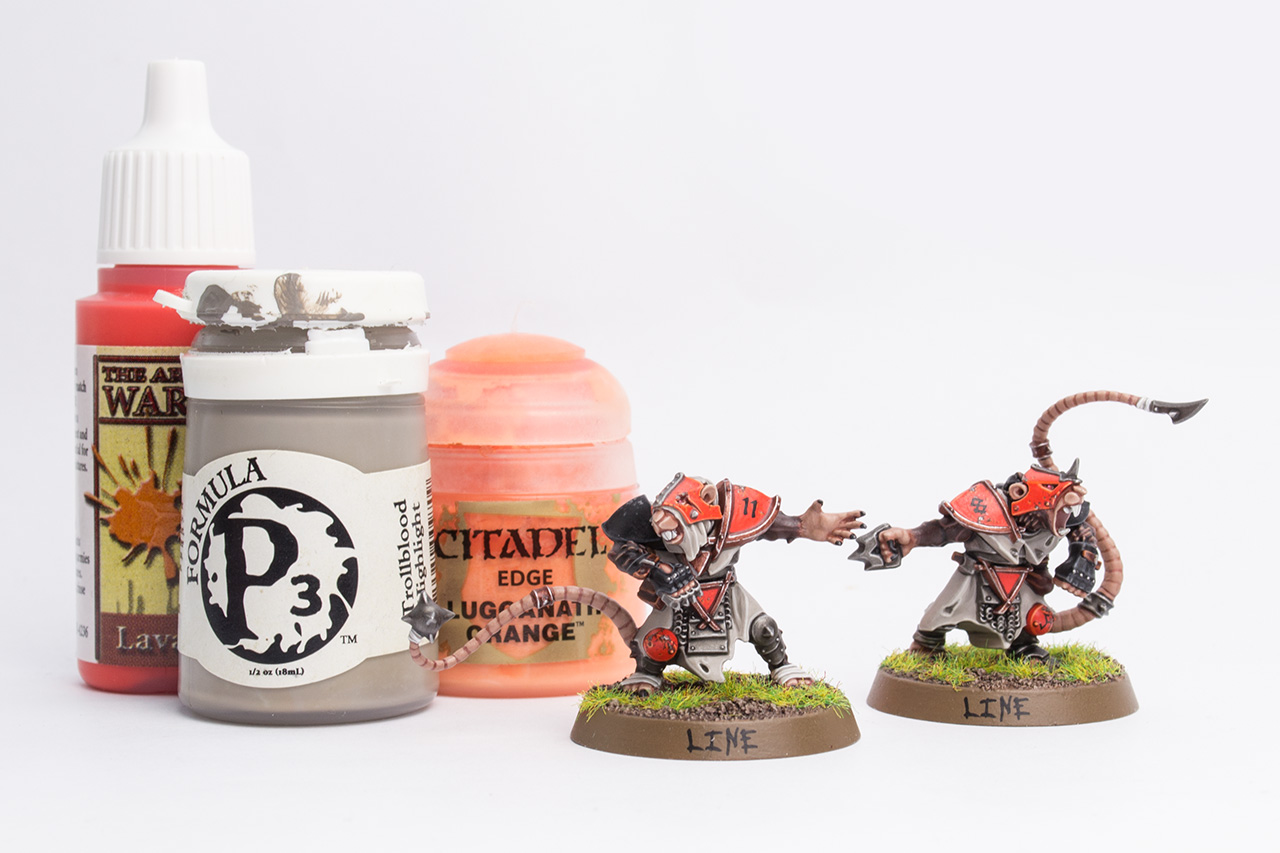
Paints I used for this tutorial:
- The Army Painter Leather Brown Color Primer [Mournfang Brown spray]
- Citadel Terminatus Stone
- Citadel Macharius Solar Orange (OOP) [Jokaero Orange]
- Citadel Fiery Orange (OOP) [Fire Dragon Bright]
- Citadel Lugganath Orange
- Citadel Scorched Brown [Rhinox Hide]
- Citadel Dheneb Stone (OOP) [Rakarth Flesh]
- Citadel Tallarn Flesh (OOP) [Cadian Fleshtone]
- Citadel Ogryn Flesh (OOP) [Reikland Fleshshade]
- Citadel Wazdakka Red
- Citadel Pink Horror
- Citadel Eshin Grey
- Citadel Vermin Brown (OOP) [Skrag Brown]
- Citadel Deathclaw Brown
- Citadel Codex Grey (OOP) [Dawnstone]
- Formula P3 Beast Hide [Baneblade Brown or Steel Legion Drab]
- Formula P3 Trollblood Highlight [Skavenblight Dinge]
- Formula P3 Bastion Grey [Stormvermin Fur]
- Reaper Master Series Polished Bone [Pallid Wych Flesh]
- Reaper Master Series Tanned Highlights [Kislev Flesh]
- Reaper Master Series Fair Skin [Flayed One Flesh]
- Warpaints Strong Tone Ink [Agrax Earthshade]
- Warpaints Dark Tone Ink [Nuln Oil]
- Warpaints Lava Orange [Troll Slayer Orange]
- Warpaints Gun Metal [Leadbelcher]
- Warpaints Plate Mail Metal [Ironbreaker]
- Warpaints Shining Silver [Runefang Steel]
- Vallejo Game Color Dark Fleshtone [Doombull Brown]
- Vallejo Game Color Squid Pink [Fulgrim Pink]
- Vallejo Game Color Hammered Copper [Screaming Bell]
- Vallejo Game Color Brown Ink [thinned Rhinox Hide]
- Vallejo Model Color Black [Abaddon Black]
- Vallejo Model Color White [White Scar]
If you need to expand your paint collection, check out our 🇬🇧/🇪🇺 partner stores Wayland Games, Element Games, and Firestorm Games, at 🇩🇪 Taschengelddieb and PK-Pro, and at 🇺🇸 Noble Knight Games, which all offer an amazing range of paints and hobby products at a discount. Using our links helps to support Tale of Painters at no additional cost to you, so thank you very much for using them!
How to paint Skavenblight Scramblers

1. The model was primed with Leather Brown Color Primer from The Army Painter. You could also use Mournfang Brown spray paint from Games Workshop, or any other brown primer. Stock black primer would work as well, but a brown basecoat will improve the coverage for most paints later used in this tutorial. Once the primer was dry, the texture of the base was heavily drybrushed with Terminatus Stone, then washed with Army Painter Strong Tone Ink [Agrax Earthshade or old Devlan Mud].
2. The orange armour was basecoated with two thin coats of old Macharius Solar Orange [Jokaero Orange]. This will save you some layers of Lava Orange later.
3. Multiple thin coats of Army Painter Lava Orange [Troll Slayer Orange] were applied over the orange basecoat. This will take a few layers for an even coverage.
4. Vallejo Game Color Dark Fleshtone [Doombull Brown] was painted directly into the recesses of the armour. Then, a small piece of blister sponge was ripped off, dabbed into paint and carefully “stamped” on the armour to add a chipped armour effect – this technique is called sponge weathering. Wipe any excess paint and don’t overdo the effect.
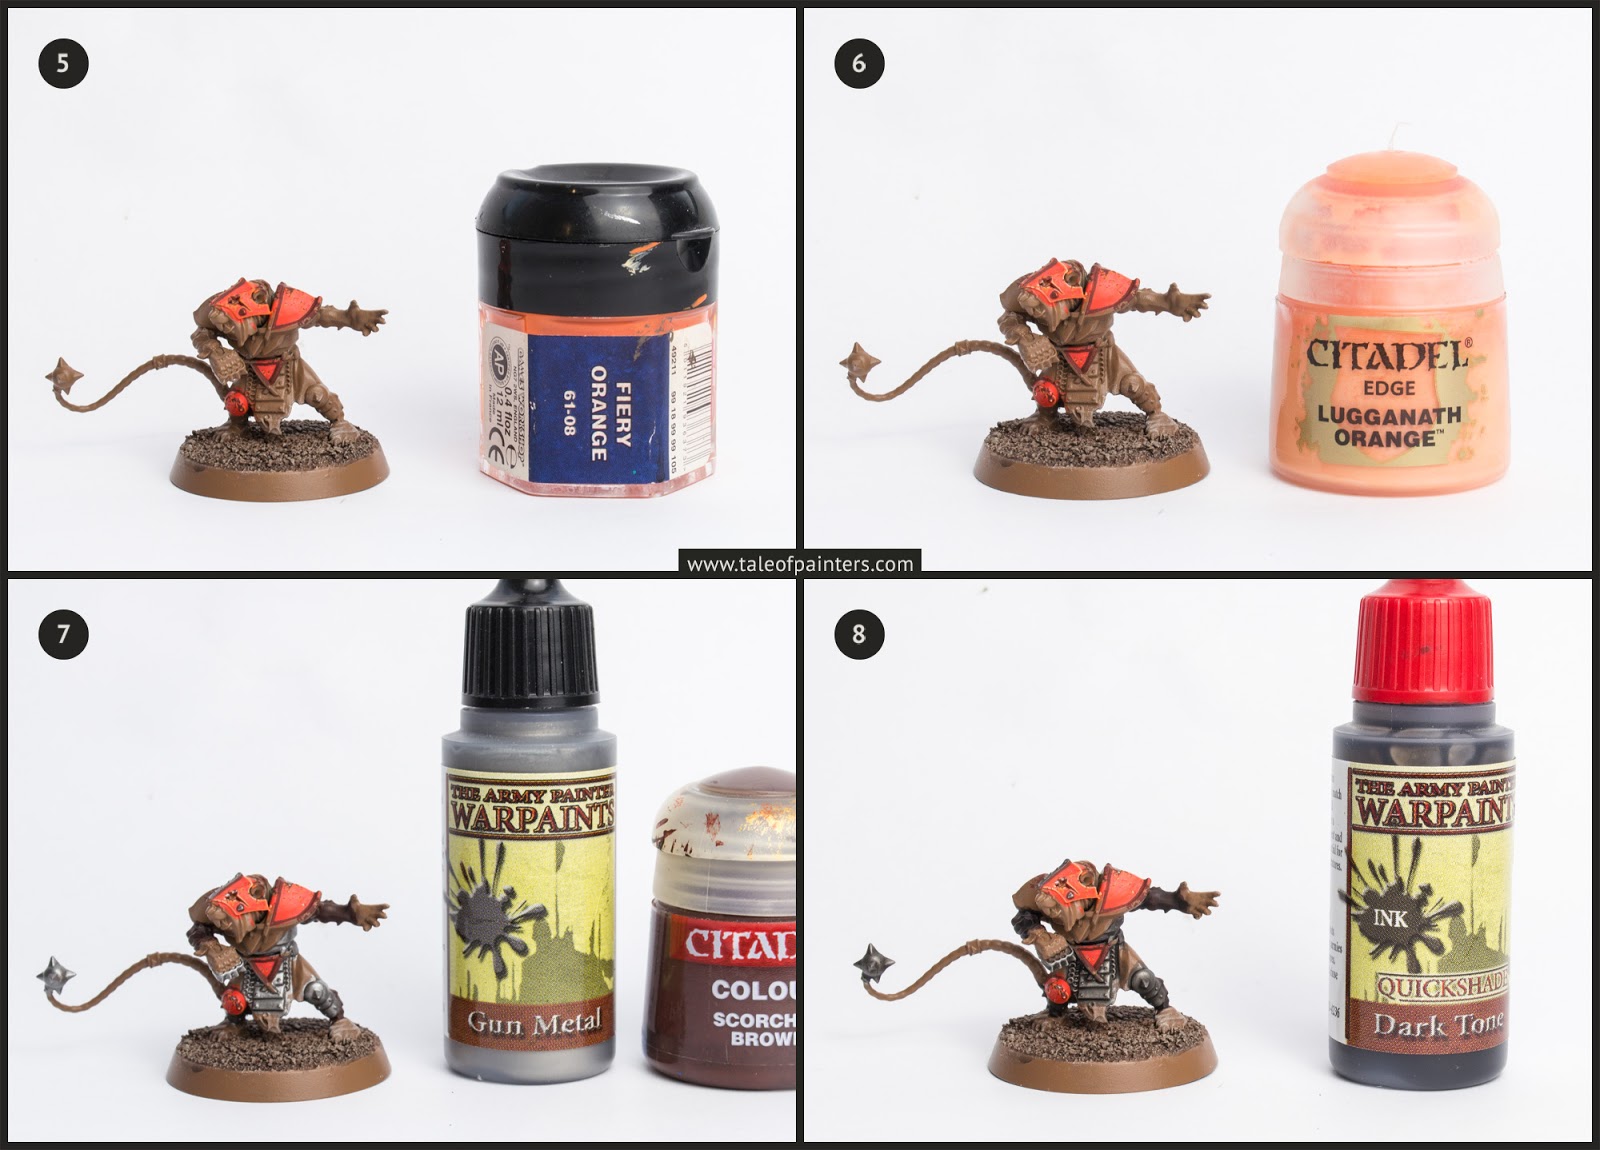
5. The armour and a couple of the larger chinks were highlighted with old Fiery Orange [Fire Dragon Bright].
6. Next, an even thinner edge highlight of Lugganath Orange was applied.
7. Small dots of Warpaints Gun Metal [Leadbelcher] were applied at the larger chinks in the armour. Then, the fur was basecoated with old Scorched Brown [Rhinox Hide], and the metal with Gun Metal [Leadbelcher].
8. Both fur and metal were washed with Warpaints Dark Tone Ink [Nuln Oil].

9. Once dry, Scorched Brown [Rhinox Hide] was layered over the muscles and fur.
10. Muscles and fur were further highlighted with a mix of Scorched Brown [Rhinox Hide] and Formula P3 Beast Hide [Baneblade Brown or Steel Legion Drab should come close].
11. Next, only the most prominent strands of fur were highlighted with pure Beast Hide.
12. The metal was edge highlighted with Warpaints Plate Mail Metal [Ironbreaker].

13. The clothes were painted with a couple of thin layers of old Dheneb Stone [Rakarth Flesh].
14. Recesses and folds were shaded with Formula P3 Trollblood Highlight [Skavenblight Dinge should be close].
15. A second stage of shading was applied with P3 Bastion Grey [Stormvermin Fur should be close]. You might need to get out the Trollblood Highlight again to smooth the transition.
16. Dheneb Stone was then used to clean up.

17. A highlight for the clothes was built up with two thinned coats of Reaper Master Series Polished Bone [Pallid Wych Flesh]. Pegasus relabeled some Reaper paints for the German market, so don’t mind the label.
18. I basecoated the skin with two coats of thinned Tallarn Flesh [Cadian Skintone is close but will unfortunately require much more coats for an even coverage]. I used the feathering technique for the transition between fur and skin.
19. The skin was washed with old Ogryn Flesh [Reikland Fleshshade is close but slighty less reddish, Warpaints Flesh Wash would also make a good replacement].
20. Then, I layered Tallarn Flesh, leaving the recesses dark from the wash.

21. A mix of Tallarn Flesh [Cadian Skintone] and Reaper Master Series Tanned Highlights [can be replaced with Kislev Flesh, though Tanned Highlights is more “rosy” and less yellowish] was used to build up the highlights for the skin.
22. I applied another, even lighter layer on the skin, with pure RMS Tanned Highlights [Kislev Flesh]. A final highlight of pure RMS Fair Skin [can be replaced with Flayed One Flesh, but again Fair Skin is more of a “rosy” tone] was applied only on the most prominent features – knuckles, nose, lips.
23. The eyes were painted with Wazdakka Red, then highlighted with Pink Horror and Vallejo Game Color Squid Pink [Fulgrim Pink, though it’s more pastel than Squid Pink].
24. The right pauldron, claws and glove were basecoated with Vallejo Model Color Black [Abaddon Black].

25. A highlight of Eshin Grey was applied to all black area. Then, just like with the orange armour, I sponge weathered the right pauldron with Eshin Grey, too.
26. The black was given a final edge highlight of old Codex Grey [Dawnstone]. I also highlighted the chinks in the armour, and applied some small dots of Gun Metal [Leadbelcher] in the centres of the larger chinks.
27. The mouth and the leather straps were basecoated with VGC Dark Fleshtone [Doombull Brown].
28. Only the leather was then washed with Dark Tone Ink [Nuln Oil].

29. The leather was highlighted with old Vermin Brown [Skrag Brown].
30. A final edge highlight of Deathclaw Brown was then added to the leather.
31. Armour trims and other embellishments were painted with VGC Hammered Copper [Screaming Bell].
32. VGC Brown Ink [can be replaced with thinned Rhinox Hide] was washed only into the recesses of the copper parts.
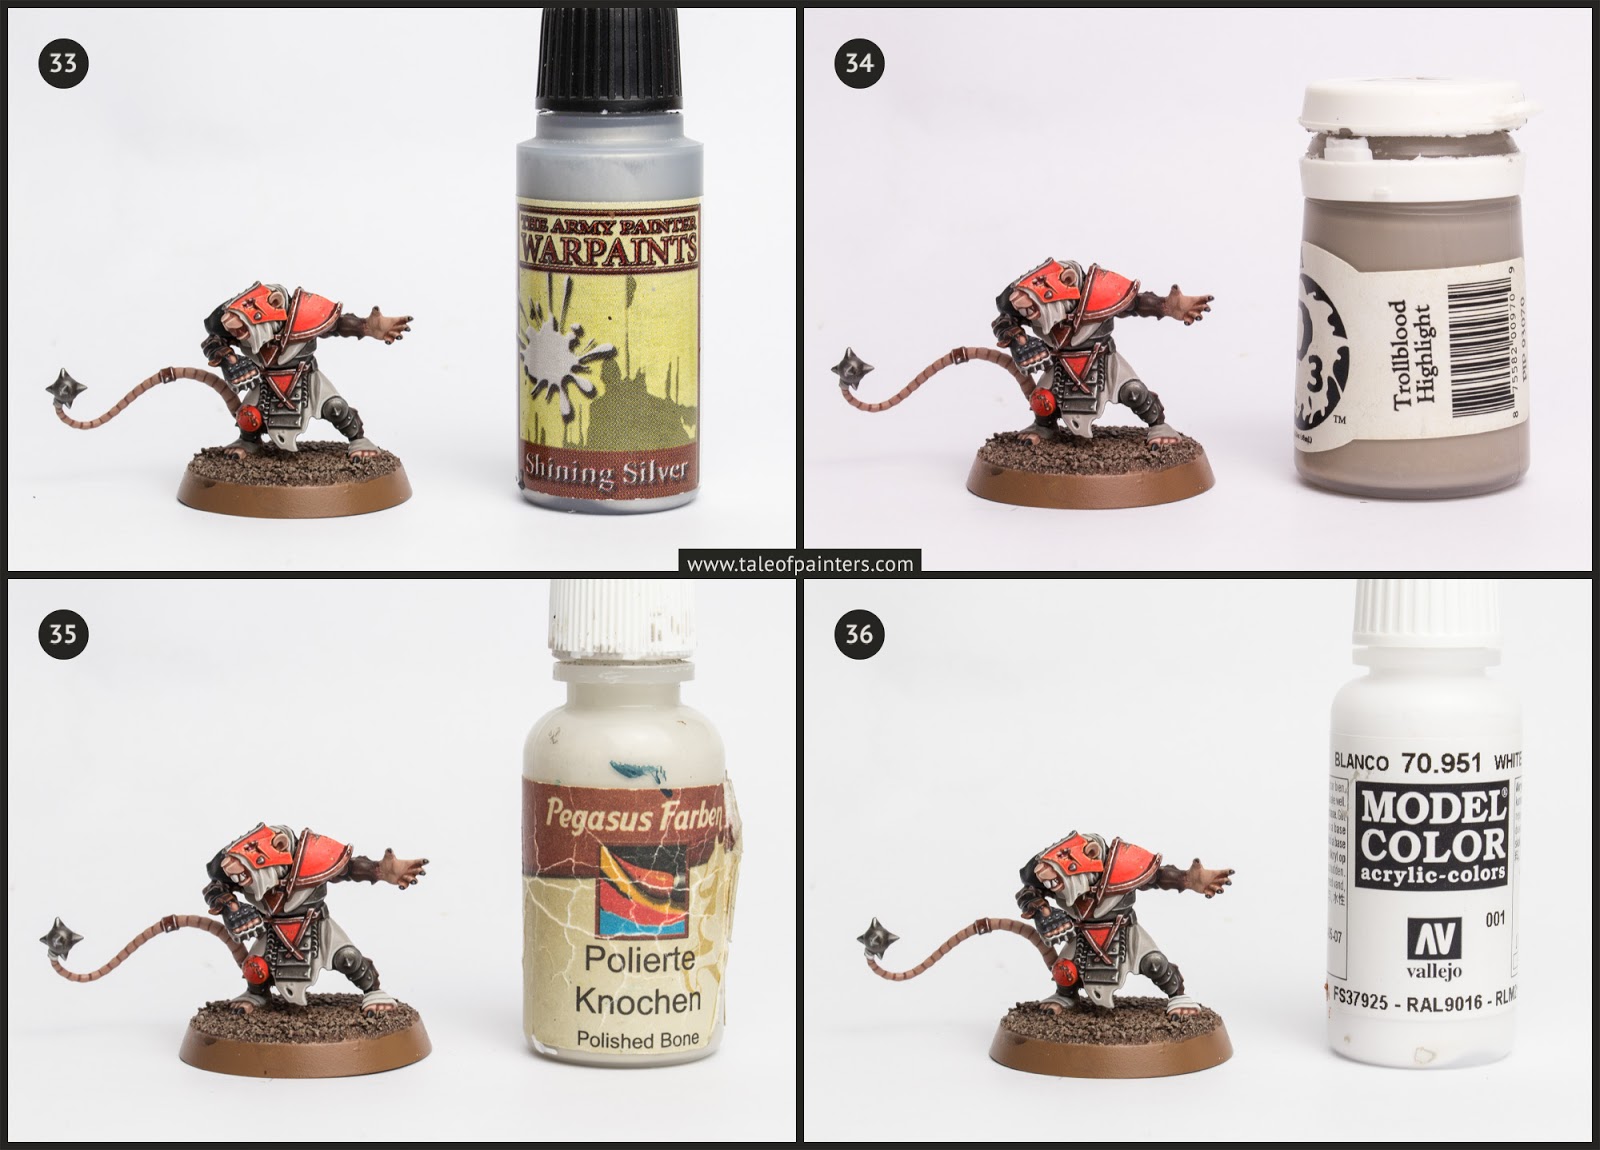
33. The copper parts were now carefully highlighted with Warpaints Shining Silver [Runefang Steel].
34. The teeth and bandages were basecoated with P3 Trollblood Highlight [Skavenblight Dinge]
35. A layer of RMS Polished Bone [Pallid Wych Flesh] was applied to the teeth and bandages, leaving the recesses in Trollblood Highlight.
36. Teeth and bandages received a final highlight of VMC White [White Scar].

37. The base trim was painted with Steel Legion Drab.
To complete the model, I added patches of green static grass. I also added a couple of transfers from the Skaven BB transfer sheet with the help of Microset (check out the tutorial here), and applied a coat of matt varnish.
More pictures of the finished Skavenblight Scramblers team can be found here.
You could easily adapt this paint scheme for Age of Sigmar of Warhammer Fantasy, but then you might need to skip or simplify some steps to make it more suitable for horde army level painting.
How do you like my Skaven? Have you found anything useful in this tutorial for your own projects? Let us know in the comments!
8 Comments
Leave a Reply
Tale of Painters is the unofficial Warhammer hobby magazine run by hobbyists like you. Support our work by using the affiliate links from our 🇦🇺 partner stores for your next purchases so we can continue to bring you fantastic FREE content every day:


![]()
![]()
Or support us directly:


I know this is 5 years late, but this guide is amazing. The step by step with all paints (and options) is extremely helpful. Thanks again
Great tutorial Stahly, your Skaven are a nice balance between colorful (fitting for BB) and muted (fitting for Skaven). I'm working on the dwarf team, but will be coming back to this when I do my Skaven next.
Well-done they are amazing
Excellent tutorial, thanks for the effort you put in it.
I really like your take on the classy "John-Blanche-Scheme". The red, black and bone colours work so well together. I especially like the robes with their slightly greyish shadows but i somehow feel the miniature is missing something. Maybe some checkers on the right shouderpad or that pink/purple blending the ´Eavy Metal Team is doing towards the end of the tail. The purple could add a bit of contrast in temperature as it´s kinda inbetween cold and warm colours whilest fitting to the existing palette. Or maybe a patina effect like you did on your Warhammer Skaven.
I hope I don´t offend you with my critique, I love your very uniquely accurate and clean painting style, it´s one of a kind, but sometimes I feel like it´s a bit too "plain".
Cheers mate
Thanks for the tutorial. They look great!
Don't worry, I'll paint a whole team eventually. Just not in one go. I'm thinking about one or two models inbetween other projects.
One of the things I love about blood bowl is being able to paint a mini army, without the (for me) massive time investment. Plus I don't get burnout, which anything above 30-40 models gives me, I learnt that the hard way with a goblin horde army…
Please finish the team, I know you said you might not, but they'd look great all together…
Thanks for the tutorial as well.