
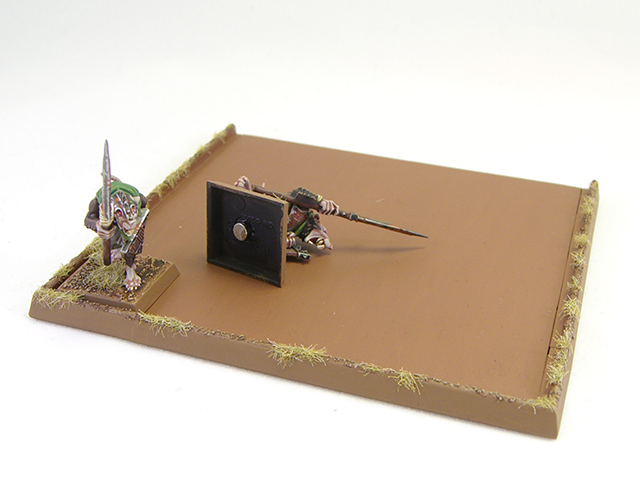
We all know movement trays, don’t we? They are crucial to move units of Warhammer Fantasy models around the table. But it often happens that models shift around or even fall off when you carelessly move the tray. This is why you shold magnetize your models to the trays. It keeps the models in their place and makes gaming a much smoother experience.
There are various possibilites to magnetize. E.g. Gale Force 9 offers magnetic bases ready made. I found the most elegant way to magnetic basing are neodym (rare earth) magnets. You glue a little one to the downside of the base which will be invisible once the models are ranked up. Both ways, your movement tray needs to be magnetic, too, so the models will stick. If you just take a regular tray and glue in an iron sheet or something similar, your models will be raised by the thickness of the material – doesn’t look that great in my opinion. In this tutorial I show you how to convert the modular movement trays from Games Workshop without adding extra height to the models.
Pick up Modular Movement Trays and other GW products at a 20% discount with cheap shipping rates to all European countries and the UK at Wayland Games.

Materials and tools you need:
– 1 mm plastic card
– 1 mm self-adhesive magnetic sheets (both the plastic card and the magnetic sheets must have 2 mm thickness in total!)
– a set of Citadel Modular Movement Trays (there are 16 corner pieces included, so you can make up to 8 movement trays out of it – one set was enough for my decent sized 2500 points Skaven army)
– plastic glue, a cutter, a set square, a modelling saw, very fine abrasive paper, a pencil, green stuff and basing material of your choice
Tutorial
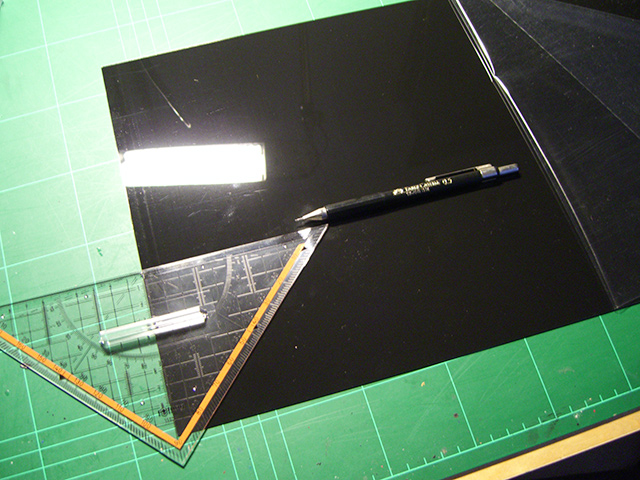

1. We will replace the floor sections of the Modular Movement Kit with custom made magnetic sheets, so put those away for future projects. The floor sections are 2 mm thick, so our magnetic replacement must be 2 mm thick as well. Take your 1 mm plastic card and cut out a rectangle that fits the size of your unit. Take your time and use a set straight to make sure your rectangle is really square. Note that the straights add like 2 mm to each side you attach them! If you want to stand your models closely together you have to deduct this value when you calculate the size of the rectangle.

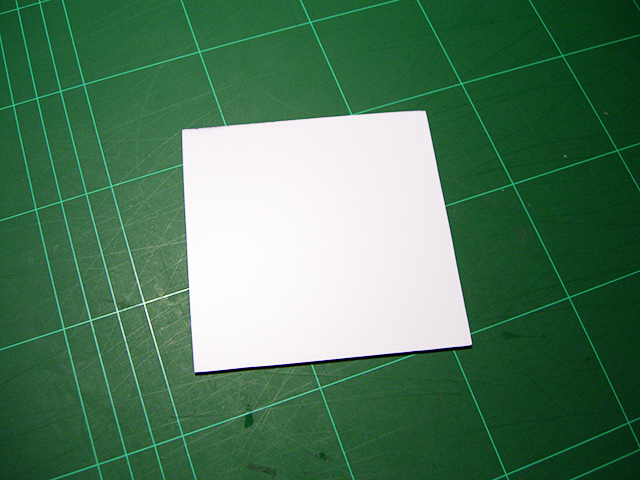
2. Once you have your plastic card rectangle ready, remove the film from the adhesive side of the magnetic sheeting and put your plastic rectangle on it. Press it together for a good contact and then cut off the excess from the magnet foil, using the edges of the plastic card as your guide. Your custom floor section is finished!


3. Glue on the corner pieces with plastic glue. The magnetic side of the floor section must face upwards. Now attach the straights. You probably need to cut them to size, so mark the length with a pencil and use your hobby saw for a perfect straight cut. It’s better to cut off too little and sand it to fit than to cut off too much and have big gaps! Keep any excess pieces as you might need them for future movement trays.


4. Now you can decide how you want to base the tray. Some hobbyists like to leave them bare, some like to apply a texture all over, or you can do like me and just base the upper rim. If you don’t want a texture all over, you have to smooth the gaps between the straights and the corner pieces. For this, get out your green stuff and fill the gaps, but don’t smooth it down but leave a little bit of excess. Once everything is dry (!), cut off the excess and use your abrasive paper to make a smooth transition. Then you can go on decorating the base to fit the basing style of your army.
5. Your magnetic movement tray is ready to paint! But you need some magnets for your models to boot. Personally I use rare earth magnets of 4 mm diameter and 1 mm thickness for my Skaven models but I think the bond could be a little bit stronger. I heard a lot of people use magnets of 6 mm diameter and 1.5 mm thickness which should be suitable for bigger plastic models and even metal models. Just take care your magnets aren’t thicker than 1.5 mm because then they won’t fit under the base. And don’t use too strong magnets, otherwise you might need too much force to remove them from the trays. Once you found the perfect magnets for your army, just stick them with super glue to the underside of your bases. Whily drying, leave plenty of space between your bases, otherwise the magnetic attraction might shift the position of the magnets of surrounding bases!
Do you like our tutorials and reviews? Here is what you can do to support us: Disable your Ad Blocker or place your next Wayland Games order by clicking here or on the banner on the right. Thank you very much, we appreciate any help to keep us going!
6 Comments
Leave a Reply
Tale of Painters is the unofficial Warhammer hobby magazine run by hobbyists like you. Support our work by using the affiliate links from our 🇺🇸 / 🇨🇦 partner stores for your next orders so we can continue to bring you fantastic FREE content every day:


Or support us directly:


Thanks for the tutorial.
Not sure where to find the magnetic self-adhesive sheets, though here in France, though.
Wow, thanks for that! I found it always annoying that the magnetized models stand above the other once, when just adding ferro-sheets and magnetic-sheets.
Danke!
Yeah, I bought mine at http://www.magnetkontor.de/de/Neodym-Magnete-Rohmagnete/Scheibenmagnete/unter-8-mm-Durchmesser 😉
Where do you buy your magnets? In Germany?
Very useful guide!