

Welcome to part two in this terrain mini series (part one on building the ruin is here). Today I’m going to give you a fully detailed step by step tutorial on how to paint the ruined building in the picture above. Let’s get started after the jump.
Paints you’ll need for this tutorial:
Black Undercoat (I use Vallejo Surface Primer through an airbrush)
Tamiya X-20a thinners (If you’re using an airbrush)
Eshin Grey (Layer)
Rhinox Hide (Base)
Steel Legion Drab (Base)
Dawnstone (Layer)
Taller Sand (Layer)
Mournfang Brown (Base)
XV-88 (Base)
Screaming Skull (Layer)
Administratum Grey (Layer)
Typhus Corrosion (Technical)
Hashut Copper (Layer)
Reikland Fleshshade Gloss (Shade)
Nihilakh Oxide (Technical)
Abaddon Black (Base)

1. Undercoat.
Undercoat the terrain piece black. I’ve used Vallejo Surface Primer. You can use an aerosol spray if you have one. Be warned though, if using a rattle can make sure any exposed foam has been covered with PVA glue. Aerosols will melt foam.

2. Basecoat walls, floor and rubble.
I used an airbrush to paint the walls, floors and rubble with Eshin Grey. I mixed Eshin Grey with Tamiya X-20a thinners (50:50) and sprayed it all over. Just need a single coat. If painting by handy will need to water your paints, use a large brush and probably need to paint on several coats.

3. Basecoat the dirt and gravel.
You’ll want to use the colour that matches your gaming table for this step. I airbrushed on a 50:50 mix of Rhinox Hide and Tamiya X-20a thinner where ever I wanted to represent dirt and earth. As you can see I also worked this into the corners of the ruins.


4. Wall colouring.
The decorative wall colour choice is preferential. I’ve gone for a light yellowy brown. Do you remember the cardboard ruins in the 2nd edition box set? I’m using those for inspiration. For this step I used thinned Steel Legion Drab in the airbrush and carefully just airbrushed the inner walls and the detail parts of the exterior walls. You could mask this off or use a scrap piece of card with a straight edge to limit overspray, but these are ruins and I don’t mind little bit of overspray. Adds to the tonal variance. It wouldn’t all be neat and tidy.


5. Drybrushing the grey walls, floor and rubble
If you’ve been using an airbrush, you can put it away now and get out your large flat dry brush. If you’re unfamiliar with dry brushing it’s really simple. All you do is dip your brush into your paint (Dawnstone Grey in this instance) and then wipe the brush across an old rag or some tissue paper to remove the majority of paint from the bristles, effectively leaving it “dry”. It’s not truly dry but it’s enough so that when you drag the large flat brush across your ruins back and forth repeatedly it will leave paint only on the raised details. As you can see in the pictures above it’s highlighted and picked out all the raised detail.


6. Drybrushing the interior walls and exterior detail.
Using the same technique but with a smaller flat bristled drybrush use a lighter colour (Tallarn Sand) to pick out the raised detail on the interior walls and exterior wall detail. I’ve tried not to brush over the window frames. I wasn’t worried about catching the ornaments in the centre of the exterior wall details as these are going to be painted over in a different colour.

7. Drybrushing the dirt.
Using a large flat dry brush highlight the dirt with a lighter colour then what you used previously. I used Mournfang Brown. It’s a good idea to overlap a little and get some of this highlight colour onto the rubble to blend it in. What I’m showing here is the explosion that levelled this building to ruins has thrown dirt and rubble everywhere. Over time the winds and the ran has made the mud and earth run and collect at the bottom of the crater and around the building edges. From a gaming point of view these ruins will be abled to be placed on muddy rubble areas, pavement areas or even grassy areas. The irregular shaped base giving the impression of the ruins protruding from a pile of dirt/rubble.

8. One more highlight for the dirt.
Repeat step 7 but use a lighter colour for the final highlight on the dirt. I’ve used XV-88.

9. Final highlight for the interior walls and exterior wall detail.
I’ve switched to a smaller dry brush for the final highlight on the wall interiors. Using Screaming Skull I lightly dry brush the inner walls and exterior wall detail, being careful not to get any on the grey wall areas.

10. Final highlight for floors, window frames, exterior walls and rubble.
Using my large dry brush I apply Administratum Grey to all the rubble, floors, and wall details. Don’t worry if you go accidentally go over the dirt or interior walls by mistake. I see this step almost as a light dusting. It will help tie it all together.

11. Dirtying up the ruins.
I’ve used Typhus Corrosion to add some surface level grime to the walls and floor. Typhus Corrosion has a fine grit mixed into it. So it also adds a little texture to the grime. You can mix fine sand into any paint with water and use that if you want a different colour.
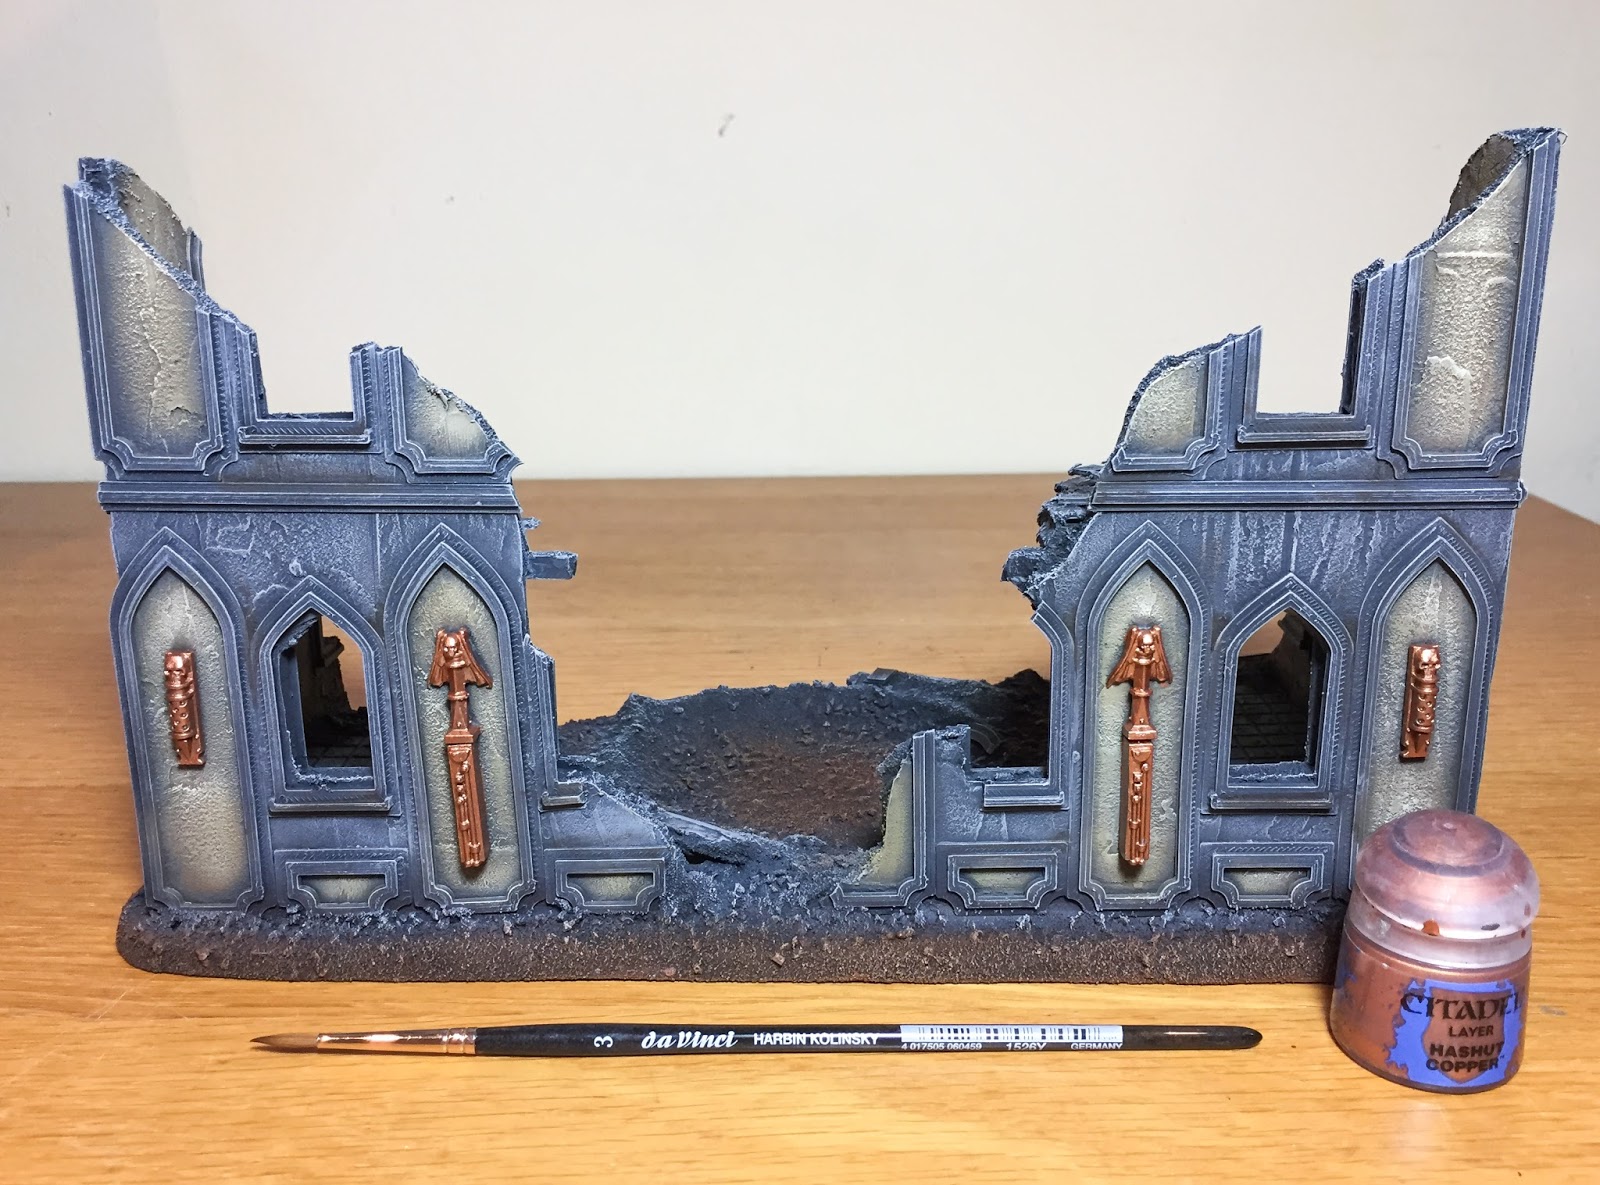
12. Painting the ornaments.
I used a large size 3 brush to apply Hashhut Copper to the ruin’s ornaments. You could paint these as stone, wood, metal, rust. I went with a brassy colour because it’s kinda steampunk gothic.

13. Shading the Ornaments.
I love these Gloss Shades for metals. They really make the metals shine. Reikland Fleshshade is great for golds and coppers.

14. Weathering the Ornaments
These ruins have been exposed to the elements for decades so the copper needs to look weathered. I’ve washed Nihilakh Oxide over all the Hashut Copper and then wiped it off using my thumb. It really helps to tie the copper pieces to the weathered old ruins.

15. Adding fire and smoke damage.
I’ve dry brushed Abbadon Black onto the edges of the building and in some patches on the walls. I’ve done this quite sparingly to just hint at smoke and fire damage. In reality these ruins would probably be pure black smoke damaged shells but that would look naff in a table top wargaming setting so I went easy with the black.

16. Adding Static Grass
Before adding the static grass, give your ruin a spray with matte varnish. As I mentioned the ruins are decades old and I wanted the building to look like it had dirt thrown up all over it by explosions so it’s only right that nature would start to take back the ground. A few patches of static grass have been glued on using PVA glue.
Conclusion
Despite there being 16 steps these ruins were really quick to paint because I used an airbrush for the base colours (you can use rattle cans to the same effect) and drybrushing for all the highlighting. I’m really happy with the overall effect. Having the building on a base with rubble, grass and dirt just looks really nice. Something I didn’t realise I missed with Citadel’s freestanding plastic terrain kits. I think I could mix their terrain pieces with my own scratch built terrain and have it all tied together by the bases.

5 Comments
Leave a Reply
Tale of Painters is the unofficial Warhammer hobby magazine run by hobbyists like you. Support our work by using the affiliate links from our partner stores for your next orders so we can continue to bring you fantastic FREE content every day:


![]()
![]()
Or support us directly:


Hi, I came a cross your site when looking how to paint ruins. i really liked your work and all your explanation, specially for someone like me that never did anything like this before. could you let me know where did you buy your ruin model, i can find anything like it.
Thank you.
Looking forward for your answer
Grazia
Hi, thanks for the kind words. First line of this article includes a link to a previous post which shows how I made the ruin. It’s not bought, it’s made from scratch (usually referred to as a scratch build).
Absolutely love the final result, a genuine nod to the 2nd ed boxed set. Beautiful.
A great end result. I like this painted ruin!
Thanks for the tutorial.
Love this!!!! Thank you so much for doing this excellent tutorial.