
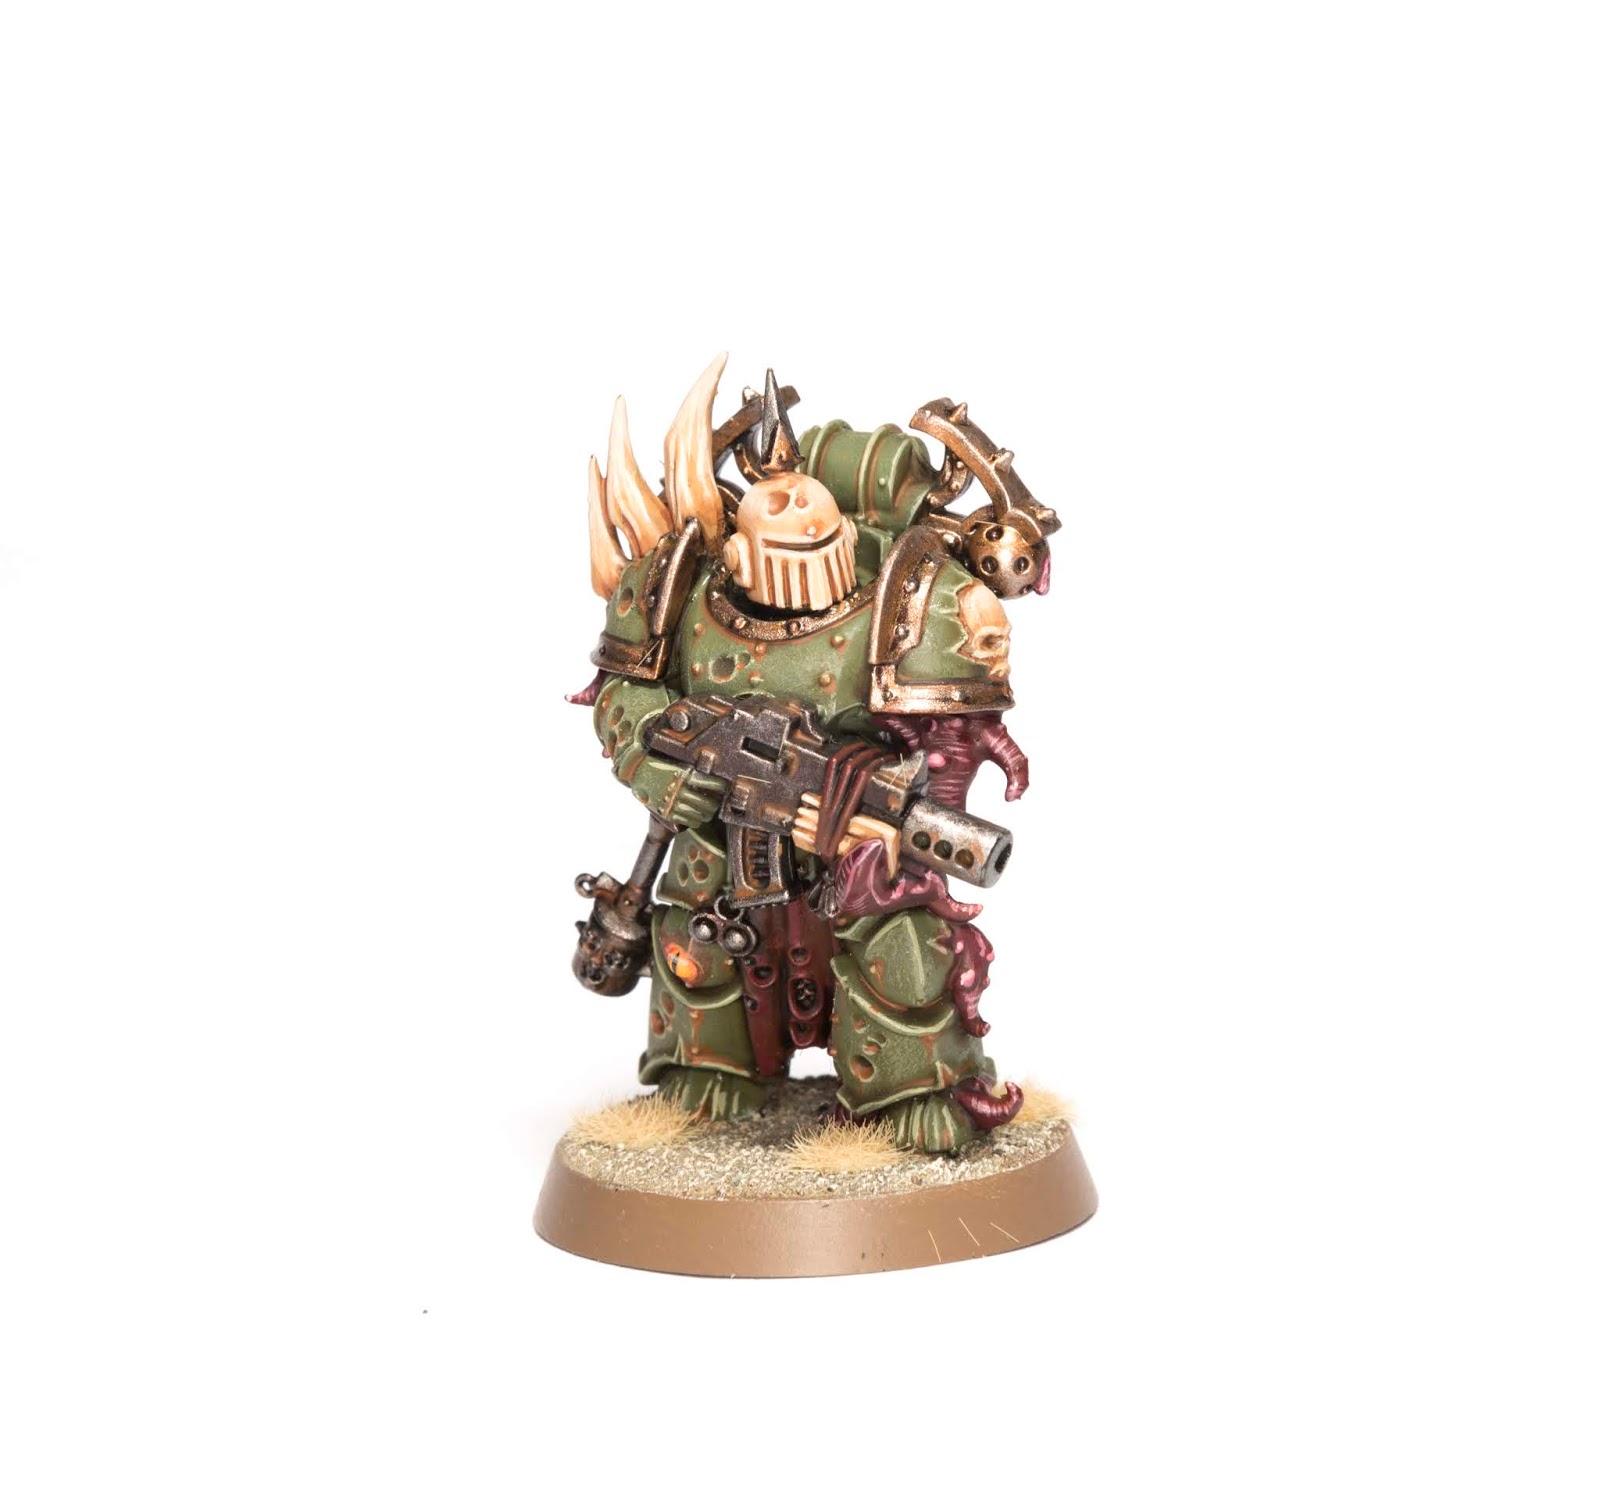
In today’s post, I share with you a complete photo tutorial guide to paint the Death Guard Plague Marine pictured above. Perfect if you’re working through your Dark Imperium starter set or the Warhammer 40.000 Conquest Subscription. What are you waiting for, more after the jump!
This tutorial assumes you have a basic understanding of how to paint. For the beginners, I will explain the techniques as I go along. Each picture below shows four chronological steps. Underneath each picture are the corresponding instructions. Each step shows the paint I used during that step.
Paints you will need for this tutorial:
Black Undercoat (Vallejo Surface Primer)
Loren Forest (Layer)
Seraphim Sepia (Shade)
Death Guard Green (Base)
Nurgling Green (Layer)
Warplock Bronze (Base)
Leadbelcher (Base)
Brass Scorpion (Layer)
Runelord Brass (Layer)
Doombull Brown (Layer)
Nuln Oil (Shade)
Khorne Red (Base)
Druchii Violet (Shade)
Emperor’s Children (Layer)
Ceramite White (Base, OOP – use White Scar or any other white paint)
Bloodletter (Glaze, OOP – use Blood Angels Red Contrast pain thinned with Contrast Medium)
Skrag Brown (Layer)
Tau Light Ochre (Layer)
Ungor Flesh (Layer)
Screaming Skull (Layer)
Abandon Black (Base)
Dawnstone (Layer)
Yriel Yellow (Layer)
If you need to expand your paint collection to follow the tutorial, check out our partner stores Wayland Games and Element Games, which offer an amazing range of paints at a discount.
How to paint Death Guard Plague Marines
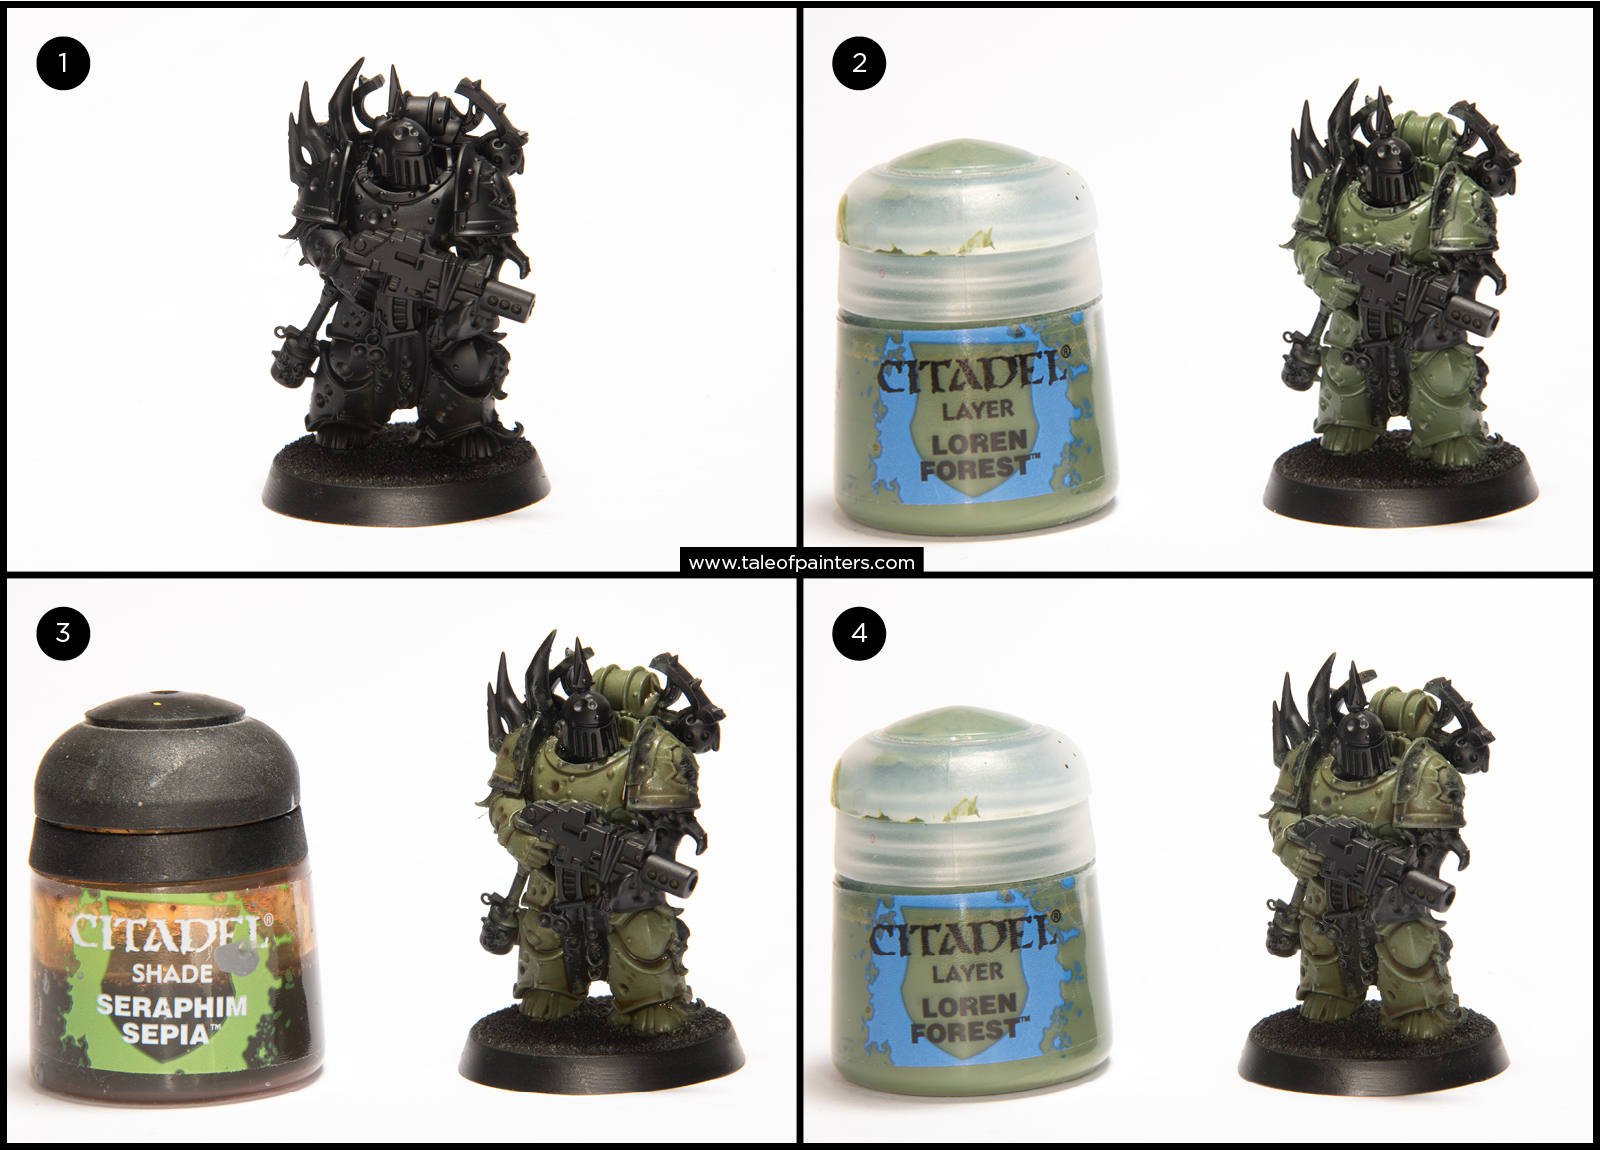
1. Undercoat the Plague Marine black. I use Vallejo Surface Primer and an airbrush. You can hand paint on a Primer or use an aerosol.
2. Using a large brush (size 2 or 3) base coat the Death Guard armour with Loren Forest. Add a touch of water to thin your paint and apply two or three thin coats to get a nice solid, smooth coat. Don’t worry about being neat, you can go over the lines in this step.
3. Wash over all the green armour with Seraphim Sepia. Load up a large brush but be careful as always not to get Shade in the ferule (metal part where the bristles are held).
4. Use a dry brush or an old large split bristled brush and add some Loren Forest to the bristles. Then repeatedly wipe it off on a tissue until the brush is ‘dry’. Wipe this dry brush back and forth over the armour so the residue of paint left on the bristles picks up on the raised areas of the armour. You may have to repeat this several times.

5. Repeat the dry brush process in step 4 but this time using Death Guard Green.
6. Using a fine detail brush (size 00) paint Nurgling Green on the raised edges of the green armour. Paint the lines as thin as you can. See the image above for placement guidance.
7. Paint all areas that are to be brass or metal with Warplock Bronze. Mixing a touch of Lahmian Medium helps to thin metallic paints making them smoother to paint. Mix this on a mixing palette (white bathroom tiles make perfect mixing palettes).
8. Lightly brush on Leadbelcher on to the areas you want to metal. This is like a heavy dry brush, you want decent metal coverage but you want to see the Warplock Bronze showing through (like on the gun casing) for variance you can paint the Leadbelcher on more solidly for example as soon on the gun barrel above.
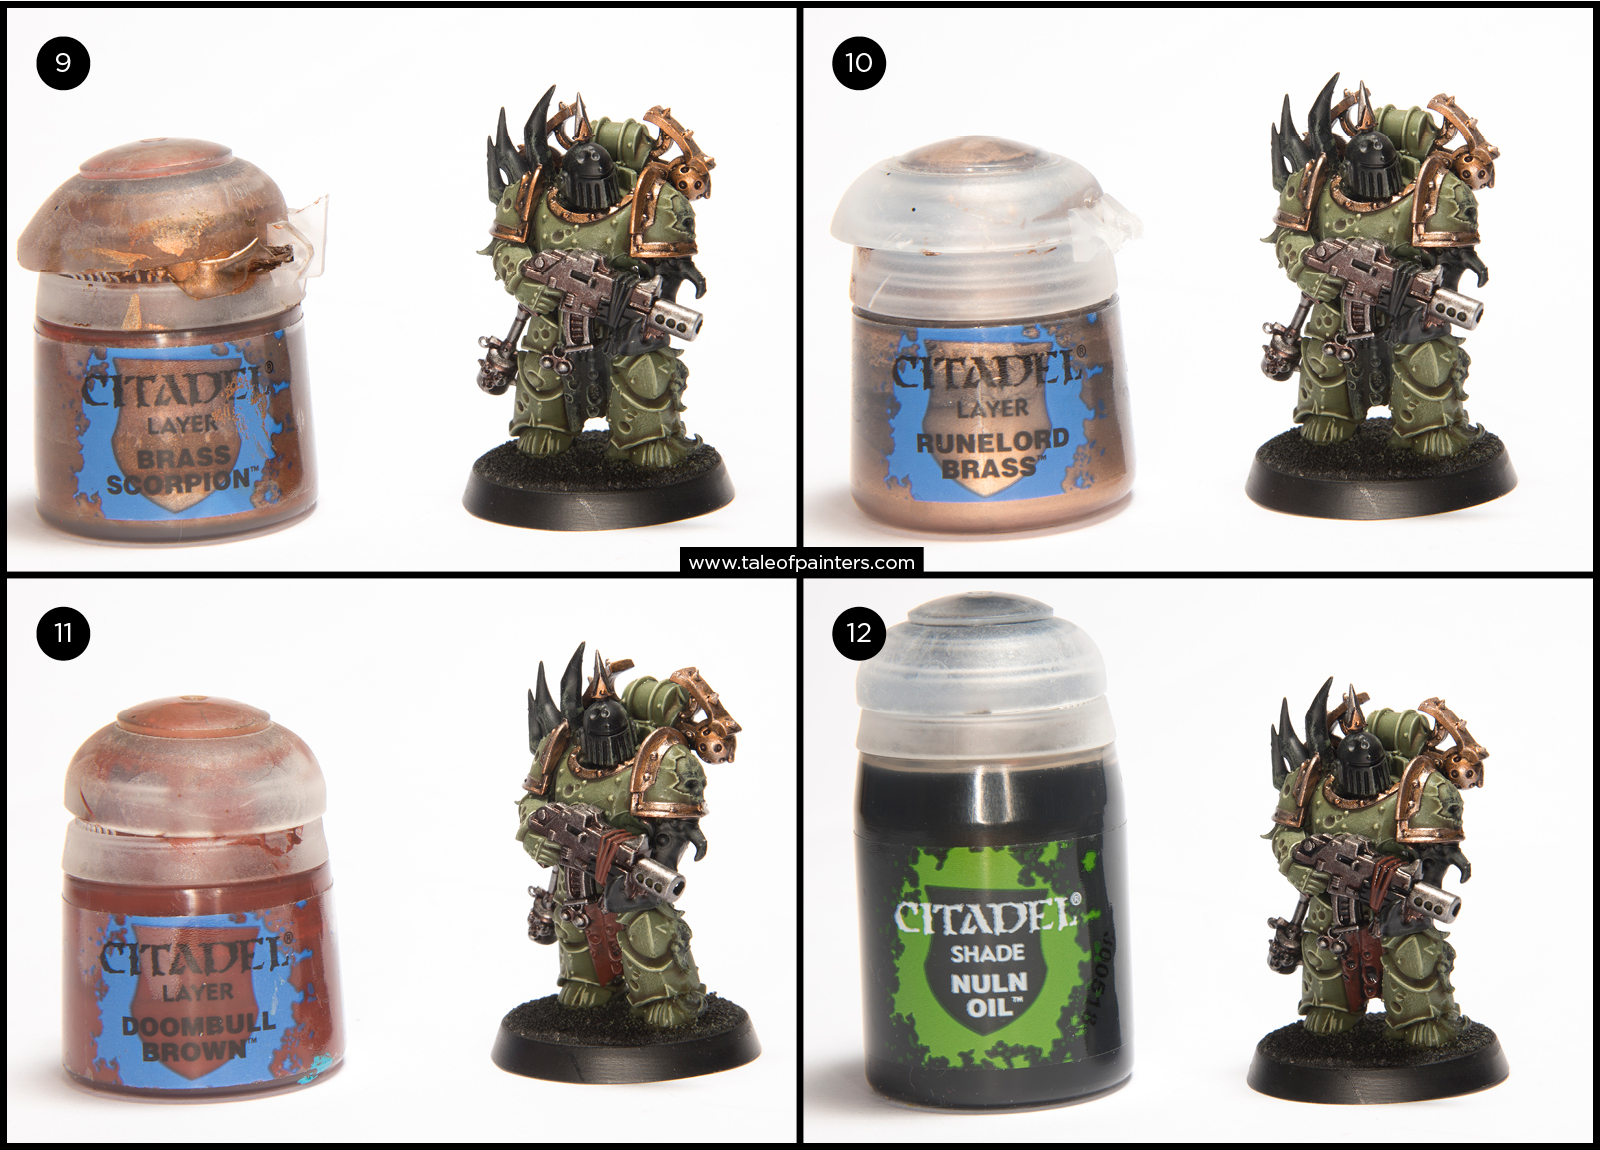
9. Apply Brass Scorpion to areas that are to be brass. Make sure you leave Warplock Bronze showing around rivets and in creases and holes. Warplock is the shading for the brass.
10. To highlight the brass, use Runelord Brass on the edges of the brass areas. Use a fine detail brush (size 0 or 00).
11. Paint any fabric areas with Doombull Brown.
12. Using Nuln Oil wash over any metal areas (not brass) and the wash over the Doombull Brown fabric areas as well.
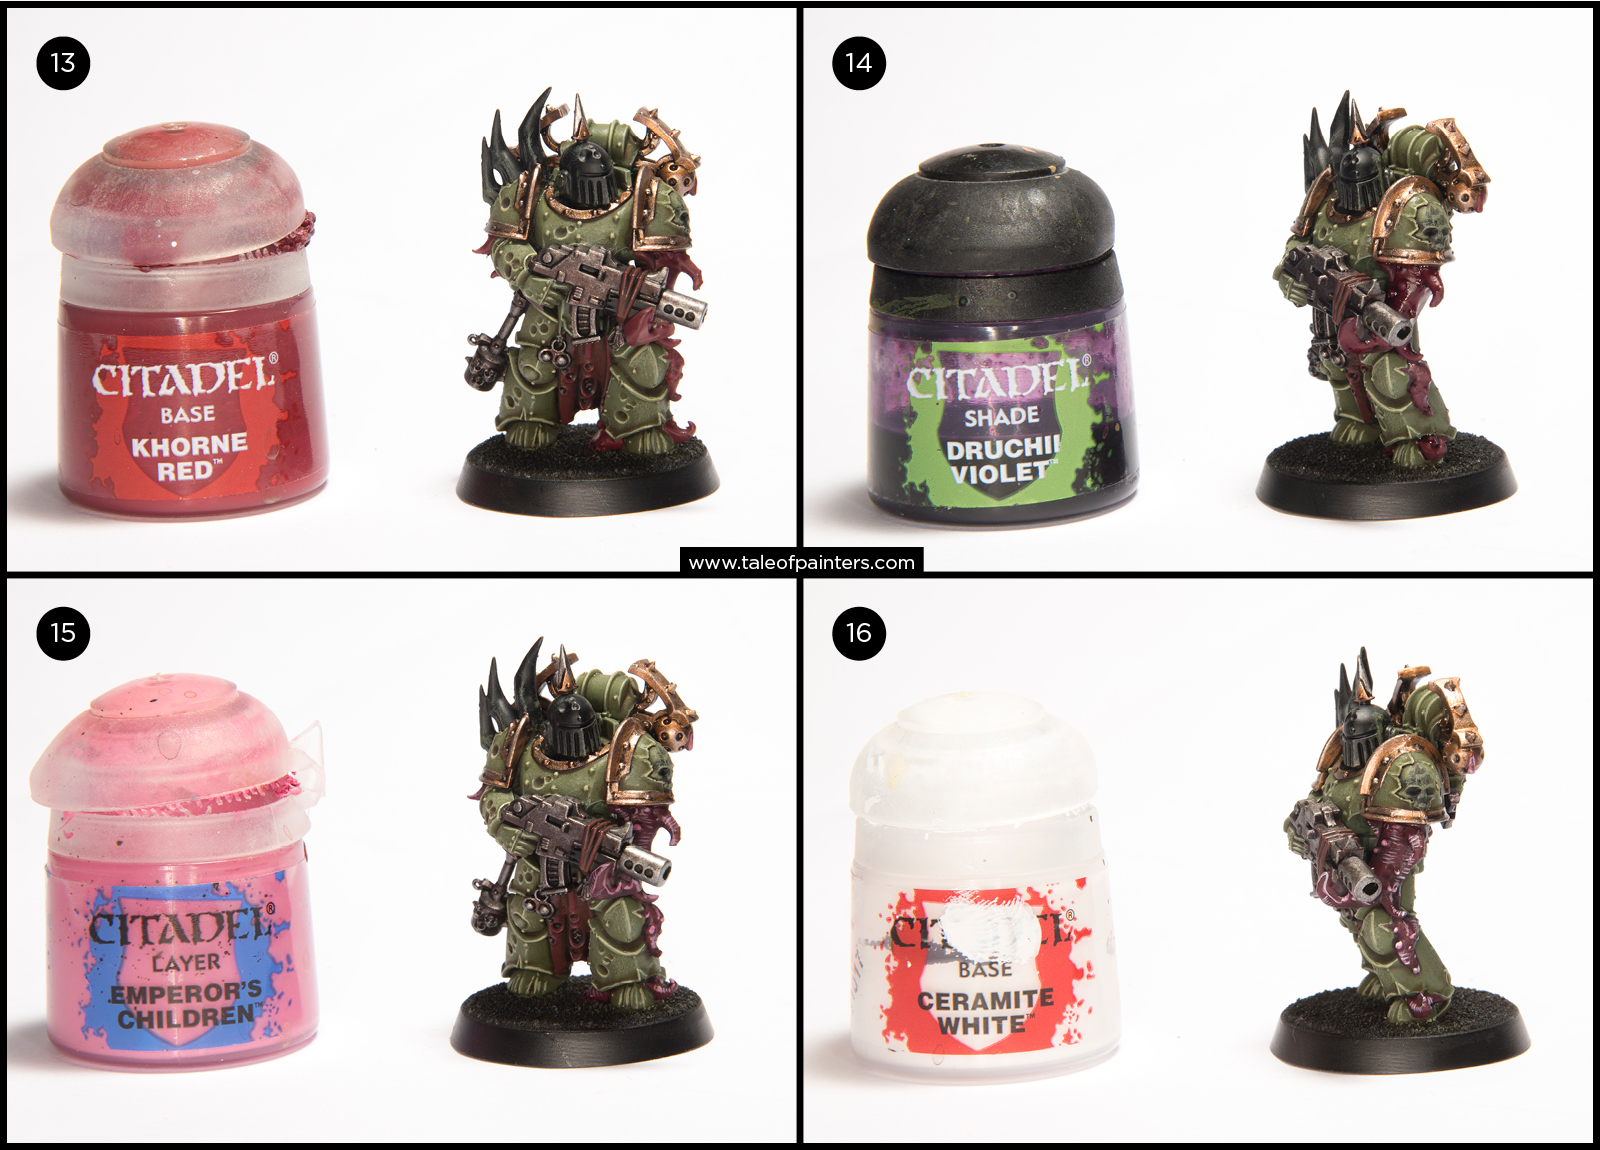
13. Highlight the edges of the fabric with Khorne Red. Paint all the daemonic mutations and open wounds with Khorne Red.
14. Use Druchii Violet to wash over all the daemonic mutations and open wounds.
15. Using small, thin strokes paint highlight lines of Emperor’s Children on the mutations and wounds. You can use parallel lines to represent texture on intestines and tentacles. You can also use small dots to pick out spots and bulbous areas. Water your paint down when it comes to painting thin strokes, it flows from the bristles smoothly and makes painting thin lines easier.
16. Using watered down Ceramite White (OOP, use White Scar instead), repeat the above process but with even thinner lines painted within the lines of the Emperor’s Children lines.
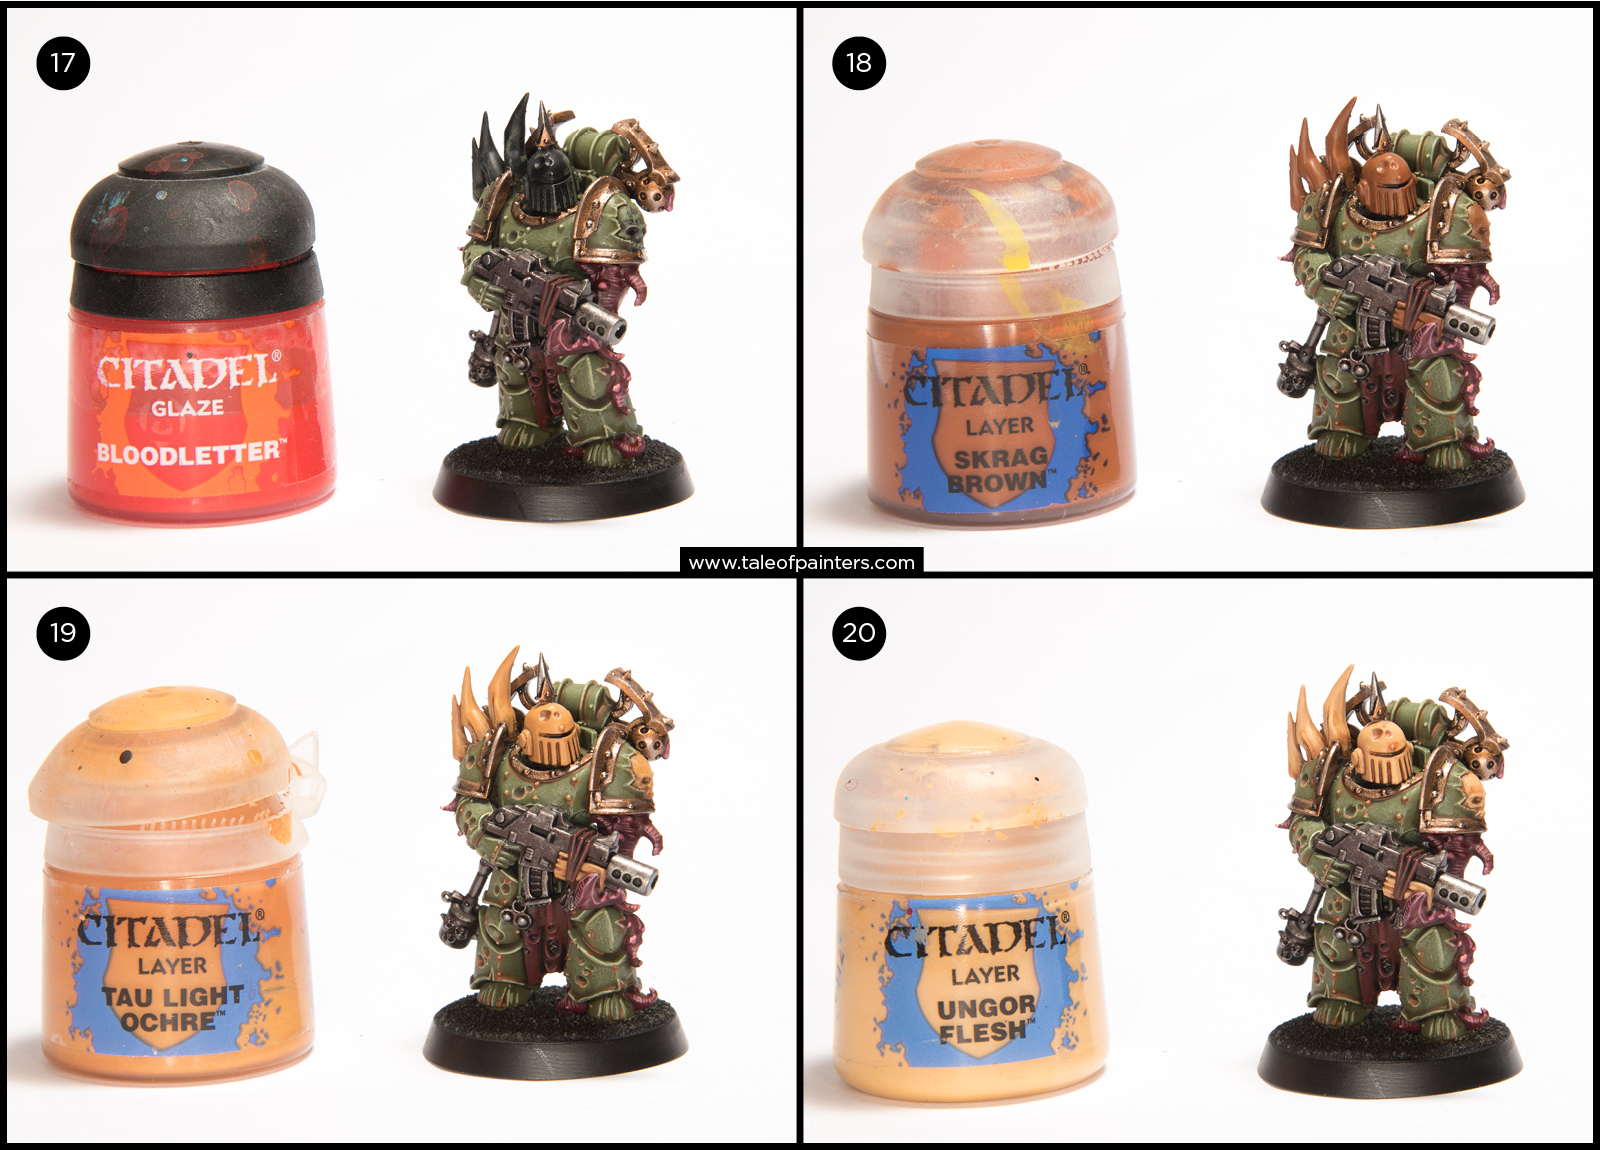
17. Using Bloodletter, cover all the mutations and wounds with a glaze. Glazes are great because it’s like tinting. You can see all the work through it but it changes the hue slightly. In this case it goes a long way to blending the highlights together.
18. Heavily water down some Skrag Brown onto a mixing palette and then paint it as rust streaks around rivets and into crevices. Do this on the green armour and metal areas (not brass). Then use Skrag Brown to basecoat all the areas that are to be bone. Water your paint for this but not as heavily as the rust. Should cover the areas in two coats.
19. Highlight the bone areas with Tau Light Ochre. Make sure you leave Skrag Brown showing in creases, crevices, gaps and dents.
20. Highlight the previous layer further using Ungor Flesh. Make sure you leave some of previous layer showing. This is called layering.

21. Paint on edge highlights of Screaming Skull to all the bone areas. Nice thin lines.
22. Paint the areas between the armour plates (the flexible, ribbed undersuit) and any exposed ribbed pipes with Abaddon Black.
23. Use thin lines highlight the ribs of the undersuit or pipes with Dawnstone.
24. Paint any bulbous spheres breaking through the armour with Yriel Yellow. You may want to base coat these spheres with white first to make the yellow easier to paint and brighter.
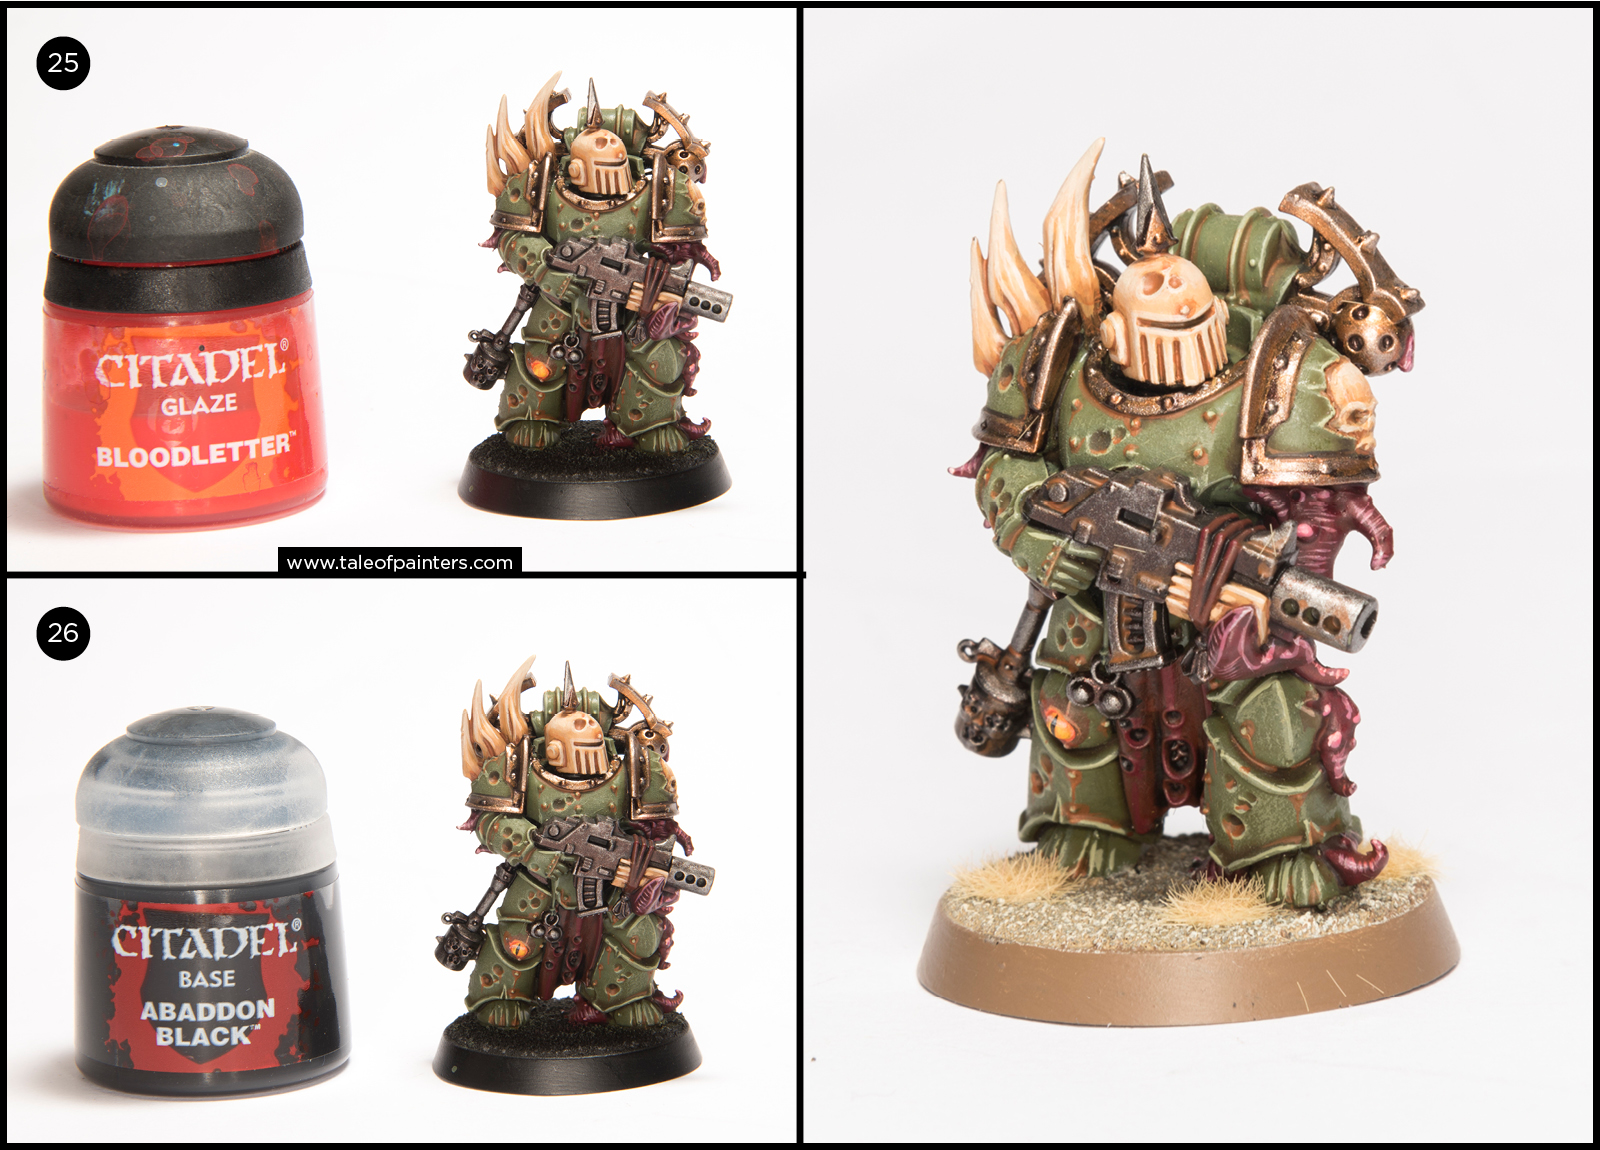
25. Wash over the yellow spheres with Bloodletter.
26. Paint a thin, vertical eye slit using Abaddon Black. You can also paint a horizontal thin line across the top of the sphere to represent a glint or shine to make the eye appear glossy.
Finally, base your Death Guard Plague Marine in a way that fits in with your collection. I glued sand to the base with PVA and then painted it with Zandri Dust highlighted with Screaming Skull and the base edge was painted with Steel Legion Drab.
Finished models & more Death Guard painting guides
Here are a few more Death Guard models I painted using this tutorial:

And here is a tutorial for painting Pox Walkers:
Thanks for checking out my tutorial. If you enjoyed this and would like to support me, Garfy’s Get a Grips available to order with same day dispatch here. Drop any questions or feedback in the comments section below.

Glaze Paints will be removed from the Citadel Colour range 🙁 So in the long-run you must replace Bloodletter Glaze…
I ordered some of the "Warcolours" Glazes, i hope they will be a good replacement for the Citadel Glazes.
I've been painting up my down Death Guard, and this just solved my problem of how to paint their Bolters!
Vallejo makes a colored surface primer that's nearly a dead match for Death Guard green called IJA Parched Grass. Might save a bit of time (and paint) vs black if you're doing a whole army of these guys. It's what I use on Death Guard
Could probably get by with one coat of Loren Forest over this stuff
Such a satisfying paint scheme. Grandfather Nurgle will be proud.
Thank you mate. I'm enjoying this new army. It's a nice change of pace.
Very cool. Great tutorial for a really nice scheme. Well done
Thanks Craig mate.