
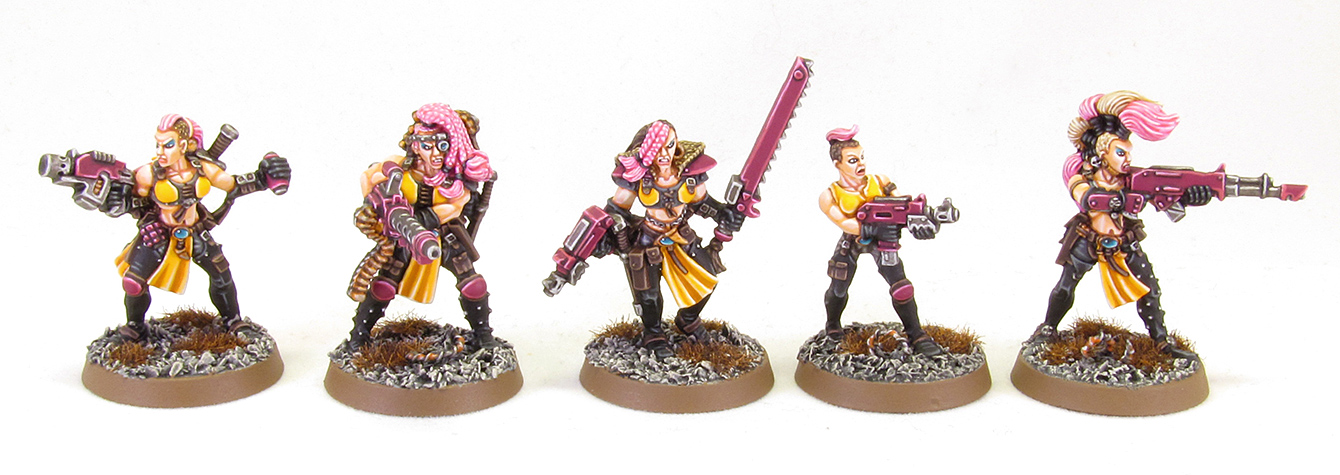
Hey there, a lot of people asked me which paints I used for the paint scheme of my Escher gang. So I compiled a list of all the paints I used in this lenghty post. It’s not a real step by step tutorial, but to make up for it, I’ve got a couple of super hi-res pictures where you really can see where I put my layers and highlights. Even if you don’t plan to paint any Escher models soon, maybe you can nick some of my recipes and use them for your own projects.
I present you this list in the order that I painted the various areas of the model. As usually I start with doing the base (and other messy drybrushing parts) and then work “from inside out”. I always complete one area, then move to the other. I did these models with my eclectic collection of paints, which includes paint pots from GW (old and new ones), The Army Painter, Vallejo Game Colour and Formula P3 from Privateer Press. When I know good substitutes, I put those in brackets. Otherwise it’s your best bet to get out and buy the specific paint if you want to recreate the same look (take a look at our sponsors Wayland Games and Slaves to Painting by clicking on the banners on the right, who stock a huge selection of paints).
Basing and Priming:
– for the bases I used the tanglewire and fine slate gravel from the cityfight basing kit that was released many moons ago when Cities of Death was released
– initially I used black primer, but switched to Uniform Grey colour primer from the Army Painter lately
– wash the base texture with a heavy coat of Nuln Oil directly over the Uniform Grey basecoat (I specifically used GW Nuln Oil here to get rid of my pot, because I prefer the old Badab Black/Army Painter Warpaints Dark Tone)
– after the wash is dry, drybrush heavily with Formula P3 Trollblood Highlight , followed by lighter drybrushes of GW Terminatus Stone and P3 Menoth White Highlight (VGC Offwhite would be the same)
Skin
– paint the eye sockets black, apply two white dots left and right while leaving a black pupil in the middle, then use black to clean up (find out more about how I paint eyes and faces here)
– basecoat with Ratskin Flesh (leave a small black line around the eyes)
– layer with old GW Elf Flesh
– where a shadow of Ratskin Flesh would be a too harsh, I applied old GW Dwarf Flesh and Bronzed Flesh (mainly on the arms and bellies to differentiate the musculature), then I cleaned up everything with Elf Flesh again
– highlight with multiple coats of thinned VGC Pale Flesh
– final highlight with P3 Menoth White Highlight
– glaze thinned VGC Falcon Turquoise above the eyes, glaze the lower lip with thinned GW Emperor’s Children
Yellow bras and tabbards
– basecoat with Reaper Master Series Paint HD Golden Yellow. Even though the label says High Density it still takes lots of coats to cover… so I applied yellow coats after every step when painting the skin to not waste time. Yriel Yellow of VGC Sunblaze Yellow would work fine as well.
– shade with VGC Scrufulous Brown (looking back, a slightly lighter brown like VGC Filthy Brown or Tau Light Ochre would have been better)
– highlight with VGC Pale Yellow
– final highlight with P3 Menoth White Highlight
Purple armour and weapons
– basecoat with GW Screame Pink
– shade by painting VGC Black Ink into the recesses (thinned Abaddon Black would work as well)
– highlight with GW Emperor’s Children
– final highlight with VGC Squid Pink
Pink hair
– basecoat with VGC Squid Pink
– wash with a custom was made of thinned Emperor’s Children with a little bit of VGC Glaze Medium
– highlight with VGC Squid Pink
– final highlight with P3 Carnal Pink

Blonde hair
– basecoat with P3 Menoth White Base (GW Ushabti Bone would work as well)
– wash with The Army Painter Warpaints Soft Tone Ink (or old GW Gryphonne Sepia)
– layer with P3 Menoth White Base
– highlight with GW Screaming Skull
– final highlight with P3 Menoth White Highlight
Light brown hair and fur
– basecoat with GW XV-88
– wash with Warpaints Strong Tone Ink (or old GW Devlan Mud)
– layer with GW XV-88
– highlight with old GW Tausept Ochre
– final highlight with P3 Menoth White Base
Dark grey clothes
– basecoat with GW Eshin Grey
– wash with Warpaints Dark Tone Ink (or old GW Badab Black)
– layer with GW Eshin Grey
– highlight with old GW Adeptus Battlegrey
– final highlight with Warpaints Uniform Grey
Warm Grey clothes
– basecoat with P3 Bastion Grey
– wash with a 1:1 mix of Warpaints Strong Tone and Dark Tone Ink (Devlan Mud and Badab Black)
– layer with P3 Bastion Grey
– highlight with RMS Stone Grey
– final highlight with P3 Trollblood Flesh
Lilac grey clothes
– basecoat with GW Warpfiend Grey
– wash with Warpaints Dark Tone Ink (or old GW Badab Black)
– layer with GW Warpfiend Grey
– highlight with GW Slaanesh Grey
– final highlight with VGC Stonewall Grey
Black leather
– basecoat with GW Abaddon Black (or whatever black you’ve got)
– highlight with GW Eshin Grey
– final highlight with Warpaints Uniform Grey
Dark brown hair and brown leather
– basecoat with old GW Scorched Brown
– wash with Warpaints Dark Tone Ink (or old GW Badab Black)
– layer with Scorched Brown
– highlight with GW Gorthor Brown
– final highlight with P3 Beast Hide

Metal
– basecoat with P3 Pig Iron (or GW Leadbelcher or Boltgun Metal)
– for the rust on the tanglewire, paint GW Skrag Brown (or old Vermin Brown) into the recesses, followed by old GW Macharius Solar Orange
– wash with a 1:1 mix of Warpaints Strong Tone and Dark Tone Ink (Devlan Mud and Badab Black)
– highlight with Warpaints Shining Silver (or old GW Mithril Silver)
Gold ornaments and jewelry
– basecoat with VGC Glorious Gold
– shade by painting VGC Brown Ink into the recesses
– highlight with P3 Radiant Platinum
Turquoise gems and lenses
– basecoat with P3 Coal Black (or GW Stegadon Scale Green
– highlight with VGC Falcon Turquoise
– highlight with P3 Arcane Blue
– final highlight with VGC Wolf Grey (or old Space Wolves Grey), also place a small dot in the upper left for the reflection
Finally, paint the base rim with GW Steel Legion Drab (or old GW Graveyard Earth). The brown static grass is a custom mix out of mid brown, dark brown and black grass fibres. Aaand you’re done!
Do you like our tutorials and reviews? Here is what you can do to support us: Check out the websites of our sponsors, place your next orders at Wayland Games by clicking here or on the banner on the right. Thank you very much, we appreciate any help to keep us going!
6 Comments
Leave a Reply
Tale of Painters is the unofficial Warhammer hobby magazine run by hobbyists like you. Support our work by using the affiliate links from our 🇺🇸 / 🇨🇦 partner stores for your next orders so we can continue to bring you fantastic FREE content every day:


Or support us directly:


Amazing work! Bro five o/O/
Just Awesome
These are looking real pretty if that's the right word to use. Really nicely executed. Nice work.
"Pretty" is a fitting word for Stahly's style, and why I like it so much: just clean and bright.
Stahly you're king of precision painting. I really like this guide especially the different greys.
Stunning work on these guys, the colours really work well together. And thanks for posting the recipes, not just for these but for all the others you have on the site, they are a massive help.