
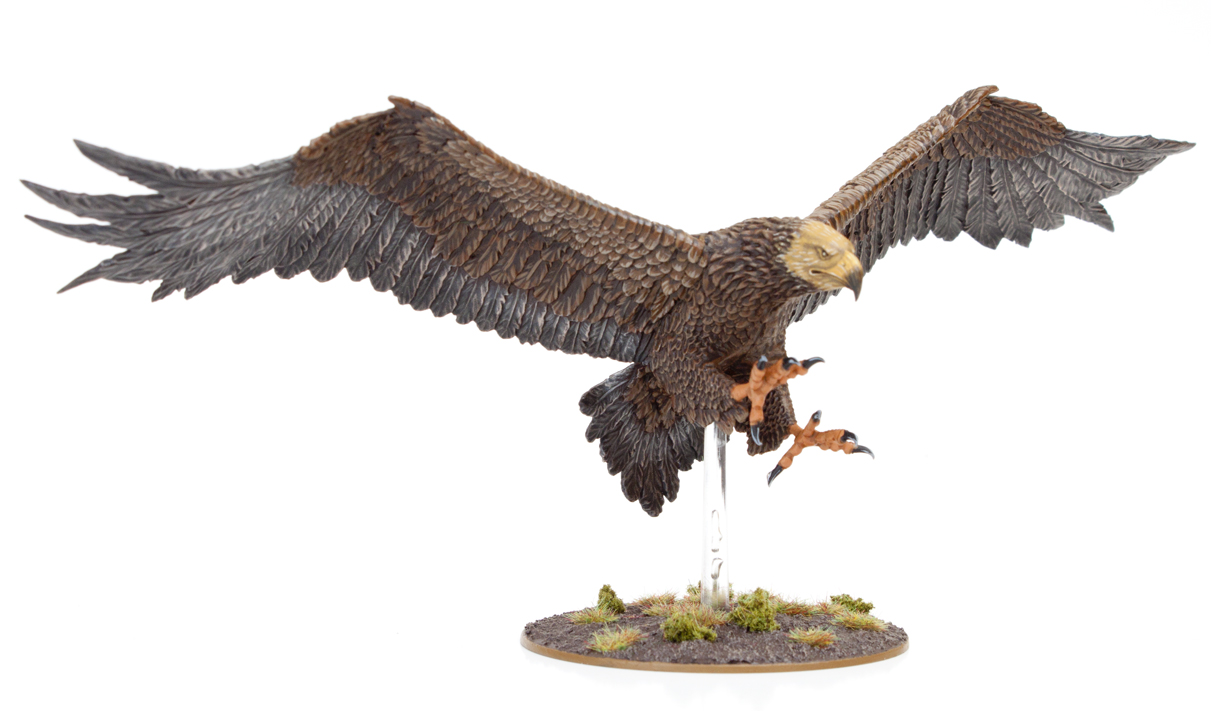
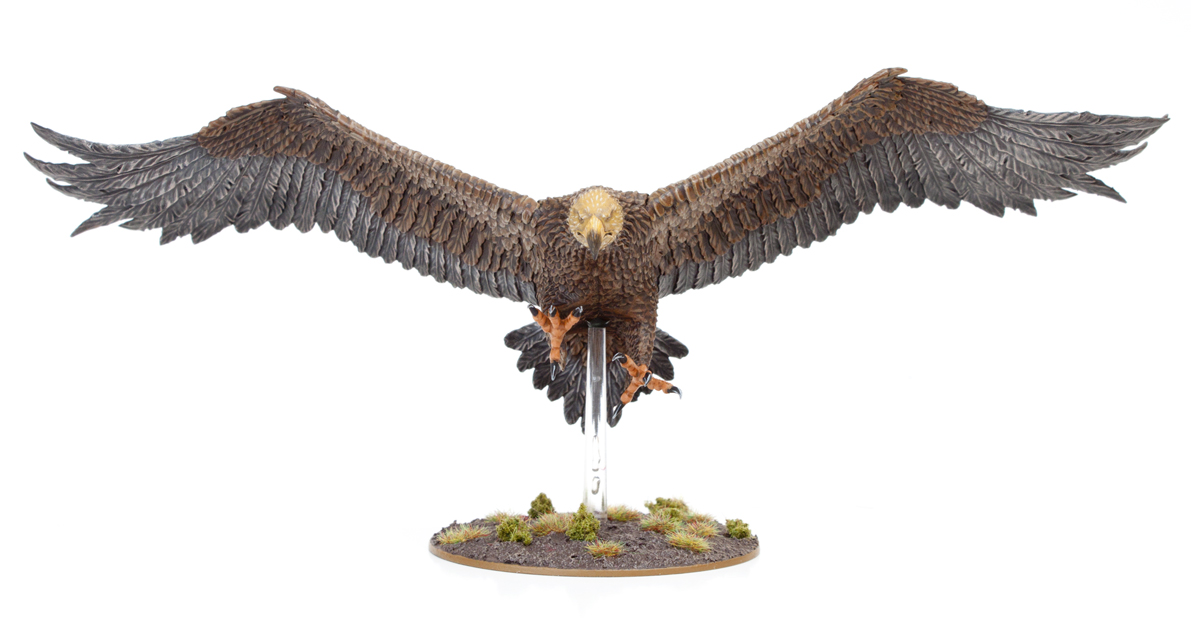
I’m really pleased to bring you guys another Hobbit based tutorial. I had such an overwhelming response from creating a whooping 17 tutorials for the Hobbit boxed game, I really wanted to continue and paint some more Hobbit models. I absolutely love the dynamic posing of the plastic Eagles so they made a great first purchase after the boxed game. Read on for the full tutorial.
I’ve designed this tutorial so established painters find it interesting but also so new comers to the hobby can learn some basic and advanced techniques. I will use terms such as glazing and dry brushing, don’t worry if you don’t know what these mean because I will elaborate and explain during that step.
Paints you will need for this tutorial:
Black Undercoat spray (I use Vallejo Surface Primer)
Rhinox Hide (base)
Mournfang Brown (base)
XV-88 (base)
Baneblade Brown (layer)
Steel Legion Drab (base)
Eshi Grey (layer)
Stormvermin Fur (layer)
Rakarth Flesh (base)
Abaddon Black (base)
Balor Brown (layer)
Zamesi Desert (layer)
Screaming Skull (layer)
Averland Sunset (base)
Skrag Brown (layer)
Jokaero Orange (base)
Ratskin Flesh (base)
Administratum Grey (layer)
Lahmian Medium (technical)
Stirland Mud (texture)
In case you need to expand your paint collection, head over to Wayland Games or Slave to Painting, which both stock a huge selection of paints at competitive prices.

1. Basecoat all the feathered areas with Rhinox Hide, this is a base paint and goes on in a single coat, so I found it easier to use a brush then my airbrush in this instance.
2. We’re going to use Mournfang Brown in two different ways. First drybrush the main body, neck and the middle row of feathers on the wings (both sides) Drybrushing is a technique painters use to quickly paint raised details. To drybrush, dip your brush into some paint and then repeatedly wipe it off on a tissue until only a small amount paint is left on the bristles, then drag the brush back and forth over the raised area. you’ll see the paint only applies itself to the very raised edges. It’s a quick way to highlight. Then paint the front row of feathers (both sides) and the feathers on the back (see step 4 for the shape I mean) completely with Mournfang Brown.
3. Use XV-88 to drybrush the the front row of feathers and the shape on the back.
4. Carefully highlight the front row of feathers and the shape on the back with Baneblade Brown. To ensure a crisp effect you’re best off painting the highlights on and taking your time. use a small brush like 000 or a GW fine detail brush.

5. Highlight the body, neck and middle row of feathers with Steel Legion Drab. Once again it’s best to carefully paint these edge highlights on rather then drybrush. It just looks neater.
6. Drybrush the lower row of feathers and the end tail feathers with Eshin Grey.
7. Drybrush these feathers further using Stormvermin Fur.
8. Paint on Rakarth Flesh edge highlights onto the grey feathers.

9. I’ve added 3 parts Lahmian Medium to 1 part Abaddon Black and mixed it together on a palette (shiny white wall tiles are the best) to create a glaze. The idea with a glaze is to gradually build up translucent layers. Being able to see the layer beneath the glaze really aids the blending effect. The more glaze layers you add, the more opaque the colour becomes. So to put this theory into practice take your mix and apply it to where you want dark shading to appear. In this instance it’s to make the wing tips darker. As you can see we can still make out the highlighting and shading from the previous stages, wheres if it was Abaddon Black straight from the pot we wouldn’t.
10. Paint the head, the top of the neck and some of the beak (leave the tip black).
11. Highlight the head with Balor Brown.
12. Further highlight the head with Zamesi Desert.

13. Add some small lines of Screaming Skull to represent feathers on the head.
14. Paint the back half of the beak with Averland Sunset.
15. Add some streaks of Screaming Skull to the beak.
16. Create another glaze of Abaddon Black and apply it to the front of the beak.

17. Paint the talons with Skrag Brown.
18. Highlight the talons with Jokaero Orange.
19. Further highlight the talons with Ratskin Flesh
20. Add some small edge highlight lines of Administratum Grey to the claws.
Finally base the model in a way which fits in with your collection. I used Stirland Mud texture paint highlighted with Karak Stone and the base edge was painted with XV-88. Static grass and scrub were glued on in small clumps.

For more Hobbit tutorials check out my Bilbo, Gandalf, Thorin, Gloin, Bombur, Ori, Dwalin, Balin, Kili, Dori, Fili, Nori, Bofur, Radaghast, Bifur, Oin and Goblin tutorials. If you found this tutorial useful, let me know in the comments.
Do you like our tutorials and reviews? Here is what you can do to support us: Check out the websites of our sponsors, place your next orders at Wayland Games by clicking here or on the banner on the right. Thank you very much, we appreciate any help to keep us going!

27 Comments
Leave a Reply
Tale of Painters is the unofficial Warhammer hobby magazine run by hobbyists like you. Support our work by using the affiliate links from our partner stores for your next orders so we can continue to bring you fantastic FREE content every day:


![]()
![]()
Or support us directly:


Tolles Tutorial, für mich, als Anfänger, super lehrreich und sehr verständlich. Dankeschön
Great eagle, I can't believe the level of detail that goes into these things!
Great tutorial. I followed your suggestions for some old school Citadel metal great eagles and turned out really well. Not as good as yours but better than I expected! Thanks
Can anyone suggest how I can assemble a makeshift stand for my eagle as mine has broken
Most people have numerous spare flying stands. You could walk into any Games Workshop and plead your case and I'm sure they'd give you one (even more sure if you bought something as well).
Failing tha, some people don't like the flying stands, so they mount their airborne models onto pieces of terrain. I've seen the eagles mounted to the Games Workshop plastic trees so it looks like they're flying overhead.
Fantastic!
Any chance of a tutorial for the kings of erebor? Thrain and Thror?
Keep up the fantastic work, such a big fan of yours
Gorgous. I can not wait to try thi son my older great eagles from Wood elves collection. should make them look really nice actually.
amazing work!!!! nothing more to add keep it up guys
how do you put the model on the stand?
AMAZING painting! but a lot of different paints. if i have to buy them all, it would cost me €75. do you have some tips how i can lower this price? thanks!
People like these tutorials because they don't have to mix paints. You could probably cut out all the middle tone paints and just mix the lighter and darker tones together.
thanks.
Will do , here is link of his work ,http://www.thedeadmarshes.com
his signature is crazzzzzy basing 🙂 goes OTT , also with the "Instant Generation" why dont GW produce – Painting by Number guides like you do , so much money to be made tbh. the ONLY one i saw was the goblin town one on the IPAD and it was so bad , cant believe i wasted 15 gbp on it.
200 GBP for one day with "Eavy Metal" Masterclass… too expensive do you think for the experience or lessons you will learn?
Ah ok , i guess you interpreted differently and everyone does they want. Im been using your guide like a bible since i got back in LOTR modeling , doing rhinox hide base coat as we speak. Thanks for reply , you should perhaps show your work on One-Ring.com and Thelastalliance , although only guy i know comes close is Deadmarshes guy , do you know him or heard of him?
I'm really happy you like the guides.
I haven't heard of Deadmarshes guy. Do you have a link to his work? Does he have a blog? Why don't you invite him to join our blog network here at ToP.
Hmm Garfy , i was wondering if you could possible tel me why you chose the Xv-88 for the head and beak part BASE instead of Zandri Desert? , i guess i like the GW look , but dont know how to do it 🙁
Thanks if you could answer this.
I chose xv88 because it's a darker brown then Zandri dust so it's better for the shading and blending into the darker neck feathers.
More Hobbit tutorials please. More!
Thank you so much for this! I'm about to start a Wood Elf army and I wanted to use The Hobbit Great Eagles so I could play both games, I love these Hobbit tutorials.
please make a toturial about Thror !!!!
I might do, but I'm thinking I might by something for the evil force next. I'm really tempted by the trolls.
No please please please do Bolg, I just bought him!
Thank you!
AWESOME! I will use this to paint the eagles on my new HE chariot…I love it and it is very detailed. Thank you!!
Outstanding!
Beautiful work. I didn't even know these models existed.
I know what I'm getting for my High Elf army now.
Impressive. Greatly appreciated.