
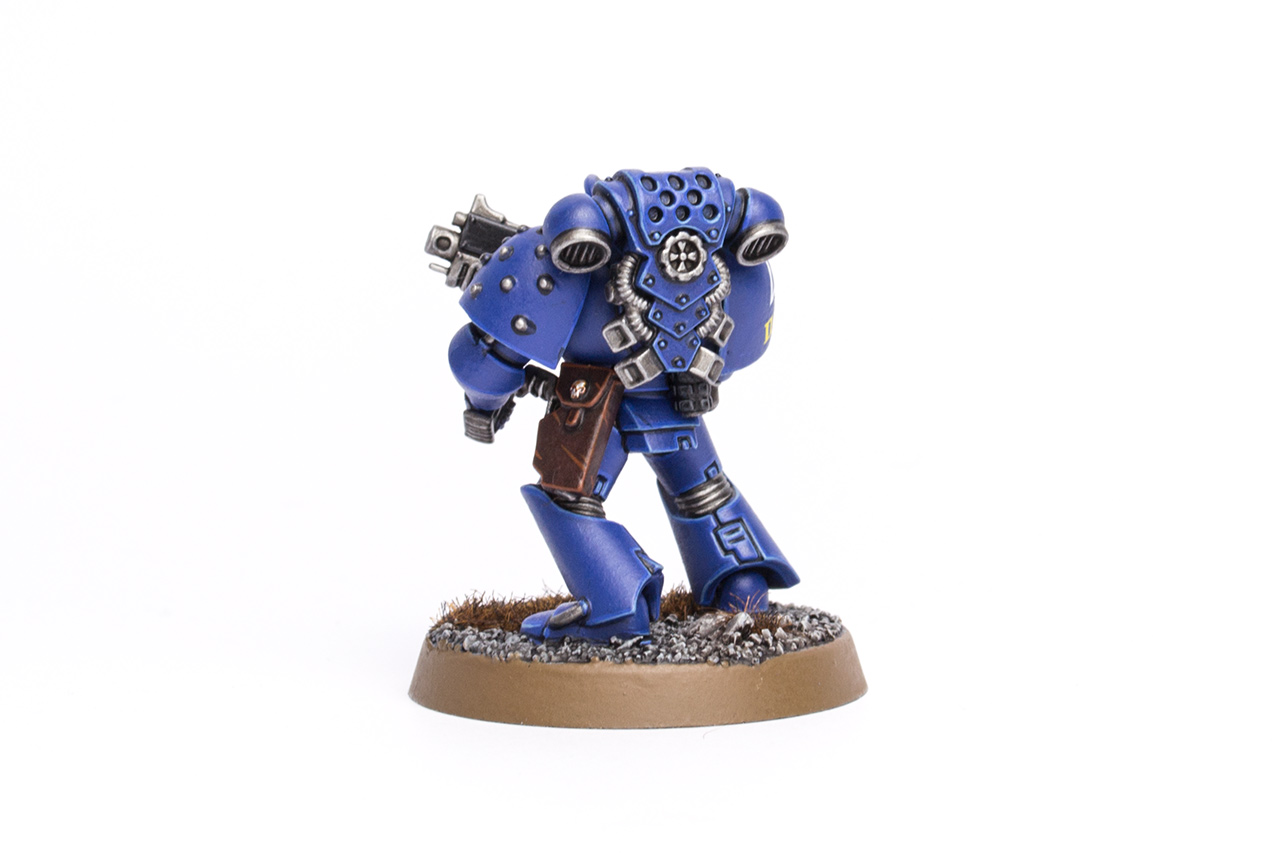
Over the years, I’ve been often asked about how I painted my Ultramarines collection. Ages ago, I created a tutorial, but time has moved on, and since then we’ve launched our popular step-by-step tutorials. So it was about time to create a tutorial in our new format. Check out the extensive, 28 steps guide for painting the chap above, after the jump.
This tutorial assumes you have a good understanding of how to paint. Underneath each picture are the corresponding instructions. Each step shows the paint(s) I used during that step. I created this paint scheme years ago, so the following tutorial harks back to a lot of paints I had available back then, mainly the old Citadel range and Vallejo. However, the tutorial can be easily converted to the current Citadel paint system. When I use a non-GW or OOP paint, I’ll provide you with suitable alternatives from the current Citadel paint range [in brackets].
Paints I used for this tutorial:
The Army Painter Uniform Grey Color Primer [Mechanicus Standard Grey spray]
Citadel Mechanicus Standard Grey
Citadel Longbeard Grey
Citadel Eshin Grey
Citadel Steel Legion Drab
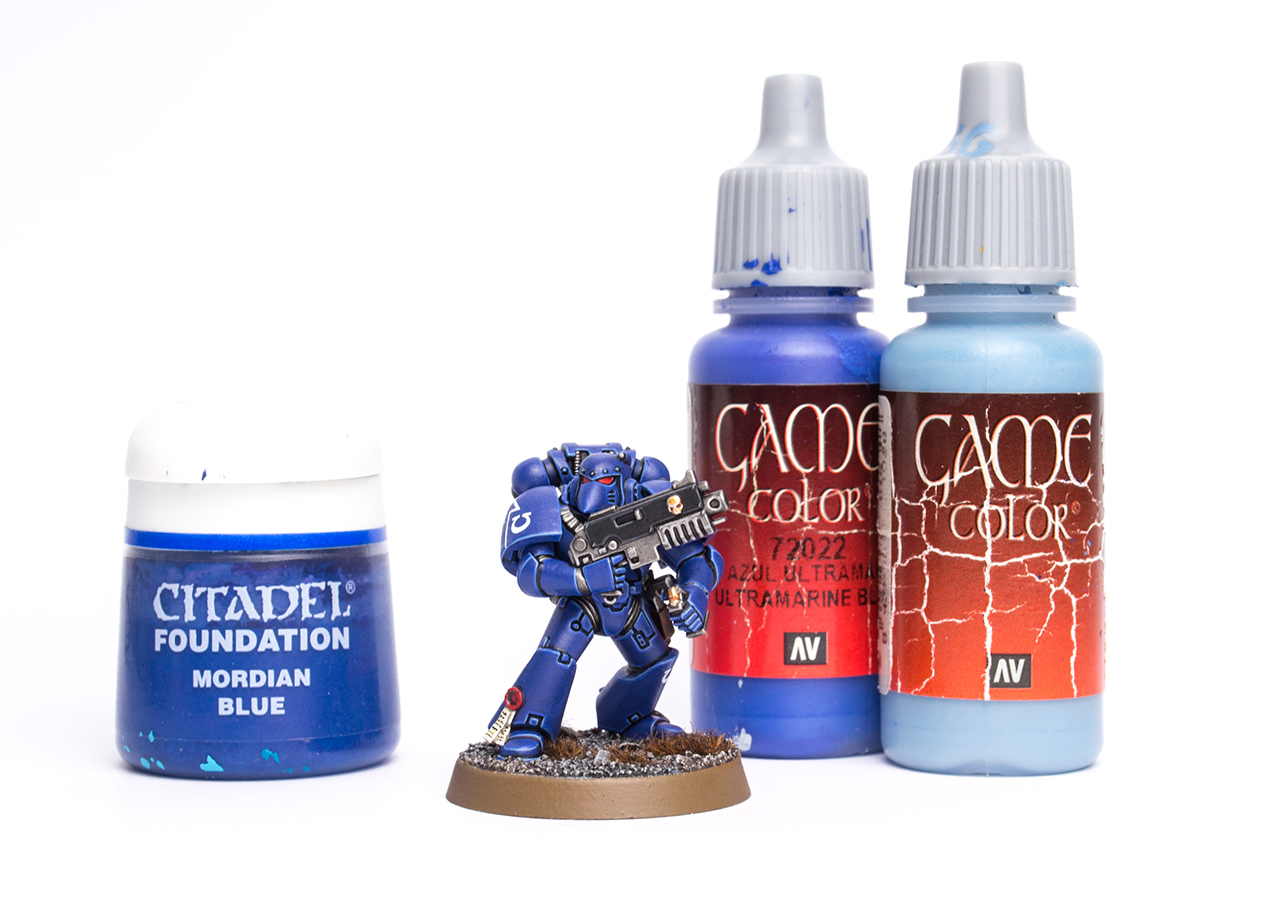
Citadel Mordian Blue [Macragge Blue]
Citadel Blood Red (OOP) [Evil Sunz Scarlet]
Citadel Blazing Orange (OOP) [Trollslayer Orange]
Citadel Codex Grey (OOP) [Dawnstone]
Citadel Scorched Brown (OOP) [Rhinox Hide]
Citadel Bestial Brown (OOP) [Mournfang Brown]
Citadel Khemri Brown (OOP) [Baneblade Brown]
Citadel Bleached Bone (OOP) [Ushabti Bone]
Citadel Mechrite Red (OOP) [Mephiston Red]
Warpaints Strong Tone Ink [Agrax Earthshade]
Warpaints Dark Tone Ink [Nuln Oil]
Warpaints Gun Metal [Leadbelcher]
Warpaints Plate Mail Metal [Ironbreaker]
Warpaints Shining Silver [Runefang Steel]
Vallejo Game Color Ultramarines Blue [Altdorf Guard Blue]
Vallejo Game Color Steel Blue [Fenrisian Grey]
Vallejo Game Color Black Ink [thinned Abaddon Black]
Vallejo Game Color Brown Ink [thinned Rhinox Hide]
Vallejo Model Color Black [Abaddon Black]
Vallejo Model Color White [White Scar]
In case you need to expand your paint collection, head over to Wayland Games, which stock a huge selection of paints at competitive prices.

1. The model was primed with Uniform Grey Color Primer from The Army Painter. You could use any grey primer, or Macragge Blue spray paint from Games Workshop. Stock black primer would work as well, though you might need more coats of blue later. Once the primer was dry, several thin coats of old Mordian Blue [Macragge Blue is pretty close] were applied with an airbrush, but a regular brush works as well.
2. The texture of the base was painted with Mechanicus Standard Grey, then heavily drybrushed with Longbeard Gey.
3. Spots of Warpaints Dark Tone Ink [Nuln Oil] and Strong Tone Ink [Agrax Earthshade] were applied in irregular patterns, allowing the washes to flow into each other slighty. This will create some interesting black/brown colour variations once dry.
4. Finally, the sand texture was finished with a gentle drybrush of Longbeard Grey.
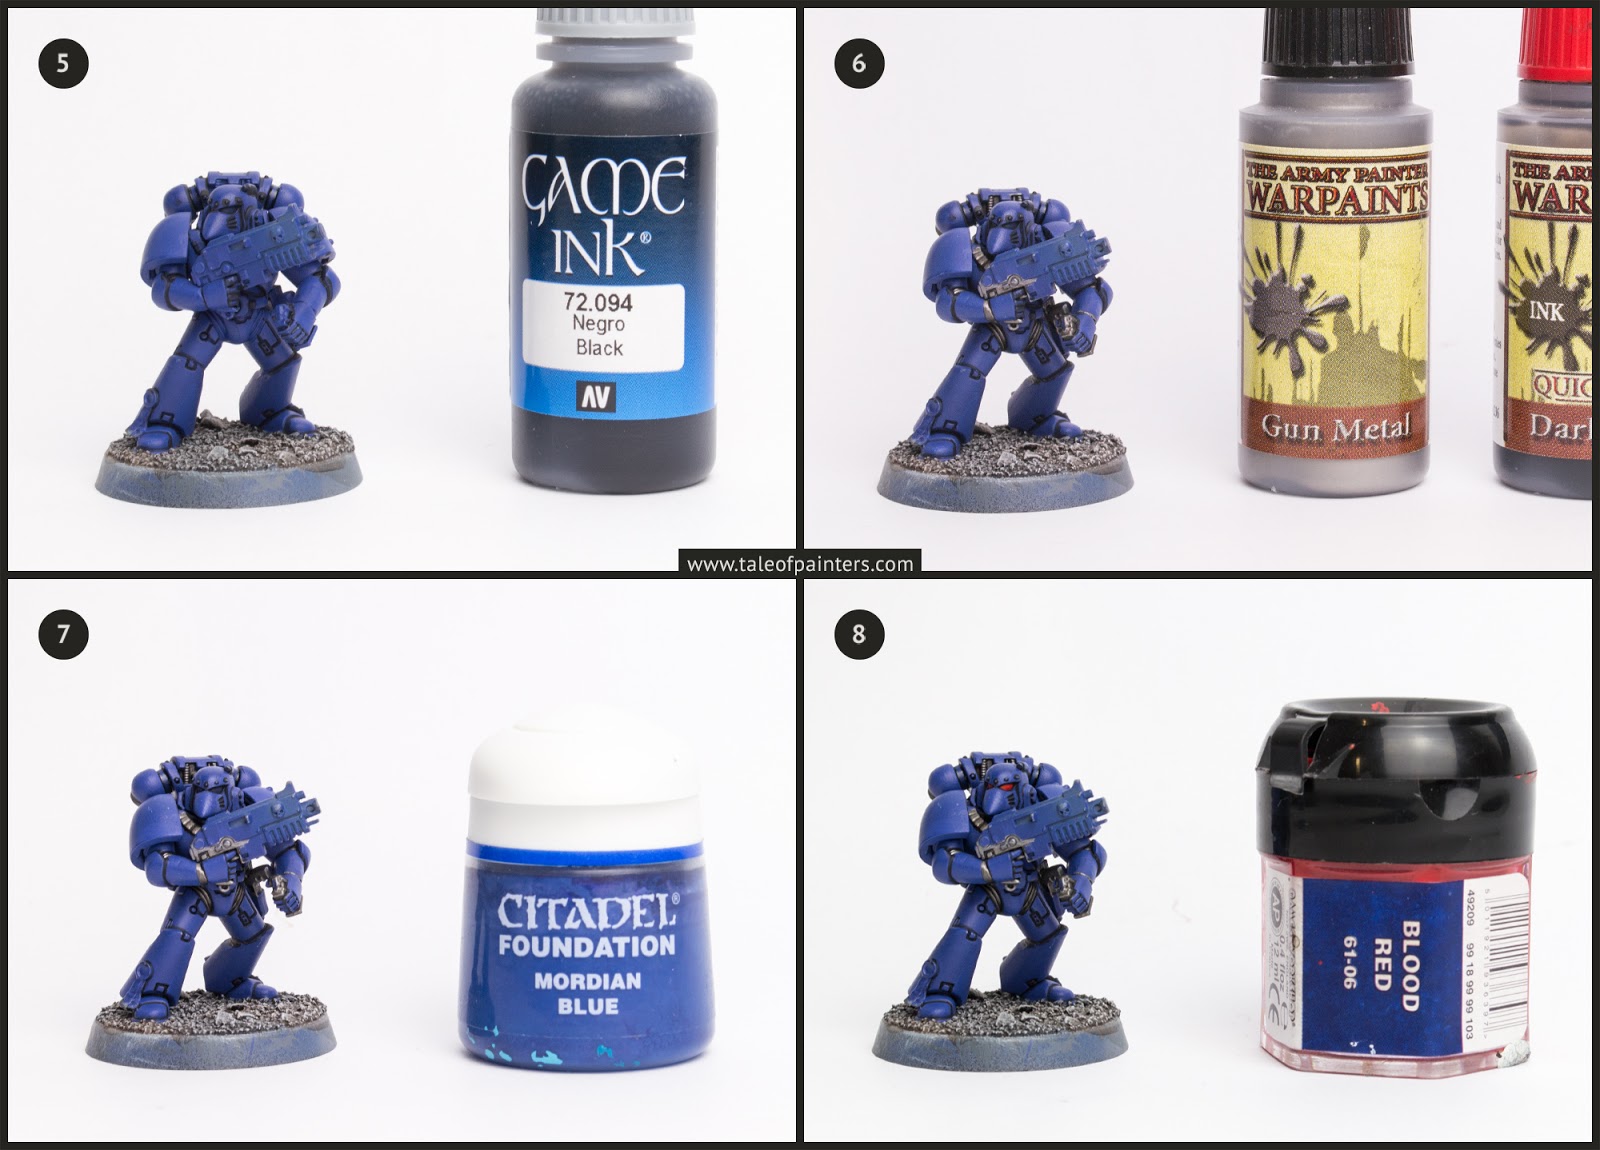
5. I repainted the armour with Mordian Blue [Macragge Blue] where the drybrush hit the feet. VGC Black Ink was then painted directly into the armour’s recesses [you could use Abaddon Black with a bit of Nuln Oil or Lahmian Medium instead].
6. Any metallic areas that would be hard to reach once the armour is painted were now basecoated
with Warpaints Gun Metal [Leadbelcher] and shaded with Warpaints Dark Tone Ink [Nuln Oil]
7. The armour was tidied up with Mordian Blue [Macragge Blue].
8. The eye lenses were painted with old Blood Red [Evil Sunz Scarlet].

9. The lower half of the lenses was highlighted with old Blazing Orange [Trollslayer Orange]. Then, a small white dot was added to complete the look. VMC Black [Abaddon Black] can be used to line the lenses where any red or orange spilt over.
10. A highlight of VGC Ultramarine Blue [Altdorf Guard Blue] was applied to all the raised edges.
11. The armour was completed by a final, even thinner edge highlight of VGC Steel Blue [Fenrisian Grey].
12. The remaining metal areas were painted with Warpaints Gun Metal [Leadbelcher], then washed with Warpaints Dark Tone Ink [Nuln Oil].
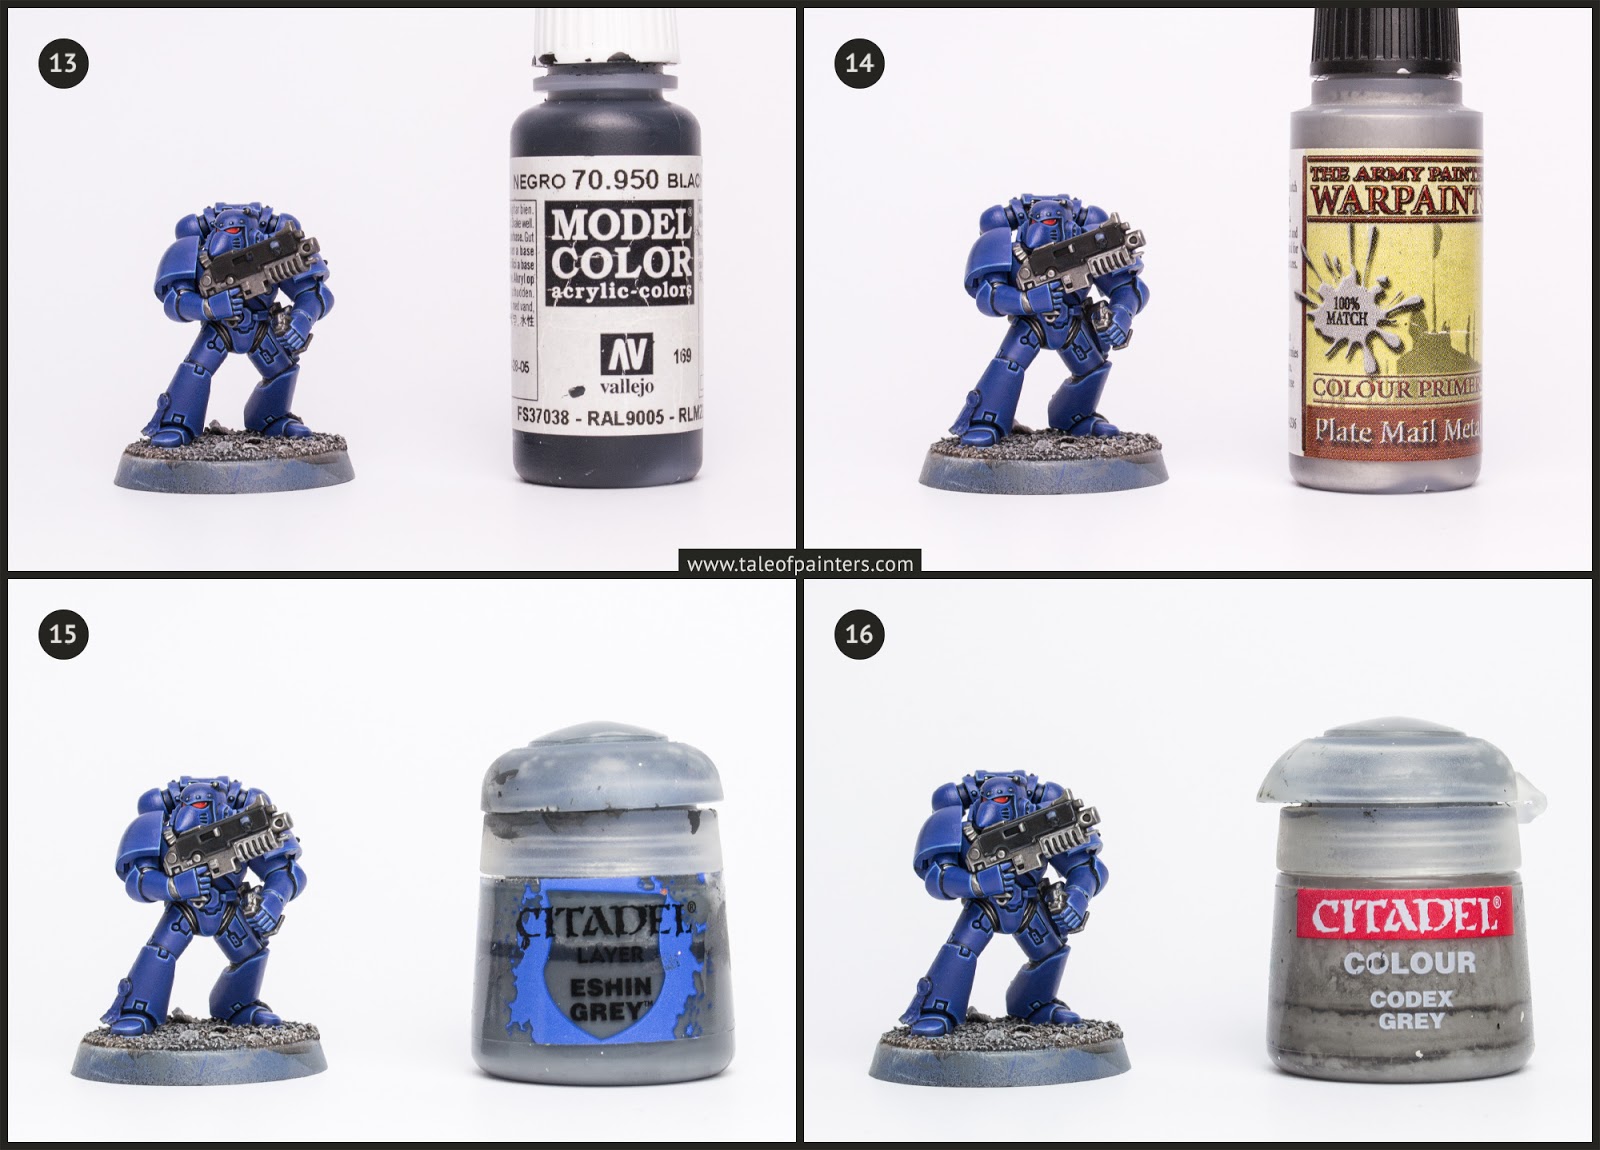
13. The casings of the bolter and grenades were painted with VMC Black [Abadoon Black]
14. Warpaints Plate Mail Metal [Ironbreaker] was applied as an edge highlight to all metal parts.
15. All black areas were edge highlighted with Eshin Grey.
16. A final edge highlight of old Codex Grey [Dawnstone] was applied.
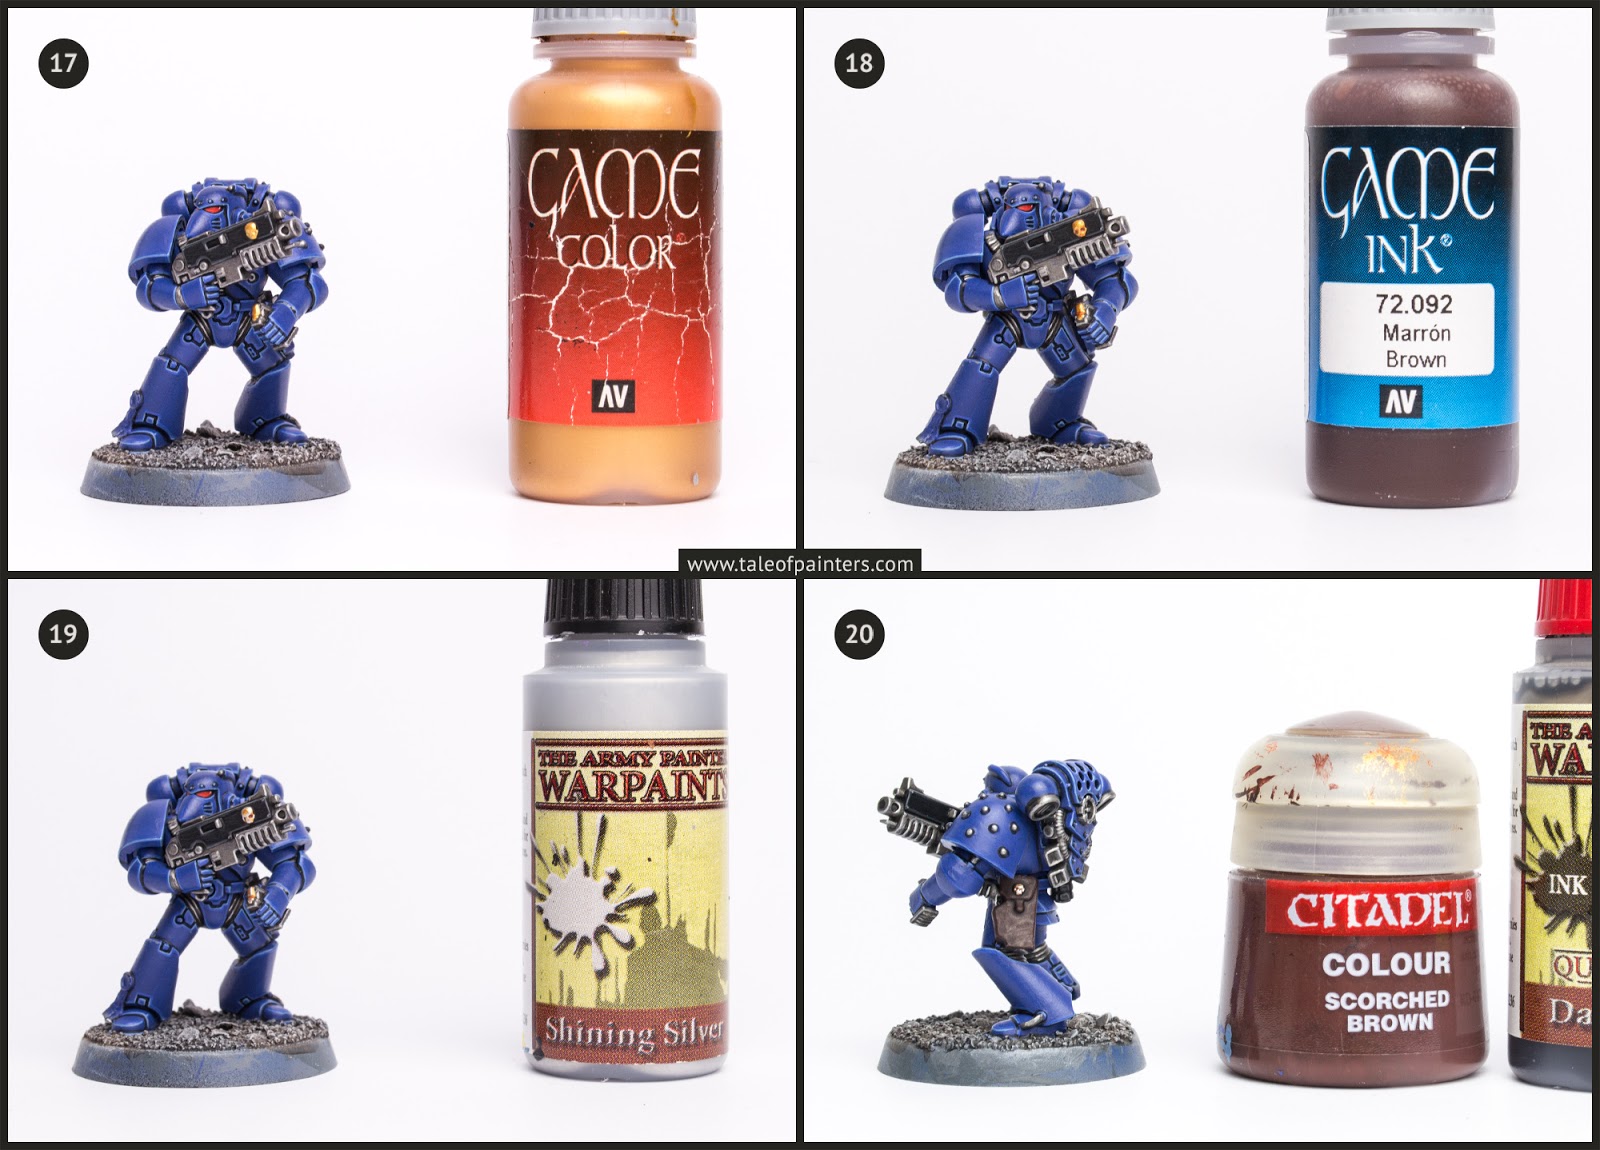
17. Any gold details were painted with VGC Glorious Gold [Gehenna’s Gold or Retributor Armour].
18. VGC Brown Ink was washed directly into the recesses of the gold details [could be replaced with Rhinox Hide mixed with a bit of Lahmian Medium or Seraphim Sepia].
19. A highlight of Warpaints Shining Silver [Runefang Steel] was applied to complete the golden details.
20. The leather pouches were basecoated with old Scorched Brown [Rhinox Hide]. Then, a wash of Warpaints Dark Tone Ink [Nuln Oil] was applied to the leather. You need to make sure that the wash doesn’t pool on the flat areas.
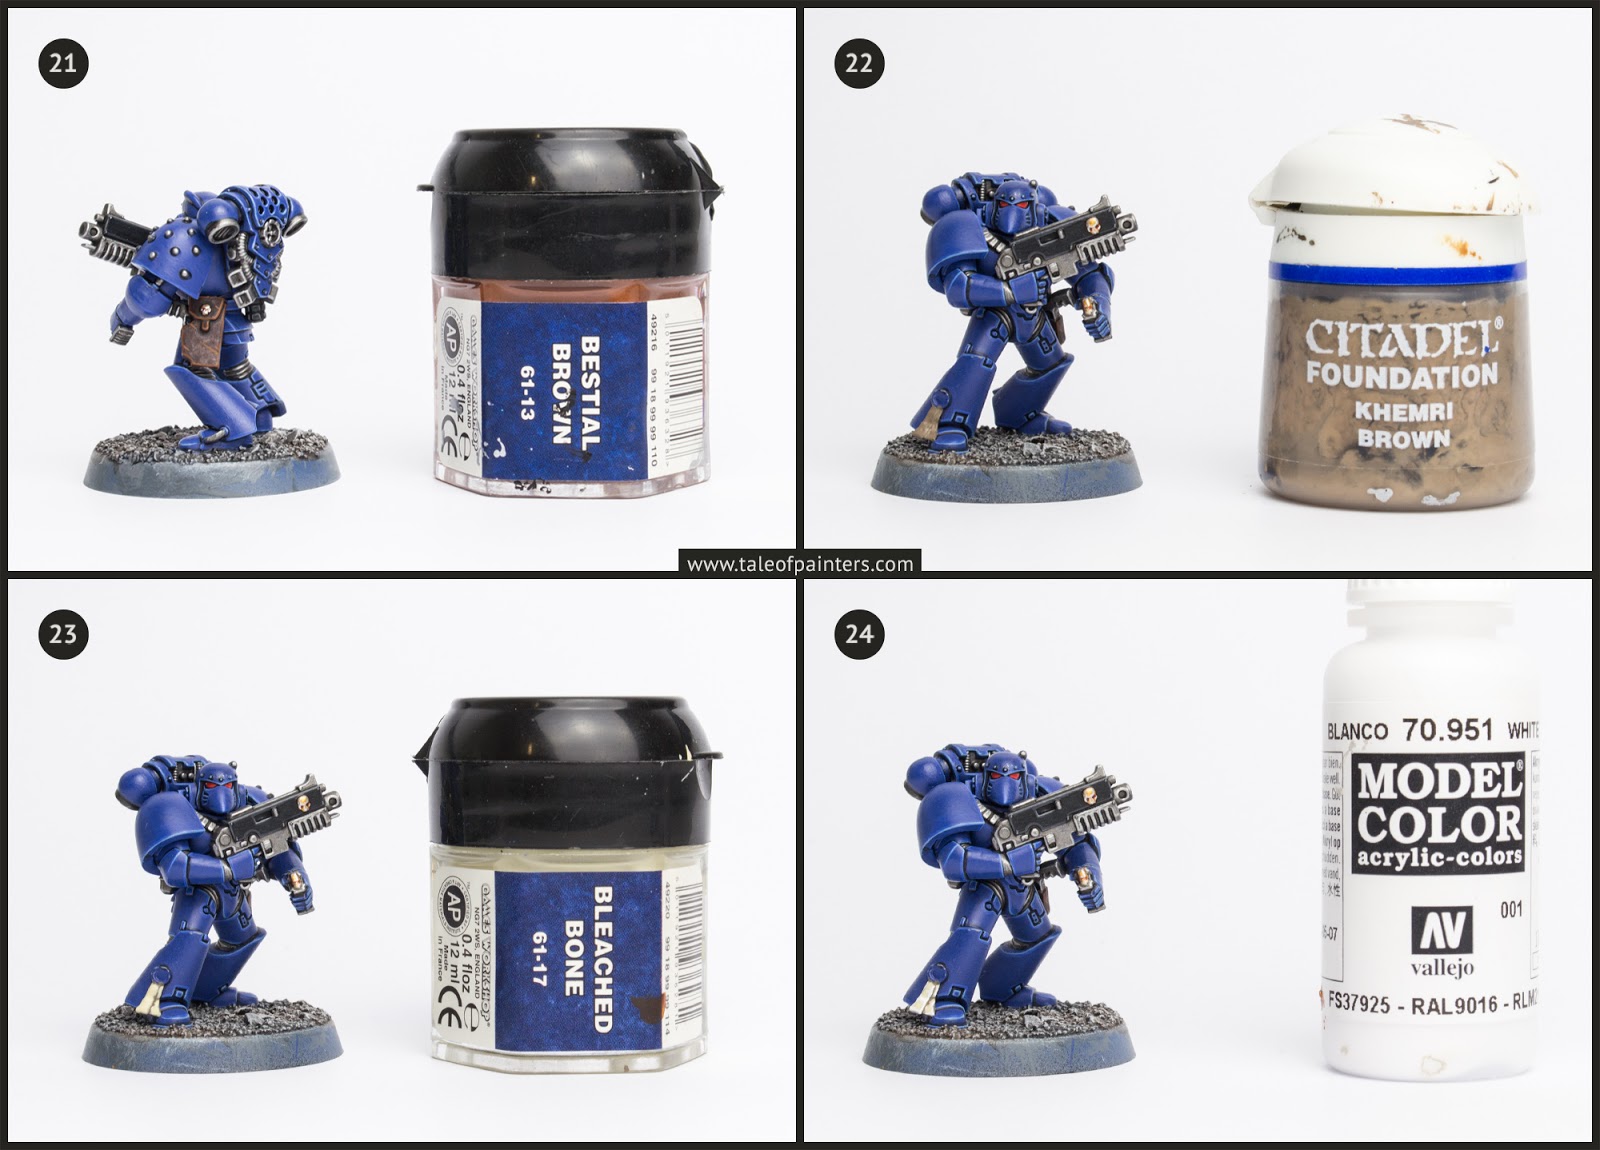
21. A highlight of old Bestial Brown [Mournfang Brown] was applied to the pouches. I also applied a couple of stress lines to bring out the leather’s texture.
22. The parchment of the purity seals was basecoated with old Khemri Brown [Baneblade Brown is close].
23. Old Bleached Bone [Ushabti Bone] was layered over the parchment, leaving the recesses dark.
24. The parchment was completed with a highlight of VMC White [White Scar.]

25. The wax was basecoated with old Mechrite Red [Mephiston Red is even better because it’s more vibrant, would have used it if they had this paint back then], then washed with Warpaints Dark Tone Ink [Nuln Oil].
26. The wax was highlighted with Mechrite Red [Mephiston Red] first, and old Blood Red [Evil Sunz Scarlet] second.
27. With a very fine brush, small dots of thinned VMC Black [Abaddon Black] were added to the purity seals to represent script.
28. The trim of the base was painted with Steel Legion Drab.


To complete the model, I added patches of a custom blend of light brown, dark brown, and black static grass fibres. I also added a couple of custom-designed and printed transfers, which I painted over with VMC White and VGC Sunblaze Yellow. I find it easier to paint over transfers in order to replicate a consistent design over several models, than to freehand from scratch every time.
Also, check out my original Ultramarines tutorial to learn how I paint robes and faces. For a different approach have a look at the tutorial Garfy created for his epic Ultramarines collection that was featured as Army of the Month in Warhammer: Vision. And don’t forget we have free tutorials for many more chapters here on Tale of Painters.
How do you like my Ultramarines? Have you found anything useful in this tutorial for your own projects? Let us know in the comments!
9 Comments
Leave a Reply
Tale of Painters is the unofficial Warhammer hobby magazine run by hobbyists like you. Support our work by using the affiliate links from our partner stores for your next orders so we can continue to bring you fantastic FREE content every day:


![]()
![]()
Or support us directly:


Great tutorial. Could you tell me why you didn’t prime using a Macragge Blue spray can?
Thanks for any help.
Yeah, you definitely can. I just hadn’t Macragge Blue spray when I wrote the tutorial 😉
Solid tutorial, it is actually a little unsettling how this is, exactly my method too. Same paints Citadel/Vallejo combos also. 😀
Key difference is brush control haha.
Amazing tutorial Stahly. I want to know how the hell all your old Citadel paints haven't dried up yet, mine all turned into solid lumps ages ago!
the clean the threads and caps and then take a q tip and put a thin layer of vaseline around the part where it seals. that will keep them air tight.
dont paint from the pot, keep the lip seal/threads literally wipe down every time you use the paint, doing that i still have perfectly good citadel hexpots i regularly use
Nice tutorial, and good to have some larger shots at the end (I can't zoom in on the stage shots on my phone!).
Regarding the airbrushing, I'm struggling to find the right consistency for the paint – can you suggest the best ratios or tips?
Again, i love the super clean simple style you have on these 🙂
Great tutorial