

It’s my birthday today and I have a gift for you, here’s a free tutorial! In today’s post I’ll share a complete step by step photo tutorial guide on how to paint a Azyrite Ruins in a sandstone colour scheme. More after the jump!
This tutorial assumes you have a basic understanding of how to paint. For the beginners, I will explain the techniques as I go along. Each picture below shows four chronological steps. Underneath each picture are the corresponding instructions. Each step shows the paint I used during that step.
Paints you will need for this tutorial:
Wraithbone Spray
Nazareth Yellow (Contrast)
Reikland Fleshshade (Shade)
Zamesi Desert (layer)
Morghast Bone (base)
Screaming Skull (layer)
Corvus Black (base)
Eshin Grey (layer)
Mechanicus Standard Grey (base)
Dawnstone (layer)
Administratum Grey (layer)
Dryad Bark (base)
Steel Legion Drab (base)
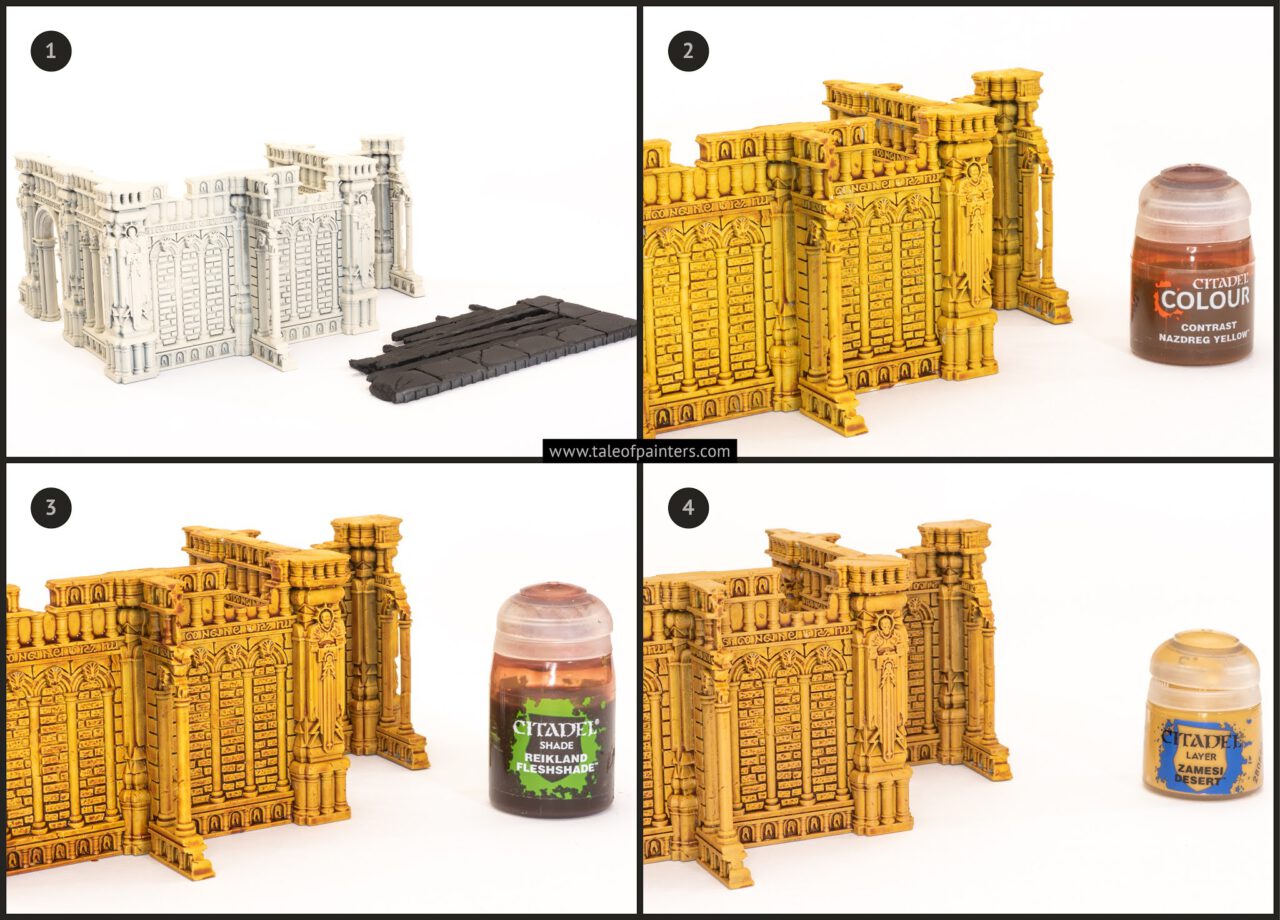
1. Undercoat the ruins with Wraithbone Spray and undercoat the floor with Chaos Black.
2. Using a large brush paint Nazdreg Yellow all over the ruin. If it starts to pool in one place wick it away with the brush.
3. Once dry, using the same large brush, wash the entire ruin with Reikland Fleshshade.
4. Using a large drybrush (soft bristled make up brush is good) pick up some Zamesi Desert paint with the bristles and then wipe some of it off. Don’t wipe too much off, you want a loaded drybrush that paints the flat areas but
leaves the recesses.

5. Repeat the drybrushing process this time using Moghast Bone. For this drybrushing you want to wipe off more paint so the brush isn’t so loaded.
6. Do a light drybrushing of Screaming Skull to catch the edges.

7. Paint the stonework completely with Corvus Black.
8. Apply a heavy loaded drybrush of Eshin Grey on to the stonework.
9. Lightly drybrush Mechanicus Standard Grey on to the stonework.
10. Lightly drybrush Dawnstone on to the stonework.

11. A final light drybrush of Administratum Grey should be used just to catch the edges.
12. Paint the wooden planks with Dryad Bark.
13. Drybrush the planks with Steel Legion Drab being careful not to get any on the stones.
Finally glue the two pieces together and you’re done!

Belated happy birthday mate!
Perfect timing as I just bought the Egyptian Green Stuff World roller. This will be perfect to colour the results from that.