
In this detailed tutorial, I’ll show you how to paint a model from the Black Templars chapter to a reasonably high standard in 46 steps. You’ll learn how to paint black armour with crisp edge highlights, yellow “John Blanche” style yellow bolters, worn leather pouches, and much more.
This tutorial assumes you have a good understanding of how to paint. Underneath each picture are the corresponding instructions. Each step shows the paint(s) I used during that step. I have a rather eclectic paint collection, so when I use a non-GW or OOP paint, I’ll try to provide you with suitable alternatives from the current Citadel paint range [in brackets]. However, if you want to acchieve the exact same result as shown, you might want to expand your paint collection.
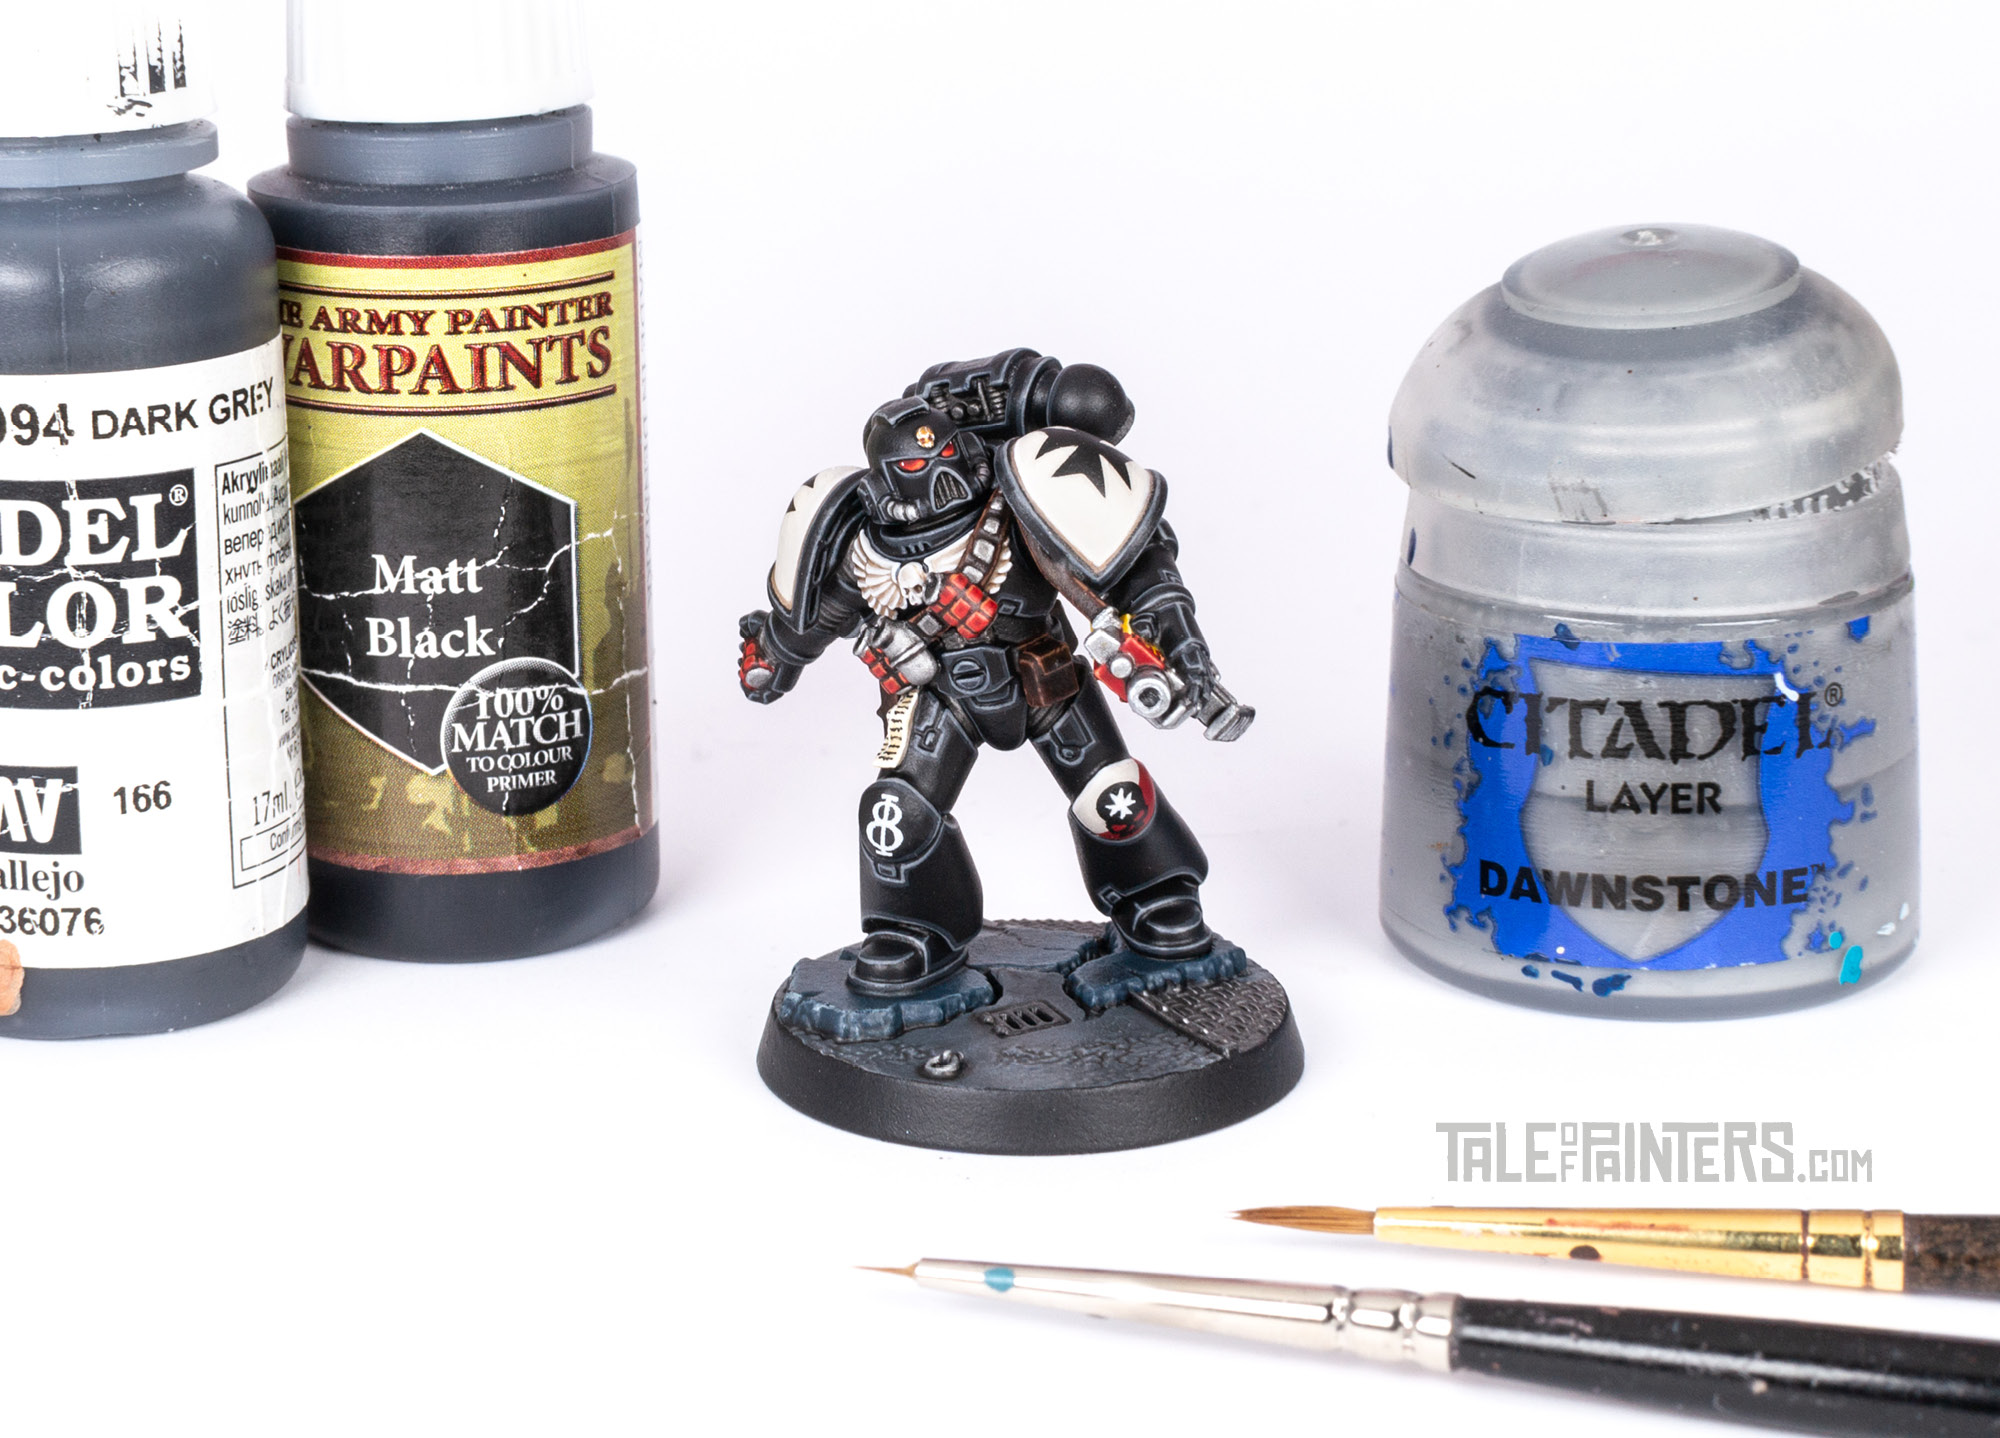
Paints you will need for this tutorial:
Stegadon Scale Green
Thunderhawk Blue
Screaming Skull
Mechanicus Standard Grey
Dawnstone
Pallid Wych Flesh
Yriel Yellow
Dorn Yellow
Mephiston Red
Evil Sunz Scarlet
Jokaero Orange
Wraithbone
Agrax Earthshade
Reikland Fleshshade
Reikland Fleshshade Gloss
Basilicanum Grey (Contrast)
Iyanden Yellow (Contrast)
Gore-grunta Fur (Contrast)
Cygor Brown (Contrast)
Scorched Brown (OOP Citadel paint) [or Rhinox Hide / Screaming Skull mix]
Khemri Brown (OOP Citadel paint) [or Baneblade Brown]
Vallejo Game Color Stonewall Grey [or Administratum Grey]
Vallejo Model Color Dark Grey [or Eshin Grey]
Vallejo Model Color White [or White Scar]
Vallejo Mecha Color Dark Steel [or Leadbelcher]
Vallejo Mecha Color Steel [or Iron Hands Steel]
Vallejo Mecha Color Light Steel [or Stormhost Silver]
Formula P3 Umbral Umber [or Rhinox Hide]
Formula P3 Leather Brown [or Rhinox Hide / Screaming Skull mix]
Formula P3 Menoth White Base [or Ushabti Bone]
The Army Painter Matt Black [or Abaddon Black]
The Army Painter Daemonic Yellow [or Phalanx Yellow]
The Army Painter Warpaints Lava Orange [or Trollslayer Orange]
The Army Painter Warpaints Dark Tone Wash [or Nuln Oil]
The Army Painter Warpaints Strong Tone Wash [or Agrax Earthshade]
Reaper Master Series Polished Bone [or a mix of Rakarth Flesh and Pallid Wych Flesh]
If you need to expand your paint collection to follow the tutorial, check out our partner stores Wayland Games and Element Games, which offer an amazing range of paint brands at decent discounts.
How to paint Black Templars
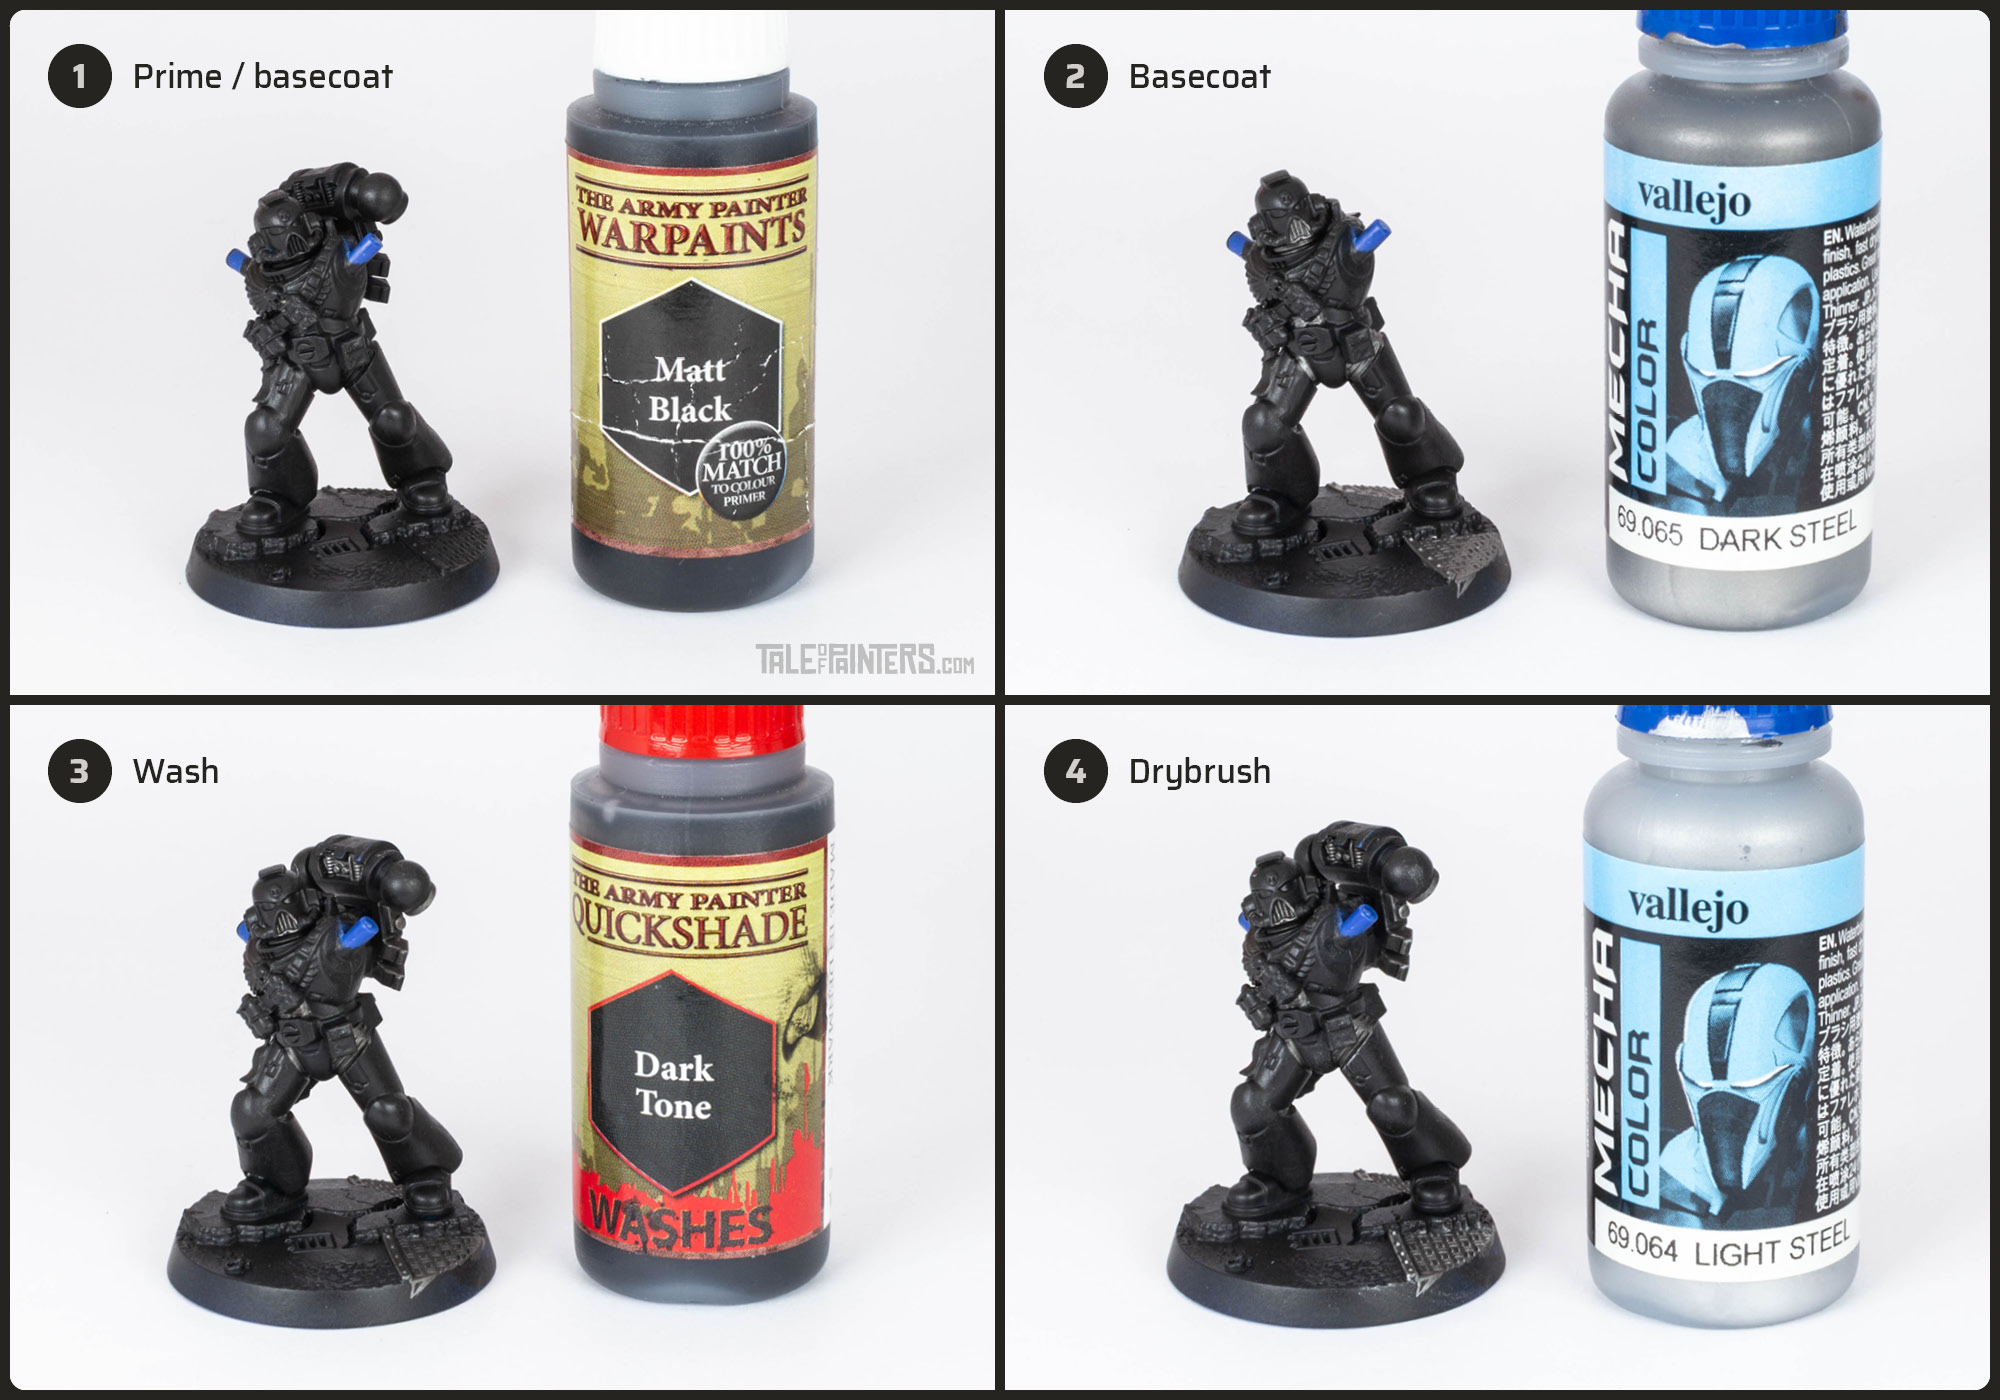
1. Prime the model with your favourite black primer. I used AK Interactive Fine Primer Black Spray, but Matt Black from The Army Painter or Chaos Black spray are fine as well. Then, for an even finish, I painted a thin coat of The Army Painter Warpaints Matt Black [or Abaddon Black] all over the model, including any areas I missed with the spray primer.
2. Basecoat any metallic details on the base with Vallejo Mecha Color Dark Steel [or Leadbelcher]. Also basecoat the joints between the armour and the exhausts on the backpack.
3. Wash the dark metallic areas with Warpaints Dark Tone Wash [or Nuln Oil].
4. Then, drybrush the metallic areas with Vallejo Mecha Color Light Steel [or Stormhost Silver].
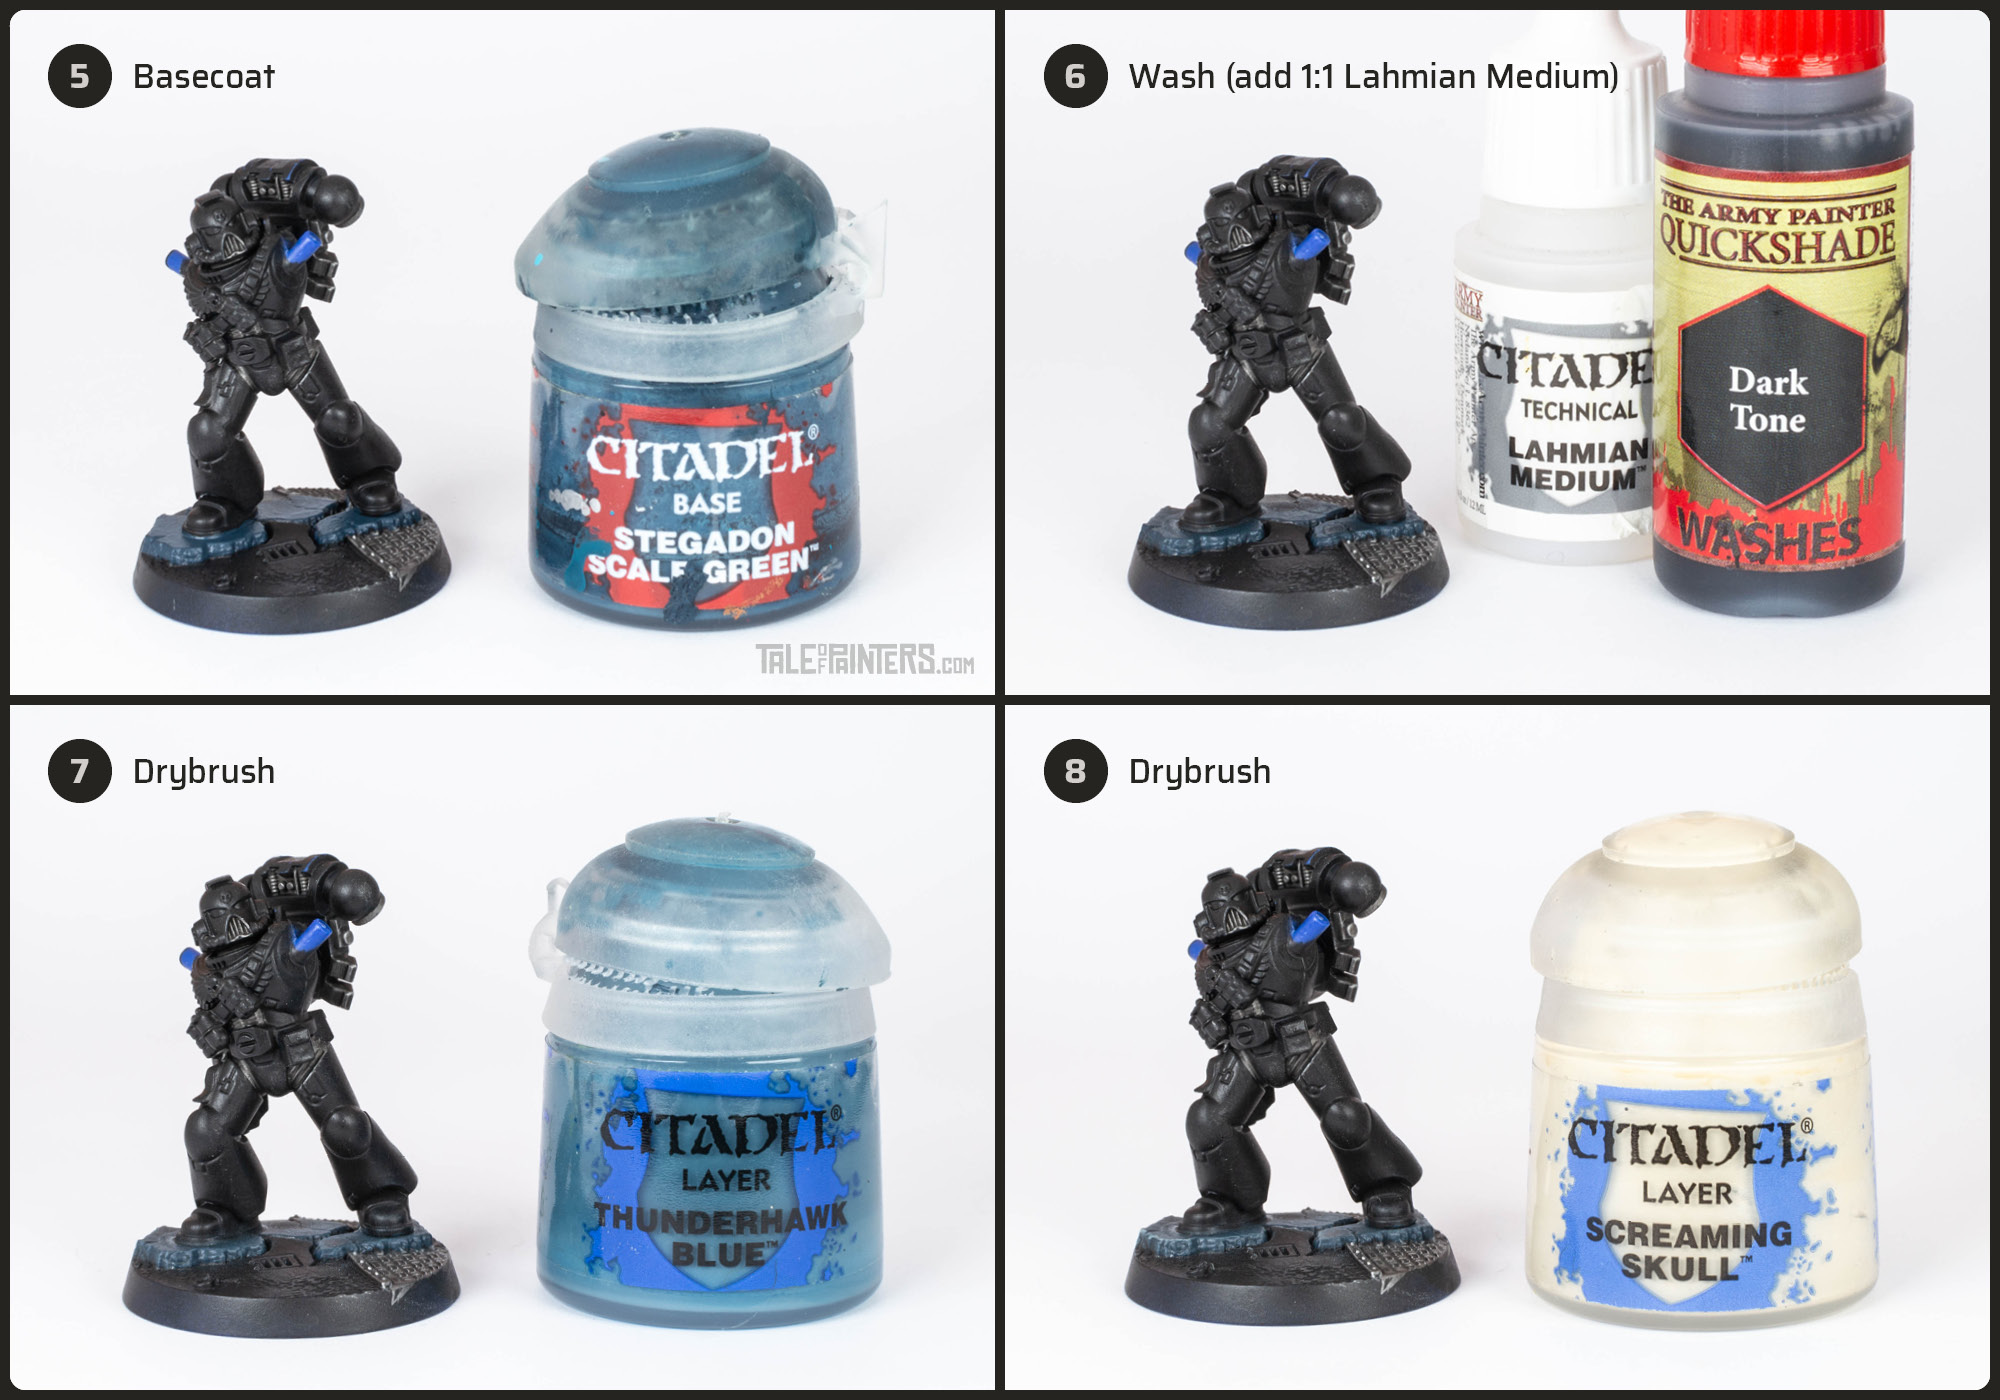
5. Basecoat the rubble on the base with Stegadon Scale Green.
6. Wash the rubble with a 1:1 mix of Warpaints Dark Tone Wash [or Nuln Oil] and Lahmian Medium.
7. Drybrush the rubble with Thunderhawk Blue.
8. Gently drybrush again, this time with Screaming Skull.

9. Basecoat the asphalt texture with Mechanicus Standard Grey.
10. Gently rybrush with Vallejo Game Color Stonewall Grey [or Administratum Grey].
11. Wash the concrete texture with a 1:1 mix of Warpaints Dark Tone wash [or Nuln Oil] and Strong Tone Wash [or Agrax Earthshade].
12. Prime the arms separately with Wraithbone spray, then apply a thin coat of Wraithbone base paint where the spray didn’t reach the model. This will make painting the ivory shoulder guards much easier.

13. Basecoat the inner part of the shoulder guards with Reaper Master Series Polished Bone [or a mix of Rakarth Flesh and Pallid Wych Flesh].
14. Apply a selective shade with Agrax Earthshade, and, if needed, clean up with the base colour Polished Bone.
15. After you’ve painted the arms black, apply an edge highlight of Vallejo Model Color Dark Grey [or Eshin Grey, but Dark Grey has a much better opacity so you’ll need less layers and can be more precise].
16. Finish the armour with a crisp edge highlight of Dawnstone. The key is to make this highlight even thinner and leaving some of the Dark Grey visible. This requires a lot of brush control, I like to use the smallest brush I can find, which is a Winsor & Newton Series 7M 000, though you can achieve this technique with any high-quality kolinsky sable brush if the tip is pointy enough.

17. Basecoat the chest aquila with Reaper Master Series Polished Bone [or a mix of Rakarth Flesh and Pallid Wych Flesh].
18. Apply an all-over wash with Agrax Eartshade.
19. Highlight both the shoulder guard and the aquila’s skull with Pallid Wych Flesh. I didn’t highlight the wings at this point because the “feathers” are so small that the single white highlight we’ll apply in step 20 will be enough.
20. Highlight all the bone areas with Vallejo Model Color White [or White Scar].
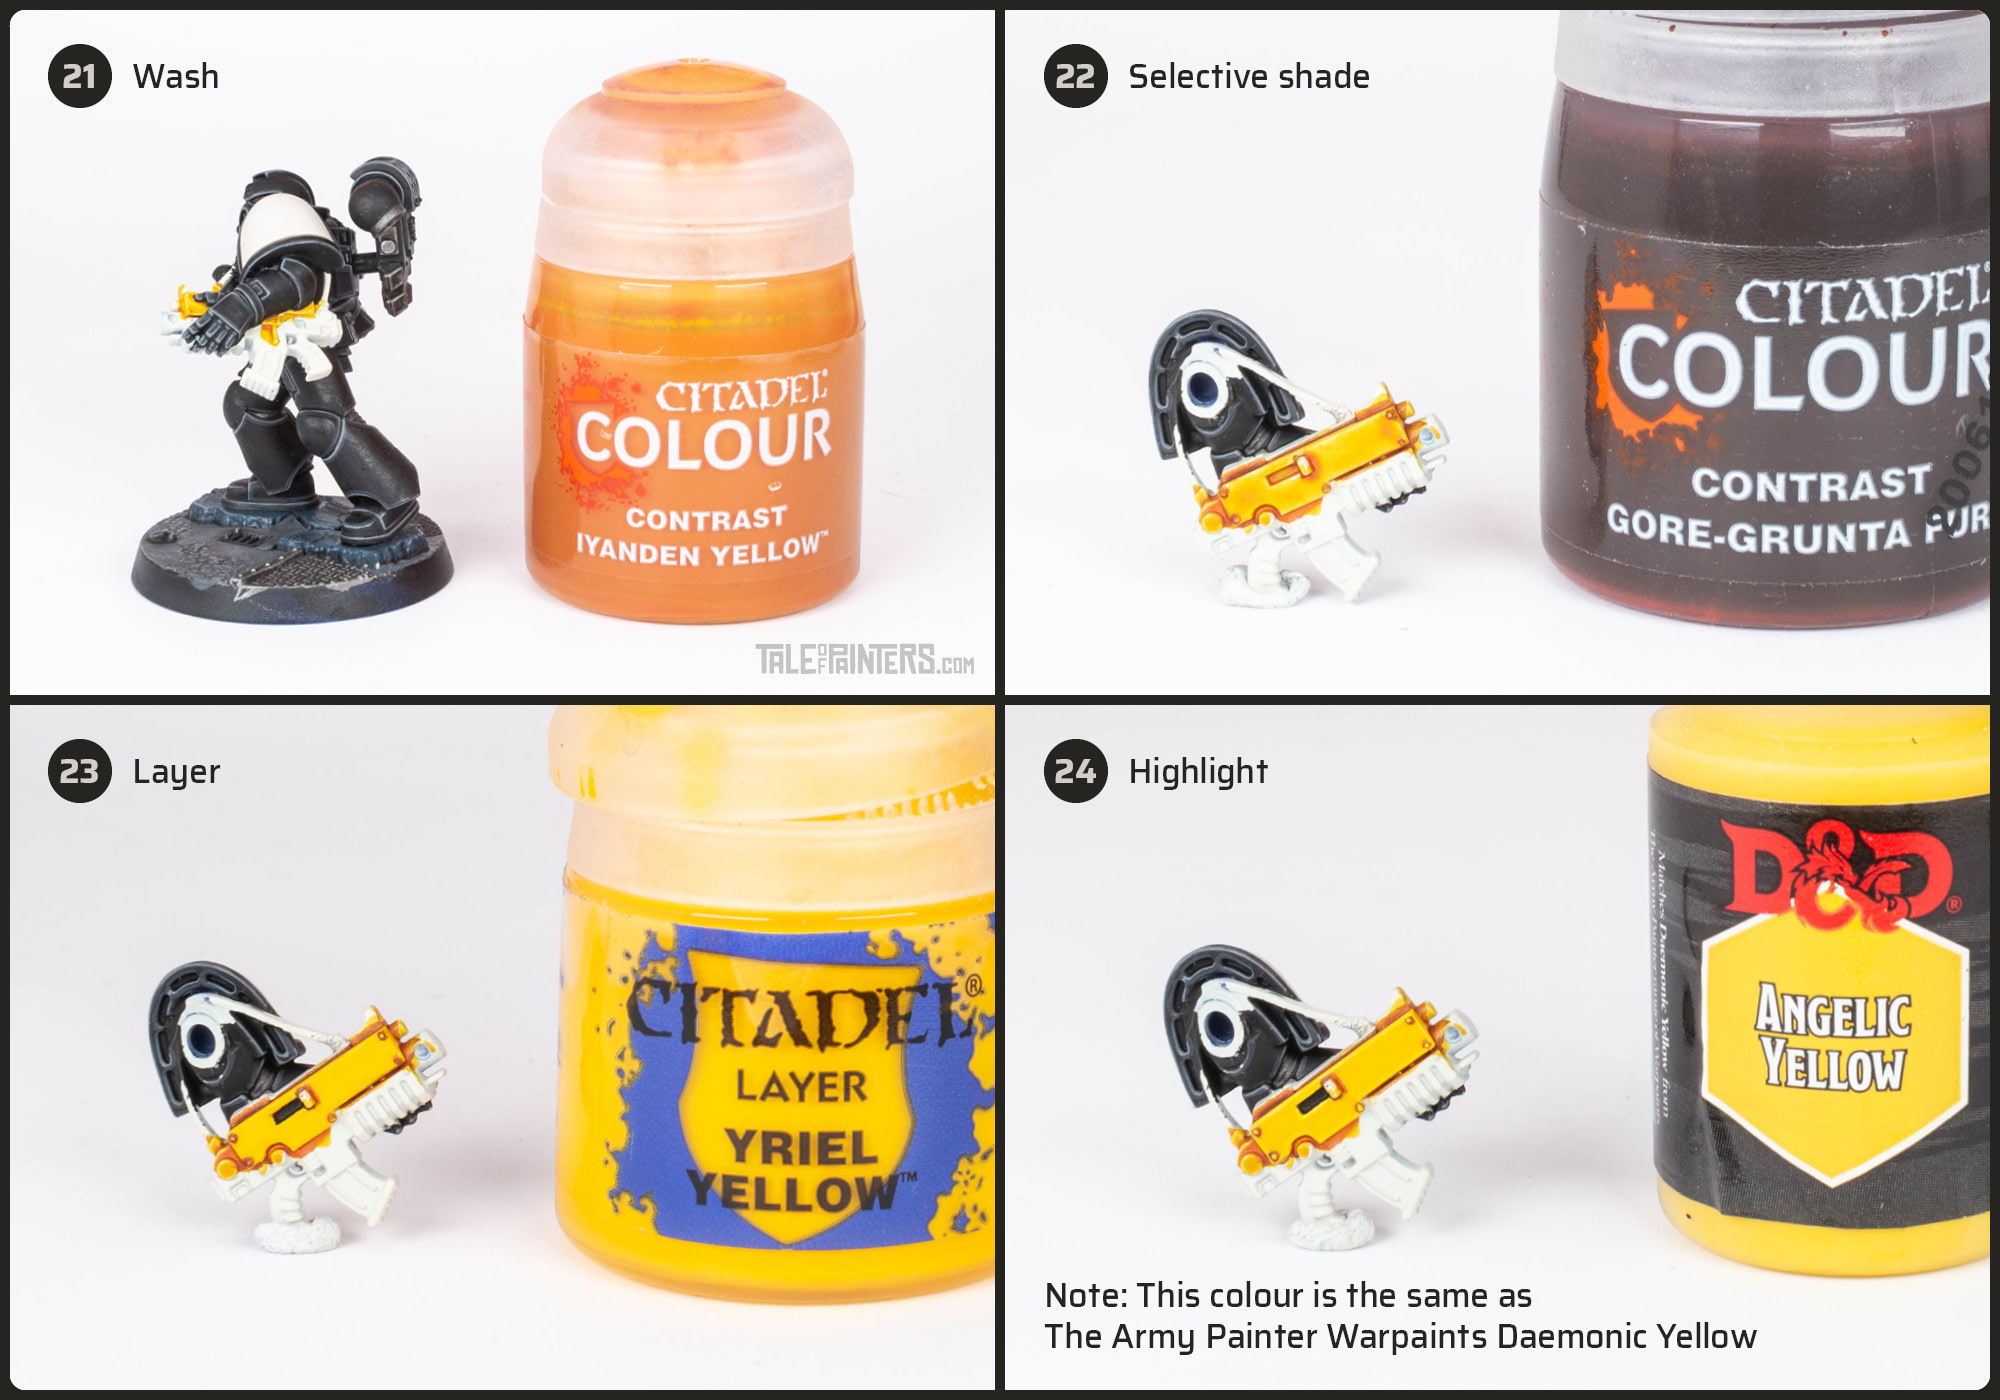
21. Wash the gun casing with Iyanden Yellow.
22. Where needed, deepen the shading by painting Gore-Grunta Fur directly into the recesses.
23. For an even finish, layer a couple of coats of Yriel Yellow over the yellow gun casing, leaving the recesses dark.
24. Apply a first edge highlight of Warpaints Daemonic Yellow [or Phalanx Yellow]. The paint depicted is a rebranded paint from The Army Painter’s D&D range, but it’s exactly the same colour as Daemonic Yellow.

25. Apply a final thin edge highlight of Dorn Yellow.
26. Basecoat the grenades and eye lenses with Mephiston Red. I also added some freehanded red flames to the gun.
27. Shade the red areas by painting Cygor Brown directly into the recesses, but don’t shade the eye lenses at this point.
28. Instead, wash the eye lenses with Warpaints Dark Tone Wash [or Nuln Oil].
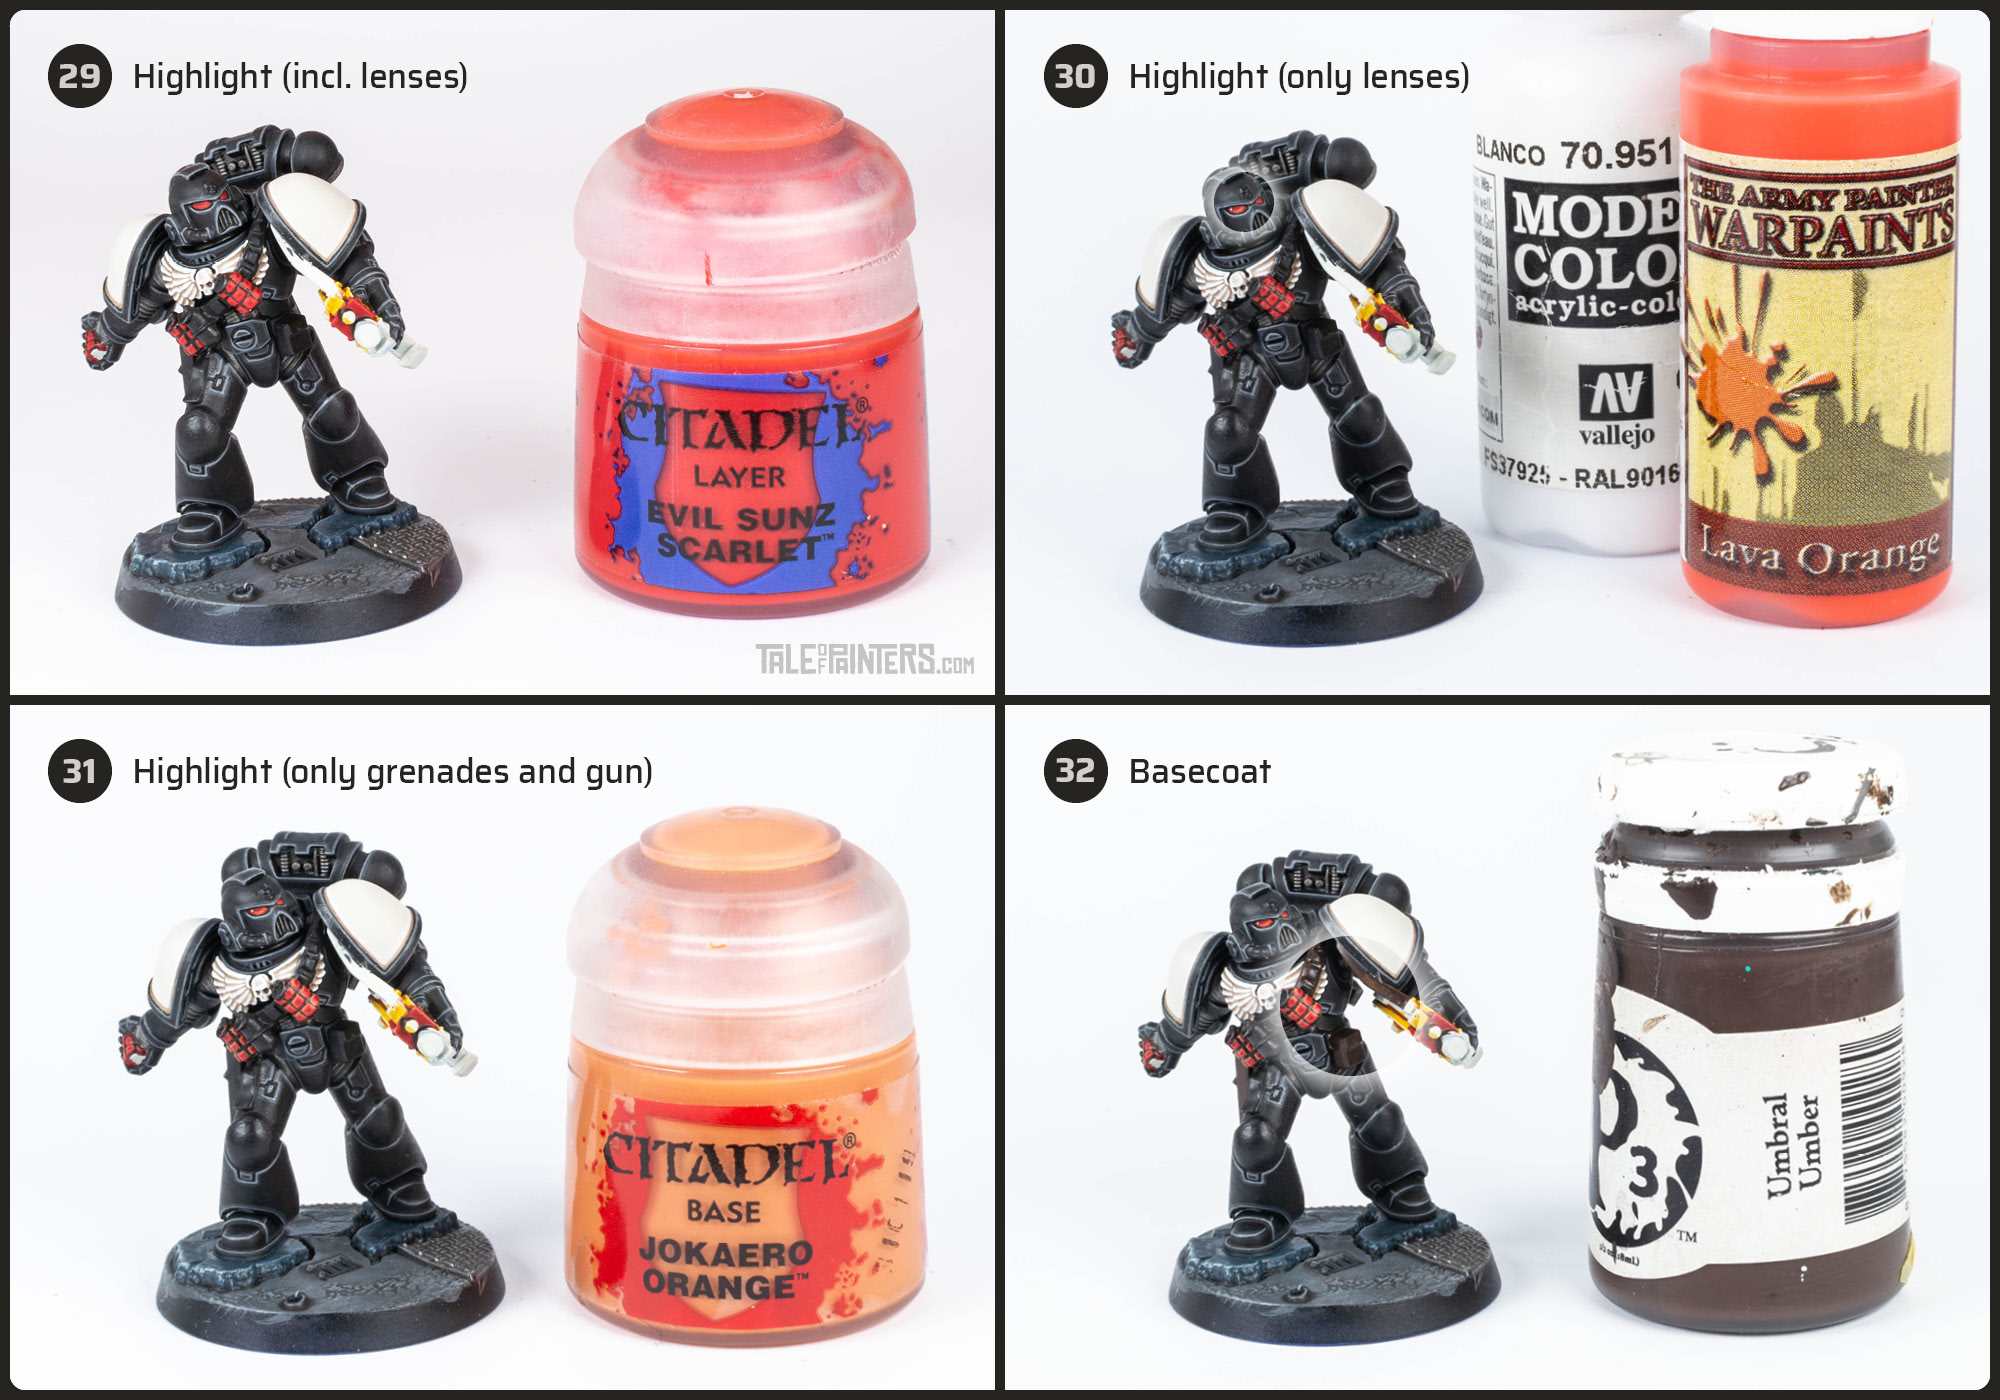
29. Highlight all the red areas with Evil Sunz Scarlet, including the eye lenses.
30. Highlight the eye lenses with Warpaints Lava Orange [or Troll Slayer Orange], then add a small dot of white to the corners of the lenses.
31. Highlight the grenades and the freehand on the gun with a final edge highlight of Jokaero Orange.
32. Basecoat the leather with Formula P3 Umbral Umber [Rhinox Hide].
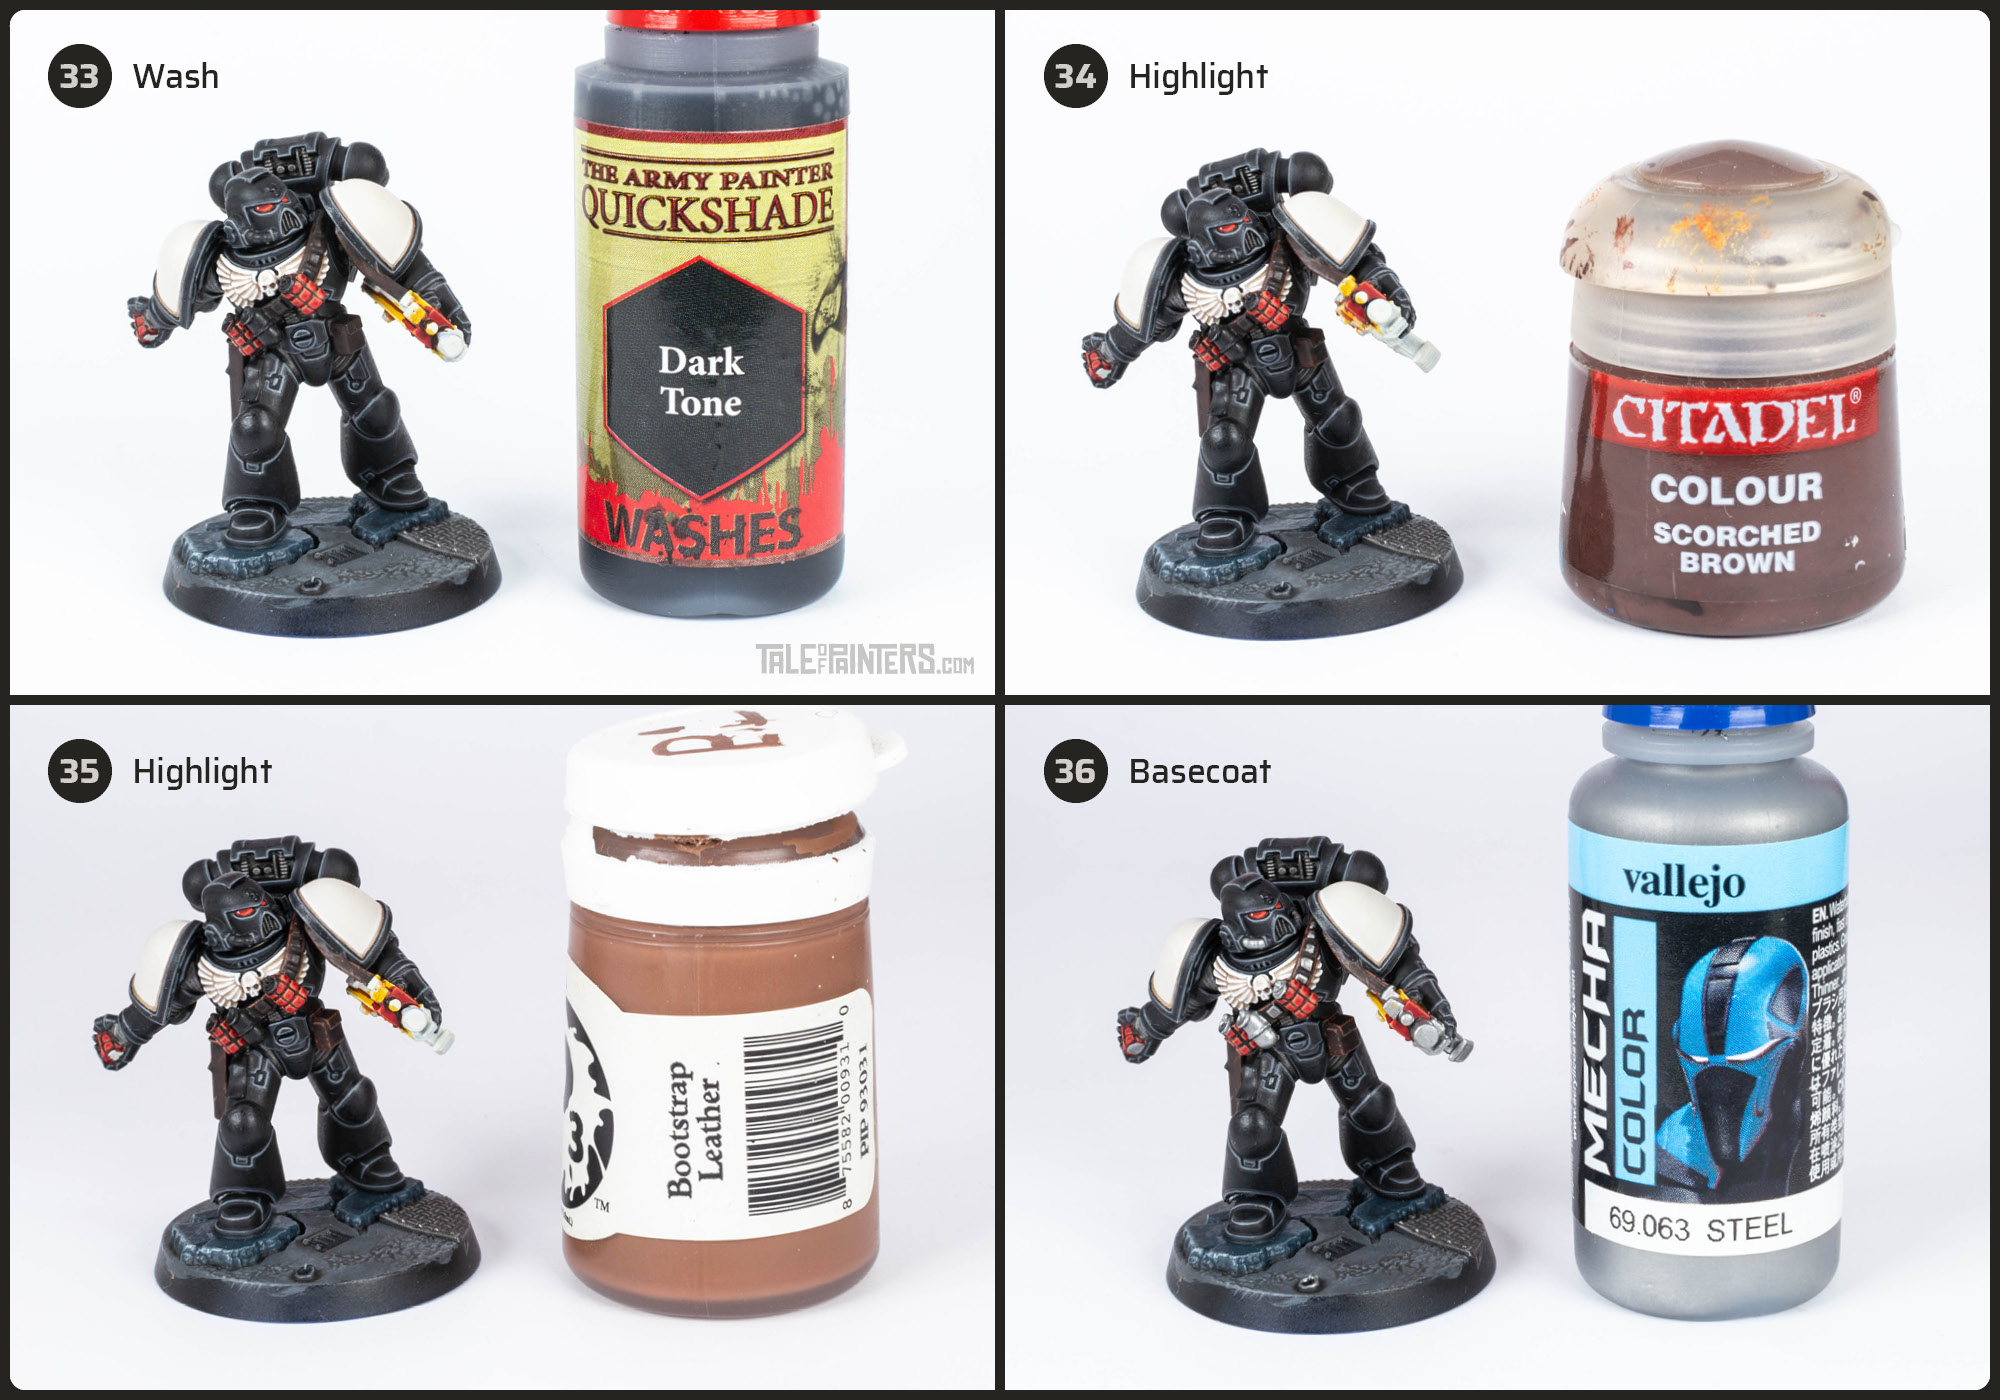
33. Wash the leather with Warpaints Dark Tone Wash [or Nuln Oil].
34. Highlight the leather in an irregular, scratchy way with Scorched Brown, an old, discontinued paint [you can also mix a little bit of Screaming Skull or Ushabti Bone in Rhinox Hide].
35. Add another “scratchy” highlight of Formula P3 Bootstrap Leather [or mix more Screaming Skull or Ushabti Bone into Rhinox Hide] to build up texture.
36. Basecoat the remaining metallic areas of the gun and grenades with Vallejo Mecha Color Steel [Iron Hands Steel].
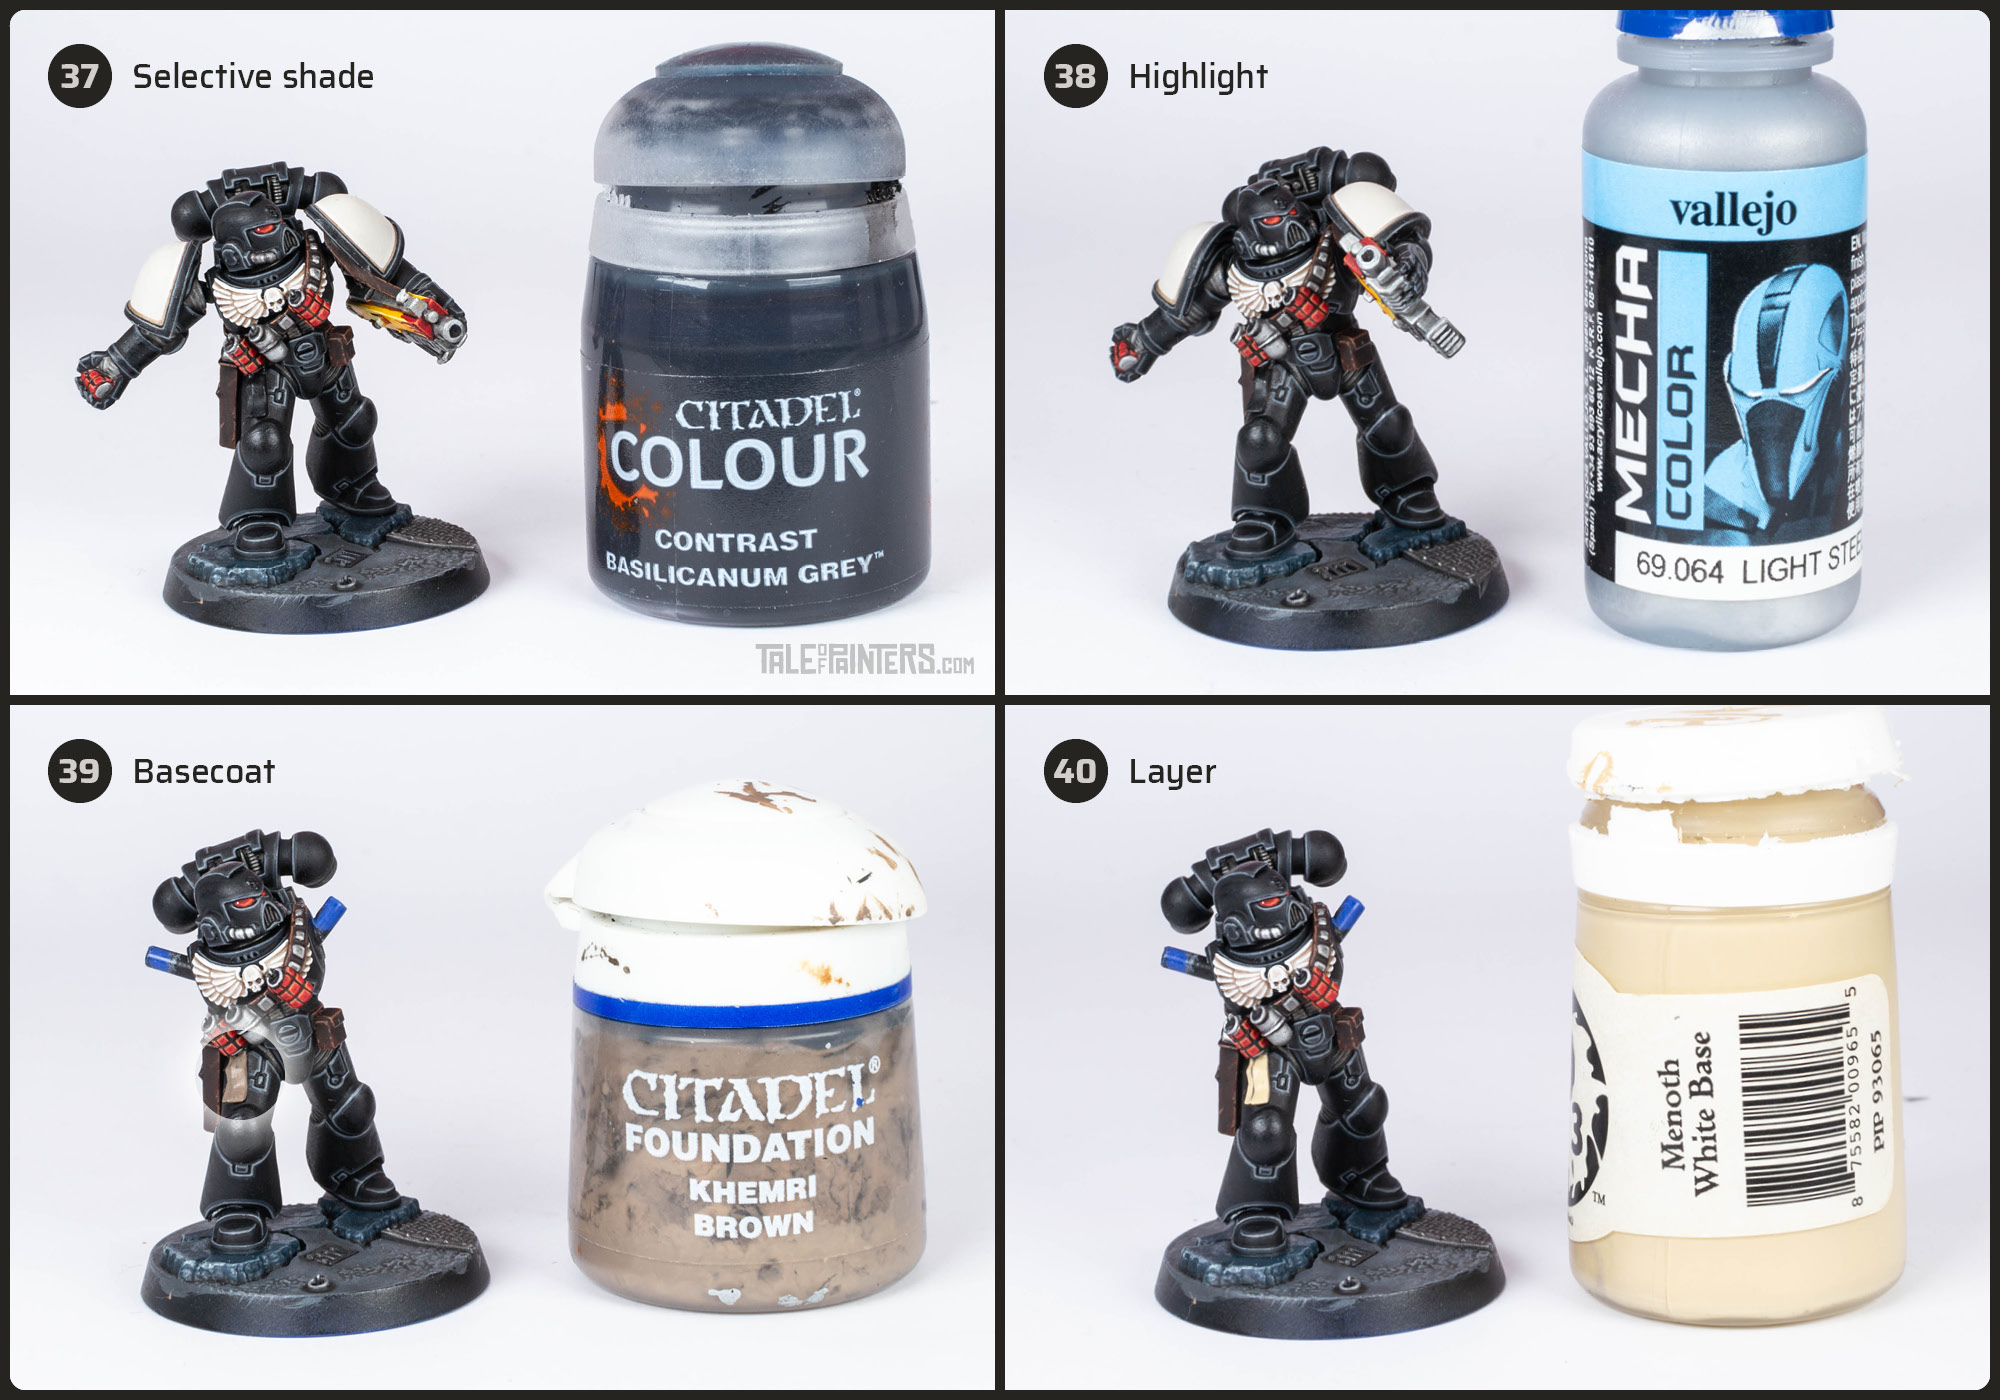
37. Shade the lighter silver areas by painting Basilicanum Grey directly into the recesses. You might need to clean this up with Vallejo Mecha Color Steel [Iron Hands Steel] afterwards.
38. Edge highlight the silver details with Vallejo Mecha Color Light Steel [Stormhost Silver].
39. Basecoat the purity seal with Khemri Brown, which is an old discontinued paint [you can also use Baneblade Brown].
40. Layer the purity seal with Formula P3 Menoth White Base [or Ushabti Bone], leaving the recesses in darker brown.
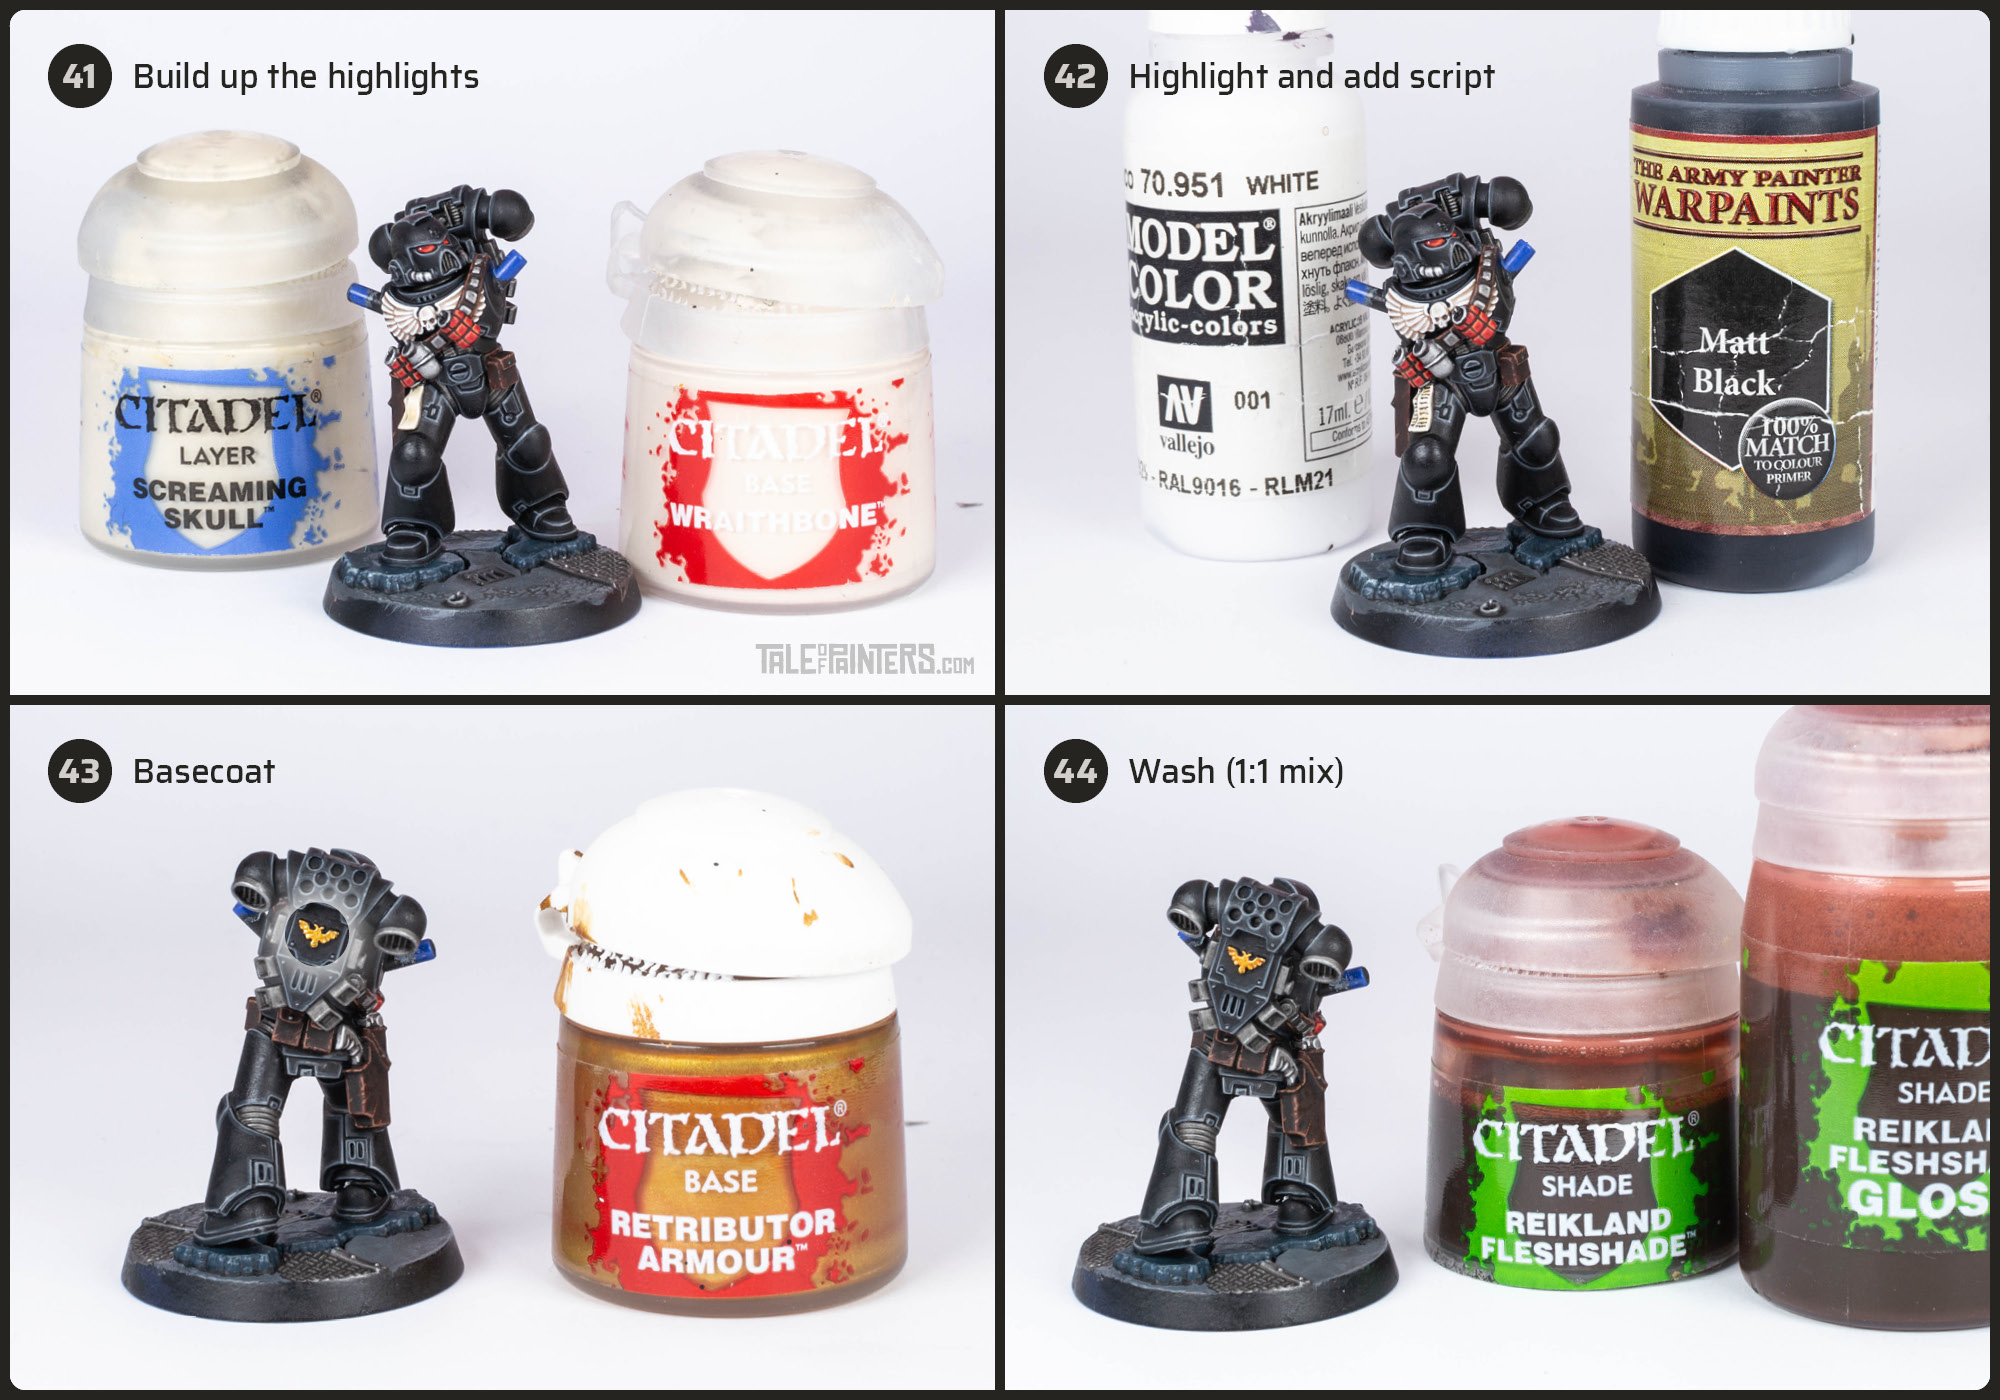
41. Build up the highlights on the purity seals with successive layers of Screaming Skull and Wraithbone. If you don’t have these paints, you can also just mix white in your base colour.
42. Add a final edge highlight of pure VMC White [or White Scar], then add some small dotted lines of Warpaints Matt Black [or Abaddon Black] with the tip of your brush to create lines of text.
43. Basecoat the gold with Retributor Armour.
44. Wash the gold with a 1:1 mix of Reikland Fleshshade and Reikland Fleshshade Gloss. The Reikland Fleshshade Gloss will help to increase the surface tension so the wash will settle better in the recesses with less overall staining.

45. Highlight the gold with Vallejo Mecha Color Light Steel.
46. Add some decals for the chapter insignia and use Microsol to make them better adhere the rounded surface of the shoulder guards. I also added a red-and-ivory-freehand to the left kneepad, see steps 17 to 20 for painting ivory, and steps 26, 29, and 31 for painting red.
And that’s how to paint a Black Templar with crisp black armour and yellow, John Blanche style boltguns.

With the techniques and paint recipes explained in this tutorial I also painted the other models from the Space Marine Heroes Series 1 range. All you need to change is the colour of the armour. To do so, I created these tutorials for painting pale blue Space Wolves armour, green Salamanders armour, and red Blood Angels armour. My recipe for painting blue Ultramarines armour can be found in this tutorial.
The paint scheme above is definitely not designed for painting large armies, more for creating a nice looking skirmish sized Kill Team. Here are some ideas to speed things up for army painting:
- Replace the first edge highlight of the armour with a drybrush of VMC Dark Gey [or Eshin Grey] and Mechanicus Standard Grey. For a cleaner result, use thinned black to remove any streaks the drybrushing might have left. Then add a crisp highlight of Dawnstone as explained in step 16. The sharp highlight will trick the eye and make the model look more refined than with only drybrushed highlights.
- Apply a sponge weathering of dark brown and dark silver to the armour, the battle damage will draw away the focus from any areas not perfectly highlighted.
- Basecoat the purity seal with Wraithbone, then add a wash of Agrax Earthshade and only do a single highlight of Wraithbone, or even skip the highlight alltogether.
- Basecoat the eye lenses with Mephiston Red and highlight with Lava Orange [Troll Slayer Orange], skip the wash and Evil Sunz Red highlight.
- Instead of two layers of highlights, just do a single highlight of Gorthor Brown on the leather.
- Instead of manually highlighting the light silver metal, just do a drybrush.
Hope you enjoyed this tutorial. If so, leave a comment or reaction below, and if you got any questions, leave them here so I can answer them for you.
4 Comments
Leave a Reply
Tale of Painters is the unofficial Warhammer hobby magazine run by hobbyists like you. Support our work by using the affiliate links from our 🇺🇸 / 🇨🇦 partner stores for your next orders so we can continue to bring you fantastic FREE content every day:


Or support us directly:


Great job on this tutorial!
I see you painted some crusade heraldry on the left kneepad. I also do that with my Templars but I can’t remember where I took the idea from, so I’m trying to track it through the internet. Wouldn’t you remember by any chance where you got that idea? If so that’d be really helpful.
Thanks and again good job with the tutorial!
Best painting tutorial I have seen in years! Really well set out with the colours next to the stages and how it looks on the miniature. I will be stealing this for my death company.
Thanks James 🙂
[…] skin and faces on your Warhammer miniatures. The rest of the model was painted as explained in this Black Templars tutorial. The hair was painted the same way as the worn leather demonstrated in steps 32 to […]