
Here is how I painted the Assault ram. Full tutorial after the jump.
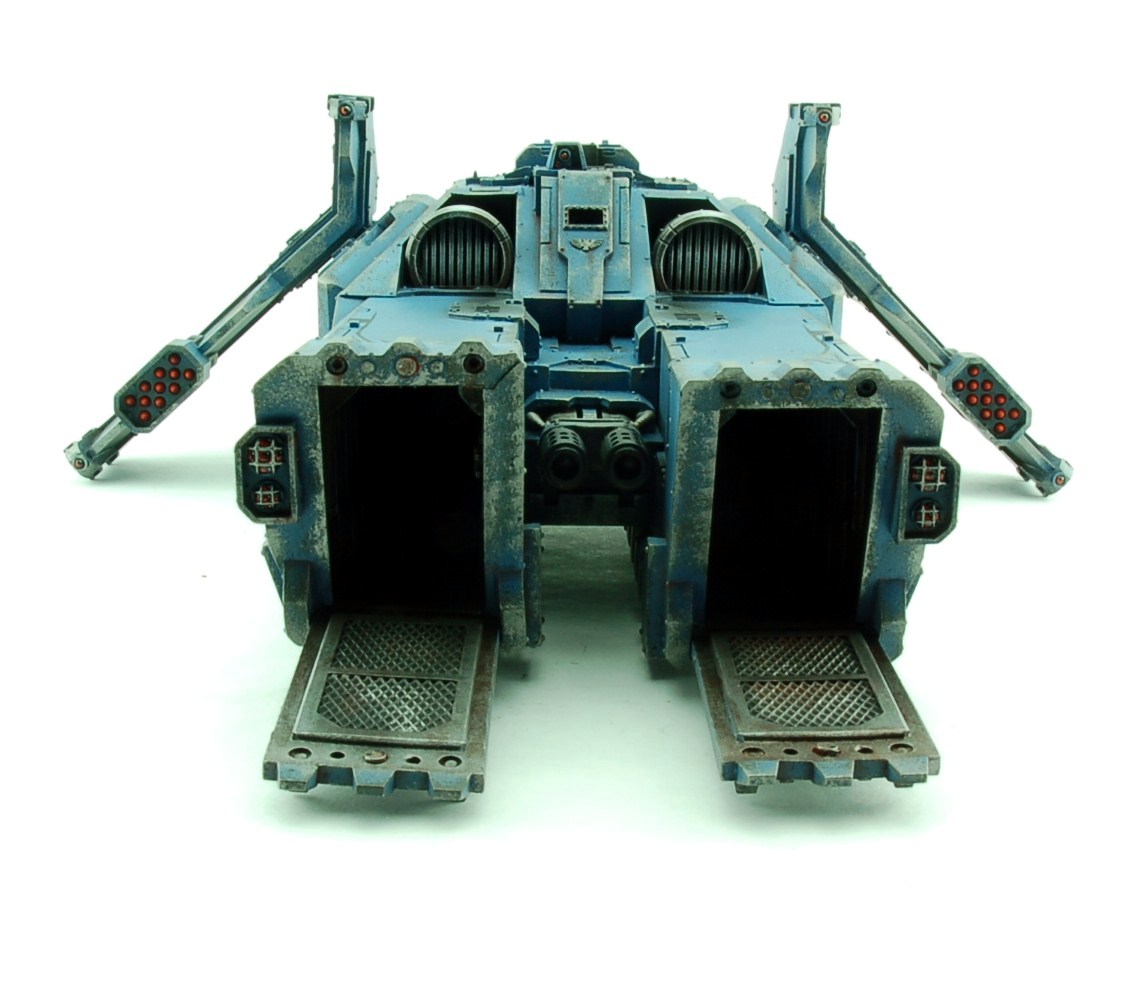
1) First of all you need to consider whether you want the inside painted or not. Of course, if you’ve spent over £100 on big lumps of resin, chances are you’re serious enough to want at least a little bit of detailing when you open those doors. It’s easier said than done however. You can see from the pictures below that the two ‘nacelles’ are formed from L shape sides. I masked off the edges I didn’t want sprayed black, and once done went about priming the interior. I applied a rough and dirty overbrush of tinbitz, followed by a wash of badab black. This was followed by rough overbrush of dwarf bronze and a dry brush of chainmail. I applied mig weathering powders, old rust and black. These need sealing afterwards, otherwise they get all over your fingers and compromise the rest of the paint job. A quick blast of Testors dullcote did the job. After taking the picture I decided to add some OSL glow to the first roof light and door control panel. I also applied a magnet into the centre hole of the nacelle and door to ensure they stayed closed during game play & after time.

 2) After this I masked the inside portions I didn’t want to overspray onto before priming.

3) Once primed white, I mixed the pre shade colour. This was GW space wolves grey, Vallejo model air black and a new thinner I’m trying from Life Colour. I mixed these into an empty GW pot and then set about applying the pre-shade to a significant portion of the model.


4) The next stage is the main basecoat, which is pure Shadow Grey from the GW range. I thinned it to the right consistency (which is an art you WILL get the hang of, stick with it!). Then using as thin coats (or at least as thin as my patience would allow) I applied the basecoat.

5) Once the basecoat is smooth I mixed Shadow Grey with GW Space Wolves Grey, again thinning as required. I never understood the whole ‘consitency of milk’ thing. It just becomes instinct, and one I still don’t get right every time. I applied the lighter shade to the raised areas of the Assault ram, using a freehand mask (in the form of a small piece of card) where needed, but I tend not to bother.


6) Once I’ve applied the highlights, I then use a filter. It smooths the overall transition of colour and helps provide a bit of depth before weathering. The filter was 3 parts asurman blue:1 part leviathan purple:5 parts water:1part Klear

7) Before moving onto weathering I like to apply any decals or freehand. That way, when you weather the vehicle they look as if they belong rather than being slapped on afterwards. Eye of Terror uses a similar process on his Dark Eldar Razorwing fighters HERE. I started with the freehand. The method used is i) quick bit of google research ii) sketch in pencil iii) paint over carefully iv) touch up:


Next was the decals. I use the method from the Forge World masterclass book for these. I didn’t need to apply a bottom coat (or key coat) as the filter already contained enough Klear to do the job. I cut the transfer nice and close, then soaked the transfers one at a time for about 30-60 seconds depending on their stubbornness. Once applied, dab with a bit of toilet roll and then chase out bubbles with Klear (do NOT lick your brush). I then seal with a light blast of testors.


8) Ok now comes the fun bit. I take generous amounts of Charadon Granite onto my tile, get some of the old blister foam and start dabbing. Like drybrushing, make sure you dab off the excess first otherwise it’ll look rubbish. You want the top of the sponge to be applying the coat so you get the random effect. It’s well detailed in the FW masterclass book which I suggest you buy as an investment.

9) Same as stage 8, but with the silver of your choice. I vary between Chainmail and Boltgun Metal – it all adds to the weathered effect. Focus on the edges but use your imagination. Think where servitors might walk on wings for maintenance or where the thing might RAM into other ships for boarding actions. It all adds to the realism.

10) Once the sponging is done get those powders back out. Make sure your brush is i) old and ii) dry as a bone. Focus on recessess and again, use your imagination. Do NOT lick your brush, this time it’s not just the taste which’ll get you, it’s the fact that you’ll be applying orange sludge rather than nice rust. Make sure you seal the powders once applied. I did this over two days, the top first with a quick blast of testors to seal, then the underside once it’d all dried the following evening with another quick seal.


11) Once the seal coat is dry paint all the metallic componants in the same manner as the interior from phase 1 – Tin Bitz, Badab Black, Bronze, Chainmail. I also added a stripe of Mithril Silver on the forward vents.
12) I then got the airbrush back out and applied some black soot trails around and from the vents. Low pressure, straight lines.


13) The main bulk of the work is now done. All that remains is to add the details – lenses, missiles, etc.


I hope you’ve enjoyed this tutorial and that it helps detail some of the stages involved in achieving the finished effect. It’s actually not that hard and I urge you to try it – push yourself!
Do you like our tutorials and reviews? Here is what you can do to support us: Disable your Ad Blocker or place your next Wayland Games order by clicking here or on the banner on the right. Thank you very much, we appreciate any help to keep us going!
10 Comments
Leave a Reply
Tale of Painters is the unofficial Warhammer hobby magazine run by hobbyists like you. Support our work by using the affiliate links from our 🇺🇸 / 🇨🇦 partner stores for your next orders so we can continue to bring you fantastic FREE content every day:


Or support us directly:


bad model, great tutorial
oink – I'll get on it. Funnily enough I had the same idea for a mini article and took some pics of my set up…
Winterborne – definately give pigments a go. You had to treat them with respect, and be clean and tidy, but they give very good rewards very quickly!
Rev, It's very hard to get hold of 'Klear' nowadays. Can you recommend a suitable substitute?
Cheers,
Neil
This is pure win. It makes me want to get an airbrush! I'd like to hear more about your airbrush set up… what you use, where you use it, stuff you need to take into account before, during and after use etc… safety, all that sort of stuff!
(I'm an airbrush noob!)
Looks amazing. Really impresive work, I've not used an airbrush or weathering pigments before, I might have to give them a go on my Praetorians…
Great tutorial Rev!
For my upcoming Dark Eldar army I'm going to try some sponge weathering, too, so this was a great help, thanks!
Great tutorial, thanks a lot! Since I'm completely changing the way I paint (from old-school edge highlighting to a more realistic approach) I'm DEVOURING tutorials like these right now. Thanks for the great inspiration!
Amazing tutorial!!! thanks so much!
D
Will certainly be taking elements of this tutorial and using them when I pick up my own Ram later this year.
Thanks very much for this, great final look as always.
Great tutorial, many thanks! I'm a big fan of the weathered look, especially for vehicles and this looks amazing.
http://www.theunrealisticartist.com