
Tau and Eldar collectors, don’t you know this, too? Our antigrav tanks are just too heavy for the thin rods GW’s flying stands come with. They are prone to snap off or the models don’t sit perfectly straight and always lean to one side or another. After looking at tilted Falcons and Wave Serpents in my display cabinet for far too long, I racked my brain over how to improve the stability of flying stands. Find my solution after the jump.
Of course, you can look into third party flying stands, e.g. from Back 2 Base-ix. But they just don’t have the typical GW look and it means you need to spend extra money. So my idea was to improve the stability of the flying stand you find in the box by increasing the thickness of the rod and the size of the supporting surface.
Increasing the thickness of the rod is easy. Instead of using the short clear rods that Eldar and Tau tanks come with, I used regular length rods and cut them to the right height. I’m sure you’ll have a couple of spare ones in your bitz box just like me. So we won’t use the small pin at the top for connecting to the model but the full diameter of the rod. Just notice that the clear rods come on a small sprue with two slightly different heights. Remember which one you chose, as the choice of the rod will affect the diameter of the hole we have to drill into the model later.

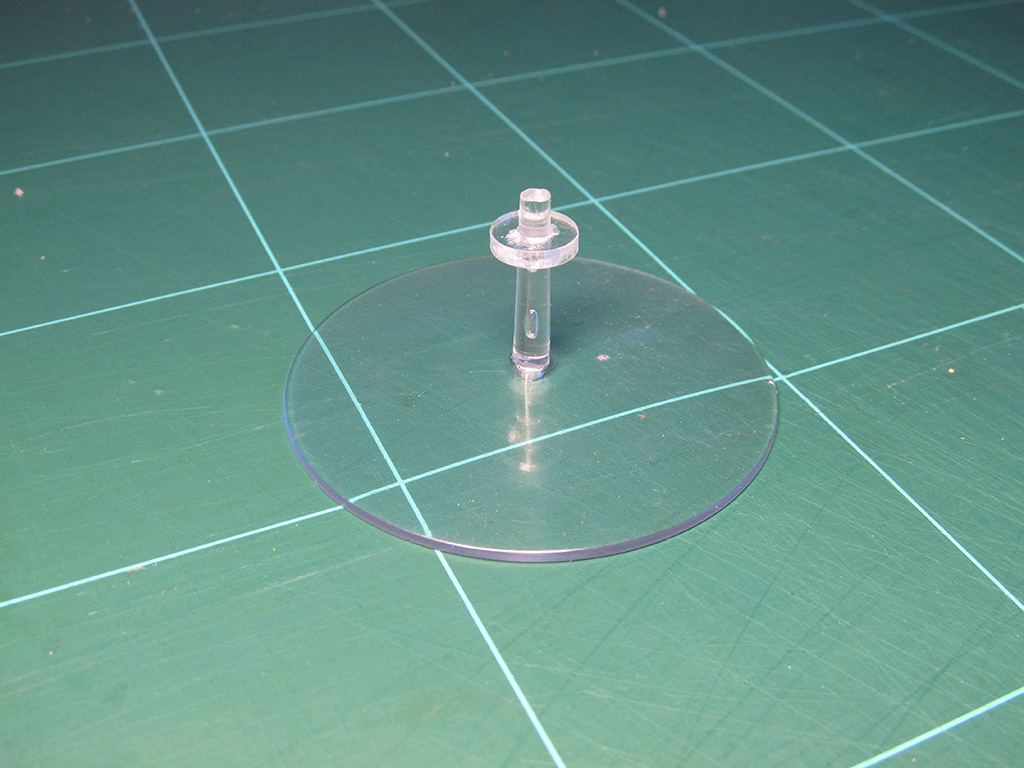
But we also want more support for the weight. So after some searching around the internet, I found a website that offers custom laser cut acrylic sheets. It’s a German business, you can find it here. If your google fu is strong, you can probably find similar websites in your country. I went for a clear acrylic with a thickness of 2 mm and chose a ring shape. The outer diameter is 10 mm, the inner 3,5 mm. Together with shipping it cost me about 8 Euro for 15 rings.

I test-fitted the ring and marked the position on the rod. Then I removed the ring and added a bit of plastic glue where my mark was, before attaching the ring again and glueing it in place. Don’t put glue in the inside of the acrylic ring and push it the way down, as this will smear the glue all over the rod. And take care that the acrylic ring sits perfectly straight.
Then I’ve used a hobby saw to shorten the stand. As the clear plastic of the stand is brittle, I recommend sawing instead of cutting. Cutting might make it snap.
Technically, I guess you could try to do without adding the acrylic ring, as long as the hole on your model is tight enough. Adding the ring increases the stability though, and helps to prevent your flying base from snapping off when your model is accidentally knocked over.

Equip your hobby drill with a 3,5 mm drill if you have used the shorter of the two rods in the sprue or a 4 mm drill for the longer one. Drill into the old hole and try to insert your flight stand into the model. Chances are that you need your hobby file to make the hole a little bigger. Work in small steps, as you aim for a tight fit. If the hole turns out too big then your model will sit too lose on the stand and you end up just where you were before.


My Falcon sits rock-solid on the customized flying stand now. And you can’t see the difference from a tabletop perspective. What do you say?
What are your experiences with flying stands? Have you modified yours, too, or do you use other flying stands than the ones from Games Workshop? Please tell us in the comments.
Do you like our tutorials, reviews and reports? Here is what you can do to support us: Check out our sponsors in the upper right corner of our blog or place your next Wayland Games order by clicking here or on the banner on the right. Thank you very much, we appreciate any help to keep us going!
12 Comments
Leave a Reply
Tale of Painters is the unofficial Warhammer hobby magazine run by hobbyists like you. Support our work by using the affiliate links from our 🇺🇸 / 🇨🇦 partner stores for your next orders so we can continue to bring you fantastic FREE content every day:


Or support us directly:


This is great, but I thought I might share an alternative solution that worked for me. Simply widen the hole on the bottom of the gravtank using a craft knife. The tank sits lower down on the plastic rod, and as it is now in contact with the sloped part, it gets wedged in when you place your model on it. Its that simple and far more secure than the original design. Plus you can widen the hole to taste, making the tank sit closer to the ground. I prefer the look of them skimming just above the surface!
You guys should take a look at the stands you can get from Corsec (http://corseceng.com/omni-stand/). I used these for dystopian wars, and most recently for GW High Elf pheonixes (which I'll feature on my blog soon!).
As promised here's the blog post about the Corsec stands I used on the High Elf Phoenixes 🙂
http://theminikingdom.blogspot.ie/2013/08/high-elf-phoenixes-with-better-flight.html
I really like this idea so Thanks! Just bought some acrylic disks similar to these from LITKO Game Accessories that have a 3mm or 1/8" opening and you get 20 for $1.99 US (although shipping is 4x's that price – luckily that was not my only purchase!)
A well worked solution to a problem we are all so familiar with! Simple, effective and practical. Long overdue someone actually tackled this problem and helped the rest of us. I salute you!
Alternatively if you don't mind a bit of DIY look, one could look for small Bolt washers or Nuts to use. I like the clear acryl. better but both work well.
That's a very clever idea. Good stuff 🙂
Nice one! I have found that simply flipping the flight stand so that the smaller end is inserted into the base, and the larger end is inserted into the model works as well. You have to drill the hole where the base meets the model a bit, but the extra diameter of the large end of the base makes the model more stable.
Awesome idea. You sure you're not an enginner? 🙂
Great idea! I'm starting tau so this is really helpful
That's a neat trick. I've already snapped off two flying stands for my Tau tanks. Great, that you came up with a solution. 🙂
Absolutely great idea. I've been looking for a way to make these stands more stable without gluing the models to it, this will be perfect, thanks.