
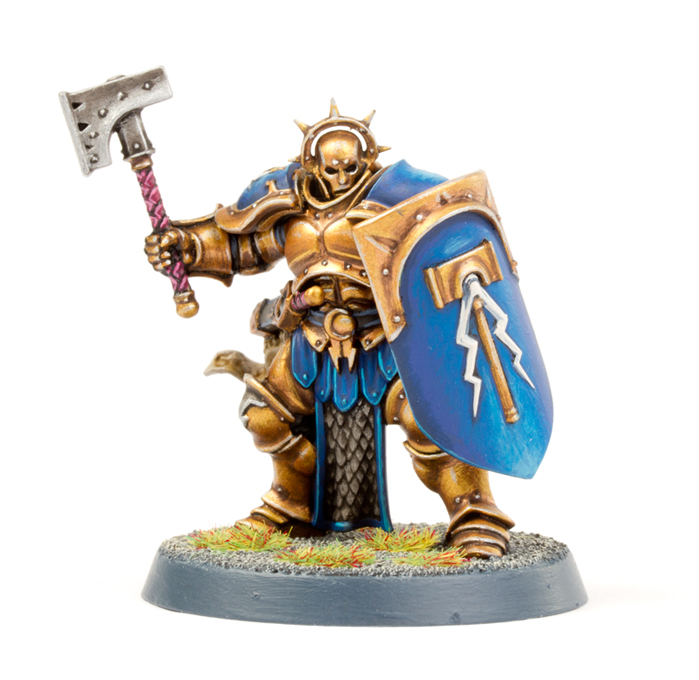
Need some help with your Soul Wars box? I thought I’d put the White Dwarf free Stormcast Eternal model to good use and create a tutorial. So if you want more than just there paint recipes in White Dwarf and want high quality photos with explanations, then you’re at the right place. Check out the detailed, quality photo tutorial after the jump.
This tutorial assumes you have a basic understanding of how to paint. For the beginners, I will explain the techniques as I go along. Each picture below shows four chronological steps. Underneath each picture are the corresponding instructions. Each step shows the paint I used during that step.
Paints you will need for this tutorial:
Lahmian Medium (Technical)
Black Undercoat
Mournfang Brown (Base)
Gehenna’s Gold (Layer)
Hashut Copper (Layer)
Warplock Bronze (Base)
Auric Armour Gold (Layer)
Ironbreaker (Layer)
Abaddon Black (Base)
Runefang Steel (Layer)
Macragge Blue (Base)
Caledor Sky (Base)
Kantor Blue (Base)
Lothern Blue (Layer)
Screamer Pink (Base)
Emperor’s Children (Layer)
The Fang (Base)
Russ Grey (Layer)
Pallid Wych Flesh (Layer)
Baneblade Brown (Layer)
Rakarth Flesh (Base)
Seraphim Sepia (Shade)
In case you need to expand your paint collection, head over to Wayland Games, which stock a huge selection of paints at competitive prices. Or support your local gaming store.
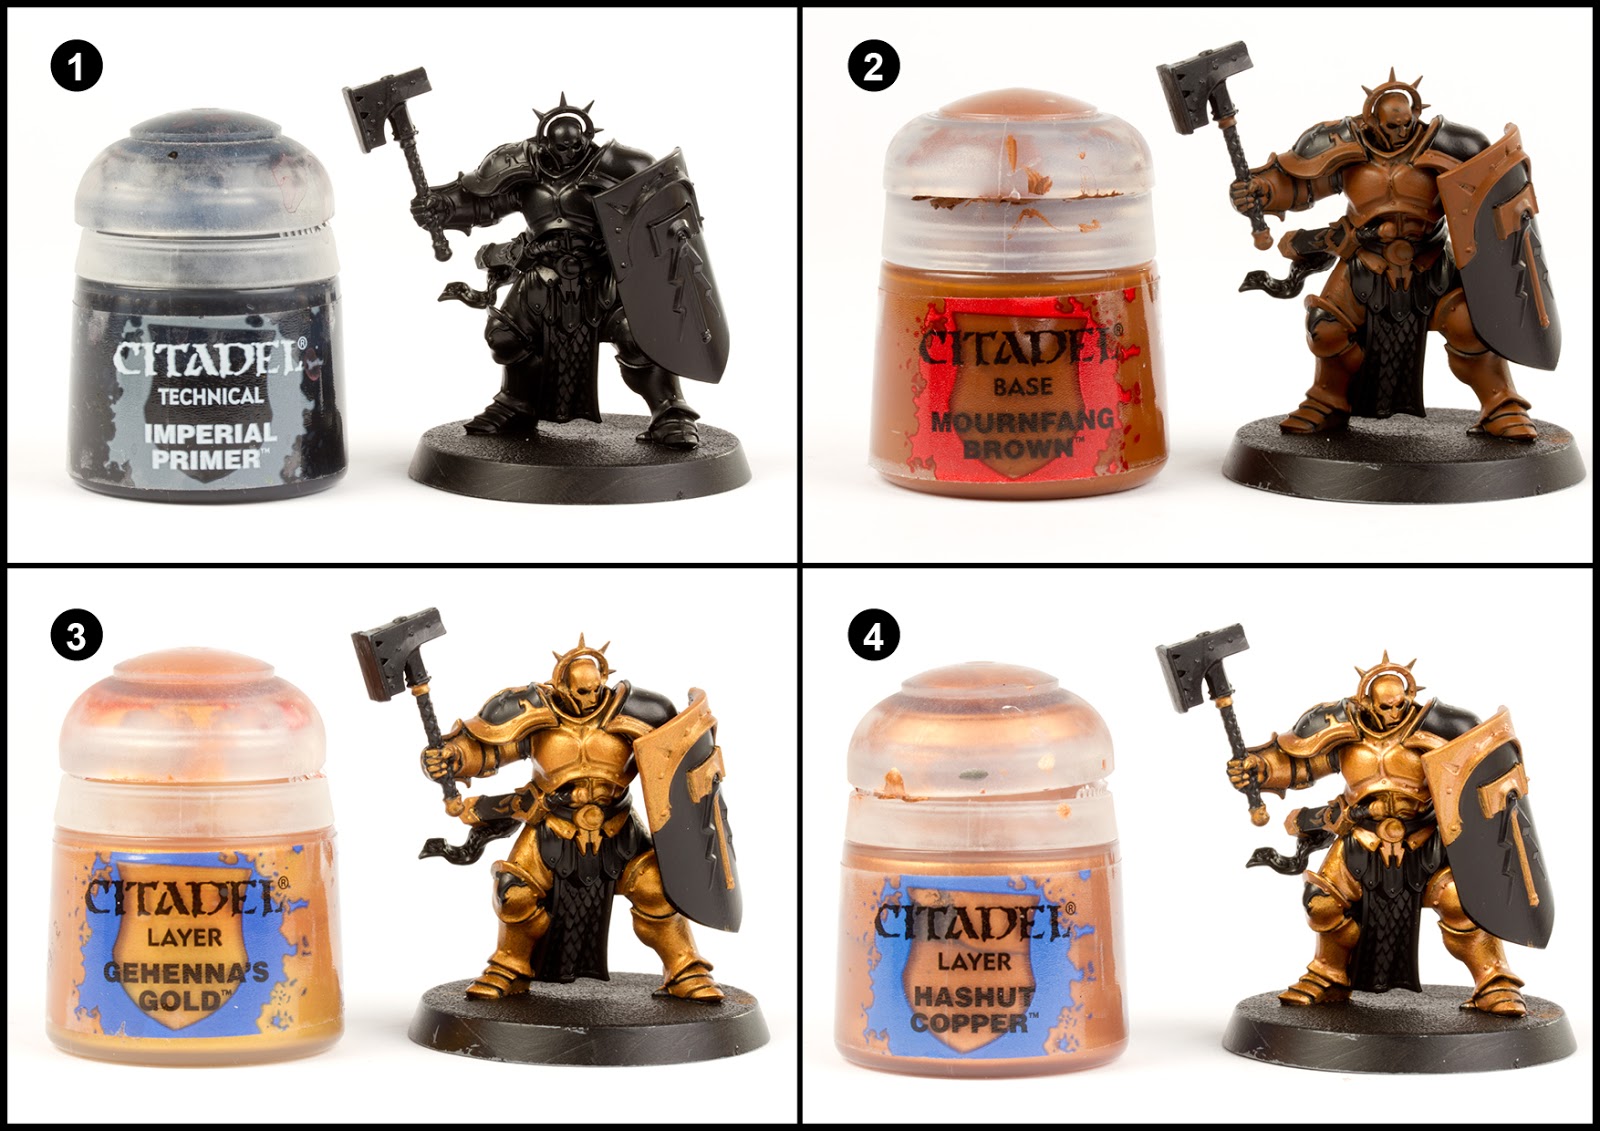
1. Undercoat the model black. For the best results use Vallejo Surface Primer (airbrush or by brush) it has a settling property in it which leaves detail crisp. Never floods the detail.
2. For this step I’ve carefully painted Mournfang Brown by hand and it took a while. I’d advise airbrushing stage 2 and 3 if you’re painting several and then painting the black detail back in. Painting by hand is tricky because you have to ensure the layers are perfectly flat.
3. The reason we’ve painted perfectly flat Mournfang Brown is because it makes it easier to paint Gold over the top. Gehenna’s Gold will now paint on in two coats. Add Lahmian Medium to the gold paint to thin it. You don’t need a lot, just enough to make it more fluid. Metallic paint has flecks of metallic colour in it, it’s a like a thicker pigment. If you don’t thin your metallic paints they can end up really lumpy which is magnified by the reflective nature of the paint. Airbrushing this stage would be a lot easier.
4. Now we’re going to create a glaze by mixing 70% of Lahmian Medium with 30% of Hashut Copper. Now don’t wash this all over, instead target the areas you specifically want to shade. This quite a subtle step, repeat this step two or three times to increase the intensity of the shading (multiple thin layers will get darker and darker the more you apply).
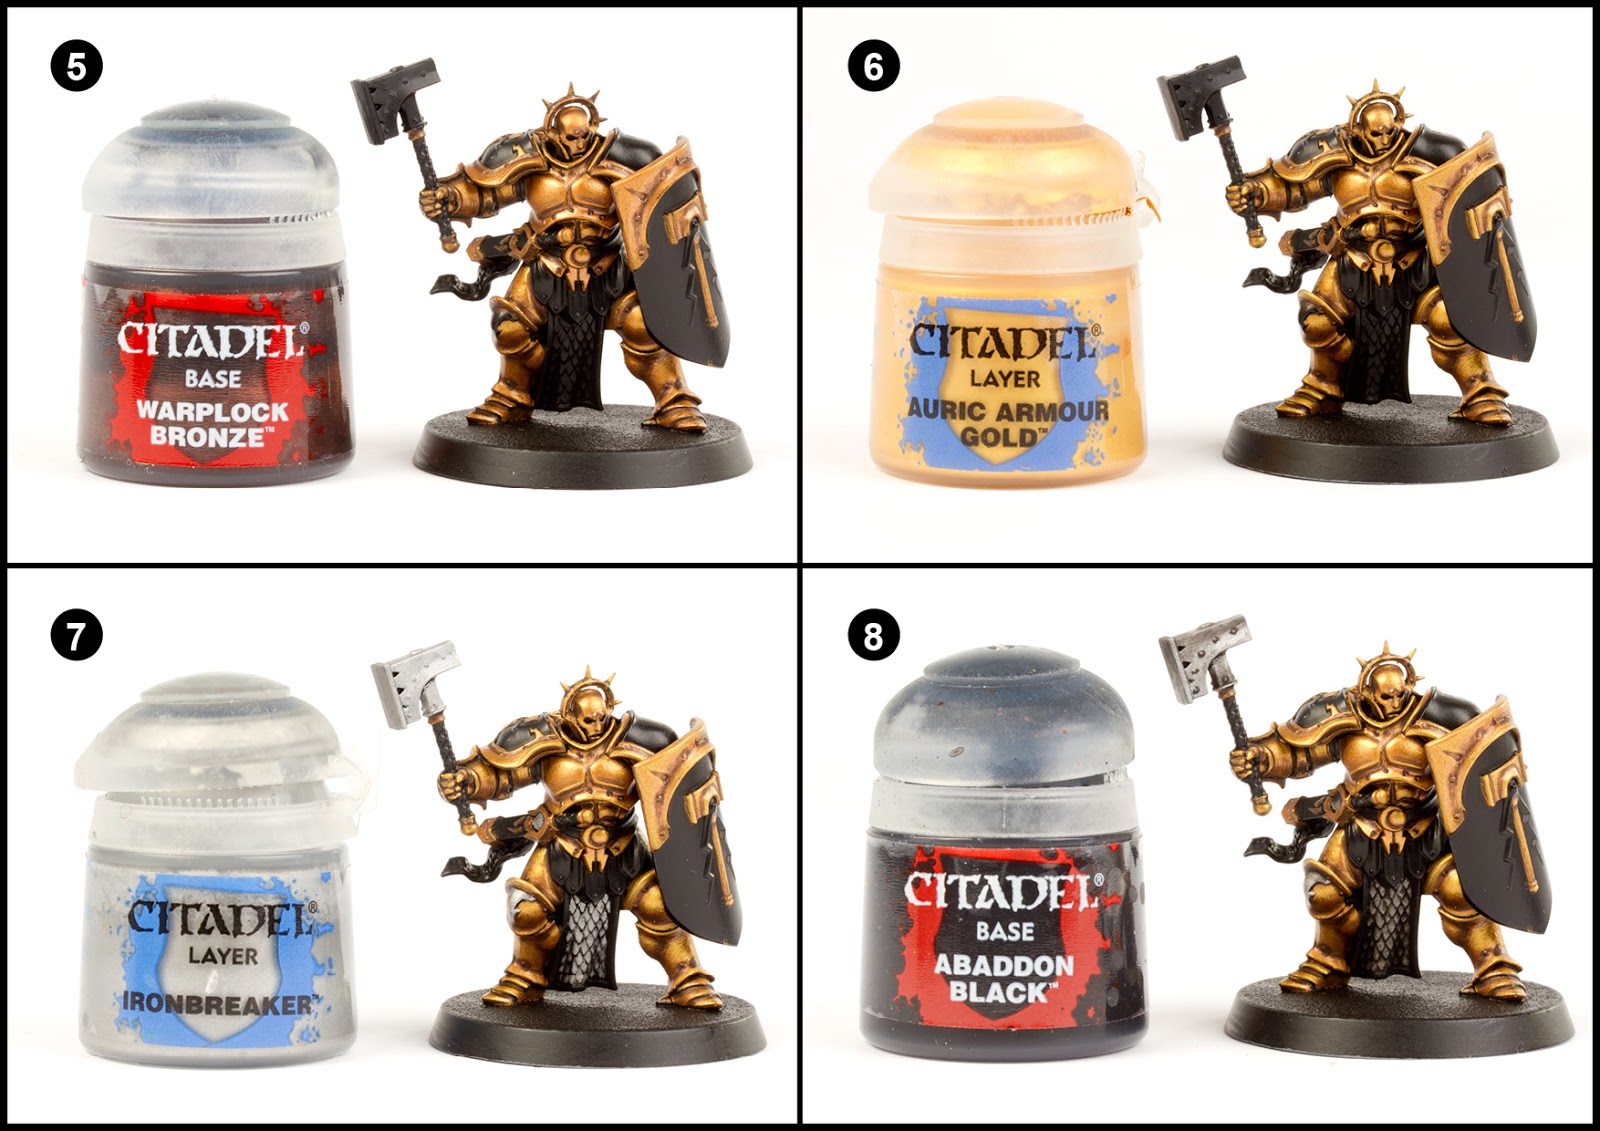
5. We’re going to create another glaze by mixing 70% of Lahmian Medium with 30% Warplock Bronze . Continue shading the model by carefully picking out the shadows with this glaze. Repeat to intensify. Painting multiple thin layers will create smoother blends then one thick layer. Don’t forget to pick out each rivet with Warplock Bronze as well.
6. To highlight the armour we want to thin our paint but not to much. Maybe 50:50 mix of Auric Armour Gold and Lahmian Medium. Paint several layers onto the curved raised areas and then paint the edges as well with a thin line.
7. Paint the hammer, icon on the knee and back of hand, and loincloth with IronBreaker. Once again Lahmian Medium will help keep the paint smooth and cut down on the lumpiness.
8. Create a black glaze by mixing 70% of Lahmian Medium with 30% Abaddon Black. Wash it over the loin cloth. Paint 4 to 5 thin layers (allowing each to dry) on the hammer head progressively blending each layer allowing each layer to get progressively darker. I like to have the darkest areas at the top of the head. I think it looks like reflection.

9. Highlight the edges of the knee/hand icon and Hammerhead with Runefang Steel. Pick out each rivet (including on the gold) with Runefang Steel. Finally highlight every edge of the gold armour with Runefang Steel.
10. Basecoat all the blue areas with Macragge Blue. Thin this with Lahmian Medium to produce a smoother result.
11. Highlight the blue areas by creating a glaze of 30% Caledor Sky and 70% Lahmian Medium and building up the thin layers slowly. Click on the picture above to see where to apply these layers, it’s basically any curved raised surface.
12. Create another glaze of Kantor Blue and build up the thin layers to blend shading onto the blue areas.

13. Highlight the edges of the blue areas with Lothern Blue. I glazed on a thin highlight onto the shoulders and shield as well.
14. Pick out the strapping of the dagger and hammer handles with Screamer Pink.
15. Pick out the edges of the strapping with Emperor’s Children.
16. Edge highlight the dagger scabbard and belt with The Fang. You’ll also have to highlight the gaps between the armour joins.

17. Highlight the previous stage further with a thinner line of Russ Grey. Base coat the Lightning Bolts on the shoulder pad and shield with Russ Grey.
18. Paint the lightning bolts with Pallid Wych Flesh.
19. Paint the scroll under the scabbard with Baneblade Brown.
20. Highlight the edges of the scroll with Rakarth Flesh.
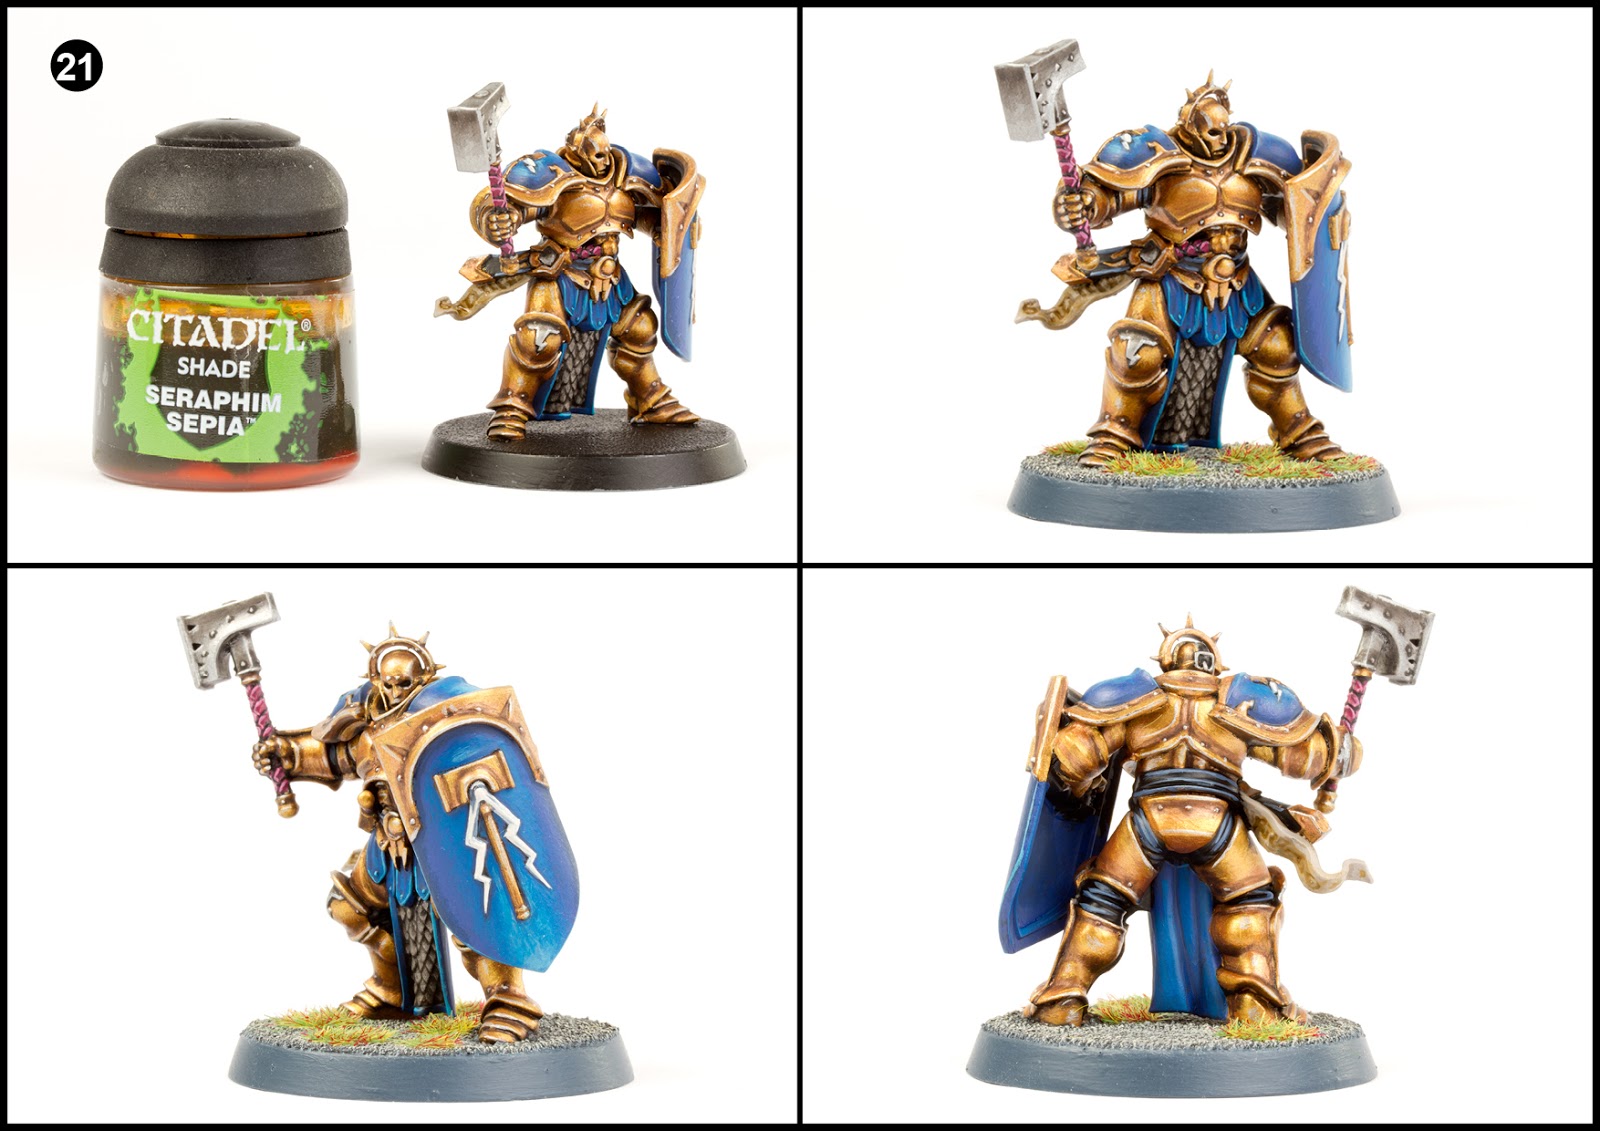
21. Wash the scroll completely with Seraphim Sepia.
Finally base the model in a way that fits with your gaming table or existing collection. I used Dark Reaper for the base edge and highlighted the sand with Ushabti Bone. Some scorched static grass glued on finishes the model off.
Be sure to check out our extensive back catalogue of tutorials. There is something for everyone.
Do you like our tutorials and reviews? Here is what you can do to support us: Check out the websites of our sponsors, place your next orders at Wayland Games by clicking here or on the banner on the right. Thank you very much, we appreciate any help to keep us going.

25 Comments
Leave a Reply
Tale of Painters is the unofficial Warhammer hobby magazine run by hobbyists like you. Support our work by using the affiliate links from our 🇺🇸 / 🇨🇦 partner stores for your next orders so we can continue to bring you fantastic FREE content every day:


Or support us directly:


Hi Garfy i notice you don't use Liberator or Retribution golds that came out with AoS , Whats the main reason? How different would the effect of using those 2 golds with the same copper/bronze wash be ?
Slightly warmer and lighter is my guess.
As usual an awesome tutorial. 🙂 I really like the gold and blue. Regarding Lahmia Medium, what kind of equipment do you use to create and store the mixed glazes? As you apply the glaze multiple times, is a wet palette a suitable carrier?
I don't store the glazes. I just mix it up fresh on a palette. I don't use a wet palette. You can if you prefer. I think it's dependent on your conditions. My painting room doesn't suffer from extreme temperatures luckily.
You should try using the Vallejo Model Colour paints. They're easily my favourite out of all the ranges I've used for my minis.
I have around 90% of the model colour range, I use to use them almost exclusively. I made the switch back to GW when they changed their range. I prefer GW personally.
Well done as always Garfy. Question for you, and something nobody is talking about yet. I painted mine up this weekend, and these guys are HUGE. I pulled out my ruler, and the model measures exactly 35mm from base to eye. Unless these models are meant to represent literal giants – which is possible – they are larger than even SM Termies, and it makes me think the miniatures are set at 35mm scale. You guys already have access to the rest of the AoS starter box. Have you measured the Chaos models to see whether they are appreciably smaller?
Size comparison picture is in our review. These are sigmar's super human warriors sent straight from heaven. They are not replacement humans.
Gonna piss Abadon off even more then when he finds out he was actually a "downgrade" of a prior warrior. 🙂
Awesome tutorial. Thanks for the effort!
What is this "Sting" on the left Feet?
It's a little rock. I just glued sand over it.
Amazing results and a fantastic tutorial, especially taken the speed into consideration! 🙂
Just a question regarding airbrushing metallics – wouldn't that clog up the airbrush? I thought pretty much the only metallics that worked well in an airbrush was the Vallejo Air-line?
I've had great results with Tamiya's X-20A Thinner. It's like magic.
Of course you can substitute for Airbrush specific paints if you want to be sure. Sorry, I can't tell you what the equivalents are though.
Thanks, I'll give Tamiya's thinner a try. Getting metallics to work properly in my airbrush would be SO great so I'll take any tip I can get! 🙂
Wow, that was quick – and well-done!!
Hi Garfy, excellent tutorial as always, will you be doing any tutorials for the alternative colours schemes for the stormcast? I guess you'll be doing tutorials for each of the units 🙂
I only had the one mini. So this is it. I don't have the boxed game.
I hate you Garfy! Now i want to restart the fantasy again… 😉
Super fast, super tute, super gold. I really like the glazed shades, work really well on Metallics.
Between your tutorial and Stahly's review yesterday you've got this game covered. GW should point their advertising department your way!
Keep it up all you guys on ToP, I love the different styles and different projects that so many great artists bring to the table, with a new article every single day. My absolute go to blog at least once a day.
Thankyou to all the contributers on here,
Richard.
Very impressive considering the short time you've had it, and a tutorial to boot 😀
Thanks, means a lot. Yesterday was a very, very long day!
Must have been a long day indeed 🙂
Great tutorial Garfy ;D
/leffegnu
I like this more then the tutorial from the Warhammer video
Thank you Azul.