
Here is a detailed tutorial for painting Blood Bowl Orcs in a classic Goff Klan inspired paint scheme. This tutorial is applicable to all sorts of greenskins: Goff Orks (obviously), Ironjawz, Greenskinz, Gloomspite Gitz… I aimed for a nice compromise between speed and quality and therefore, the tutorial is suitable for army painting as well. Find out more after the jump.

This tutorial assumes you have a good understanding of how to paint. Underneath each picture are the corresponding instructions. Each step shows the paint(s) I used during that step. For this paint scheme I aimed to use as many Warpaints from The Army Painter as possible, as I recently reviewed the whole range and wanted to give them a spin in a real project. I’ll also try to provide you with suitable alternatives from the current Citadel paint range [in brackets] whenever possible.
Paints I used for this tutorial:
- The Army Painter Warpaints Matt Black and Matt Black Colour Primer [Abaddon Black/Chaos Black]
- The Army Painter Warpaints Oak Brown [Dryad Bark]
- The Army Painter Warpaints Hardened Carapace [Skavenblight Dinge]
- The Army Painter Warpaints Ash Grey [Administratum Grey]
- The Army Painter Warpaints Gun Metal [Leadbelcher]
- The Army Painter Warpaints Shining Silver [Stormhost Silver]
- The Army Painter Warpaints Scaly Hide [Nurgling Green]
- The Army Painter Warpaints Dark Tone Ink [Nuln Oil]
- The Army Painter Warpaints Filthy Cape [Stormvermin Fur]
- The Army Painter Warpaints Dirt Splatter [Mournfang Brown]
- The Army Painter Warpaints Red Tone Ink [Carroburg Crimson]
- The Army Painter Warpaints Pure Red [Evil Sunz Scarlet]
- The Army Painter Warpaints Lava Orange [Troll Slayer Orange]
- The Army Painter Warpaints Mummy Robes [Pallid Wych Flesh]
- The Army Painter Warpaints Matt White [White Scar]
- The Army Painter Warpaints Wizards Orb [Sybarite Green]
- The Army Painter Warpaints Monster Brown [Karak Stone]
- The Army Painter Warpaints Banshee Brown [Rakarth Flesh]
- Citadel Mephiston Red
- Citadel Biel-Tan Green
- Citadel Lahmian Medium
- Citadel Waywatcher Green
- Citadel Nuln Oil Gloss
- Citadel Mechanicus Standard Grey
- Citadel Brass Scorpion
- Citadel Agrax Earthshade
- Citadel Agrax Earthshade Gloss
- Citadel Runelord Brass
- Citadel Incubi Darkness
- Citadel Kabalite Green
If you need to expand your paint collection, check out our 🇬🇧/🇪🇺 partner stores Wayland Games, Element Games, and Firestorm Games, at 🇩🇪 Taschengelddieb and PK-Pro, and at 🇺🇸 Noble Knight Games, which all offer an amazing range of paints and hobby products at a discount. Using our links helps to support Tale of Painters at no additional cost to you, so thank you very much for using them!
How to paint The Gauged Eye

1. The model was primed with Matt Black Colour Primer from The Army Painter, then, any areas the primer didn’t reach were painted with Matt Black Warpaint from The Army Painter [any black primer will probably do but Matt Black is my favourite].
2. Thinned Warpaints Oak Brown [Dryad Bark] was pin washed into random recesses of the armour to represent dirt and grime.
3. The armour slabs were then drybrushed with Warpaints Hardened Carapace [Skavenblight Dinge] would be similar], concentrating on the hard edges.
4. A second drybrush was applied, this time with Warpaints Ash Grey [Administratum Grey].

5. With a piece of ripped blister sponge, I sponged some Warpaints Gun Metal [Leadbelcher] on the edges of the armour.
6. A second stage of sponge weathering was applied, this time with Shining Silver [Stormhost Silver].
7. The skin was basecoated with Warpaints Scaly Hide. Scaly Hide is a light pale green that covers very well in three thin coats over black [closest GW equivalent would be Nurgling Green, which is more yellowish/olive though].
8. The eyes were painted with Mephiston Red [Warpaints Dragon Red would be similar].

9. The skin was washed with a 2:1 mix of Biel-Tan Green and Lahmian Medium. Once dry, I applied a second wash of the same mix. The Lahmian Medium will make the wash softer and less likely to pool on flat areas.
10. The skin was highlighted with Scaly Hide [Nurgling Green would be similar].
11. A glaze of Waywatcher Green will increase the vibrancy of the skin.
12. The undersuit was painted with Warpaints Necromancer Cloak [Eshin Grey is a good match, but the coverage of Necromancer Cloak is better].

13. The leather details were painted with Warpaints Oak Brown [Dryad Bark mixed with a bit of Mournfang Brown, or Doombull Brown for a slightly more reddish leather colour].
14. All the metal was painted with Gun Metal [Leadbelcher].
15. The suit, leather and metal were all washed with a 1:1 mix of Warpaints Dark Tone Ink [Nuln Oil] and Nuln Oil Gloss. The Nuln Oil Gloss will improve the flow of the wash, but will also make the result a bit glossy. If you don’t like the finish, apply a thinned coat of Warpaints Anti-Shine varnish.
16. The suit was higlighted with Mechanicus Standard Grey [mix Necromander Cloak with a bit of Filthy Cape or another light grey if you want to stick to Warpaints] in a scruffy way to add some texture.
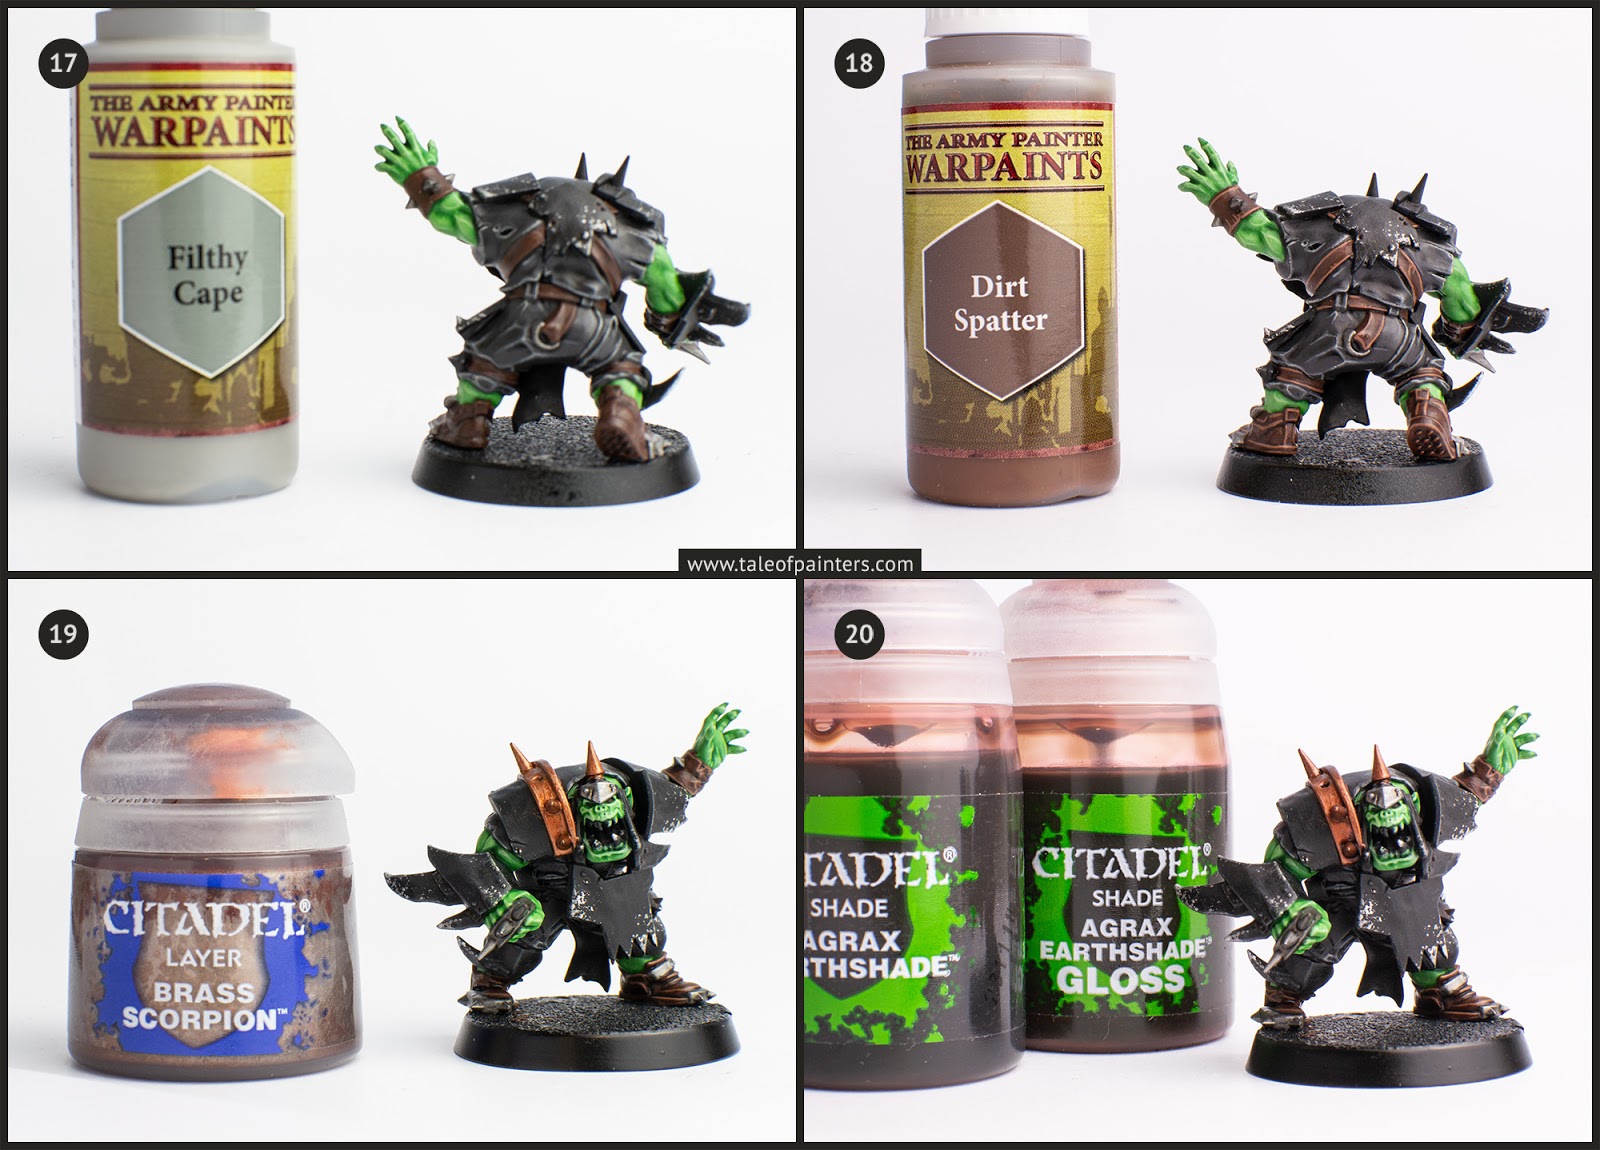
17. A second highlight of Warpaints Filthy Cape [Stormvermin Fur] was applied (sorry for the blurry picture).
18. The leather was highlighted with Warpaints Dirt Splatter [Mournfang Brown].
19. The brass was basecoated with Brass Scorpion [mix Weapon Bronze with a bit of Rough Iron when sticking to Warpaints].
20. The brass was washed with a 1:1 mix of Agrax Earthshade and Agrax Earthshade Gloss [Warpaints Dark Tone Ink is similar].

21. An edge highlight of Runelord Brass was applied [Warpaints Weapon Bronze with a bit of Shining Silver].
22. The red loincloth was basecoated with Mephiston Red [Warpaints Dragon Red]. I also layered Mephiston Red on the eyes.
23. A 2:1 mix of Warpaints Red Ink [Carroburg Crimson] and Lahmian Medium was applied all over the loincloth.
24. The eyes and loincloth was highlighted with Pure Red [Evil Sunz Scarlet].

25. A final highlight of Warpaints Lava Orange [Troll Slayer Orange] was applied to the eyes.
26. The mouth was painted with Incubi Darkness [Matt Black mixed with Wizards Orb].
27. The teeth and fingernails were picked out with Warpaints Filthy Cape [Stormvermin Fur].
28. A highlight of Mummy Robes [Pallid Wych Flesh] was applied to the teeth.

29. A dot of Matt White [White Scar] was applied to the pointed ends of the teeth.
30. The nails were highlighted with Kabalite Green [Wizards Orb mixed with a little bit of Angel Green].
31. A second highlight of Warpaints Wizard Orb [Sybarite Green] was applied to the nails.
32. The laces on the shoes and armbands were painted with Monster Brown [Baneblade Brown].

32. A highlight of Banshee Brown [Karak Stone] was applied to the laces.
33. Finally, I added a freehanded design to the armour with Matt White [White Scar].


Here is the finished model. I did a final check and touch up, added some transfers and a base. For the transfers, I started with a coat of ‘Ardcoat to seal the paint job and to create a smooth surface for the transfer to cling on. Once in place and completely dry, I apply several coats of Microsol, which softens the transfer and makes it snuggle even to curved surfaces such as shoulder pads. The numbers come from the Orc Blood Bowl transfer sheet, the checkboard from the Dark Imperium transfer sheet. I sprayed the whole model with a couple of thin coats of satin varnish (Anti-Shine Matt Varnish from The Army Painter or Munitorum Varnish works great for this).
How I did the base
The base is a regular 32mm base from Games Workshop with no sand or texture added. I basecoated the top with Warpaints Hardened Carapace [Skavenblight Dinge], then gently drybrushed with Filthy Cape [Stormvermin Fur] and Ash Grey [Administratum Grey]. I painted cracks with Warpaints Matt Black [Abaddon Black] and highlighted the edges with Filthy Cape [Stormvermin Fur]. I built up the red patches with glazes of a thinned Red Tone Ink [Carroburg Crimson]. Finally, the base trim was painted Matt Black [Abaddon Black]. The text is a self-printed transfer.

How do you like my take on painting Orcs? Have you found anything useful in this tutorial for your own projects? Let us know in the comments!
Fantastic paintjob! So good I decided to follow it for my own Orc team. I haven't painted in about 12 years and was very amateur even back then, so surprised at how well my own version turned out. Even used some of my old school Citadel paints, and made my own green glaze with warpstone green I think as waywatcher has been discontinued. Here's a finished Blitzer, and thank you very much for your very detailed tutorial:
https://i.imgur.com/xbjOrHS.jpg
How does the warpaints black compare to other brands?
It covers better than Abaddon Black, in a single coat above darker basecoats, lighter basecoats might need two coats. I also like Vallejo Model Color Matt Black, covers in 1 – 2 coats as well, but, as the name suggests, it's more matt than your average acrylic paint.
Nice tutorial thanks! I also like the simplicity of the bases. Good job.
Very nice Tutorial… Oak Brown looks good for Leather, must give it a try.
You missed description of step 18 (Dirt Splatter)
Fixed, thank you 🙂